


AuctionGate | Logistic CRM system - Form deal
To view or edit deal data, click on the button located on the right side of the table (Figure 1, Pointer 1).
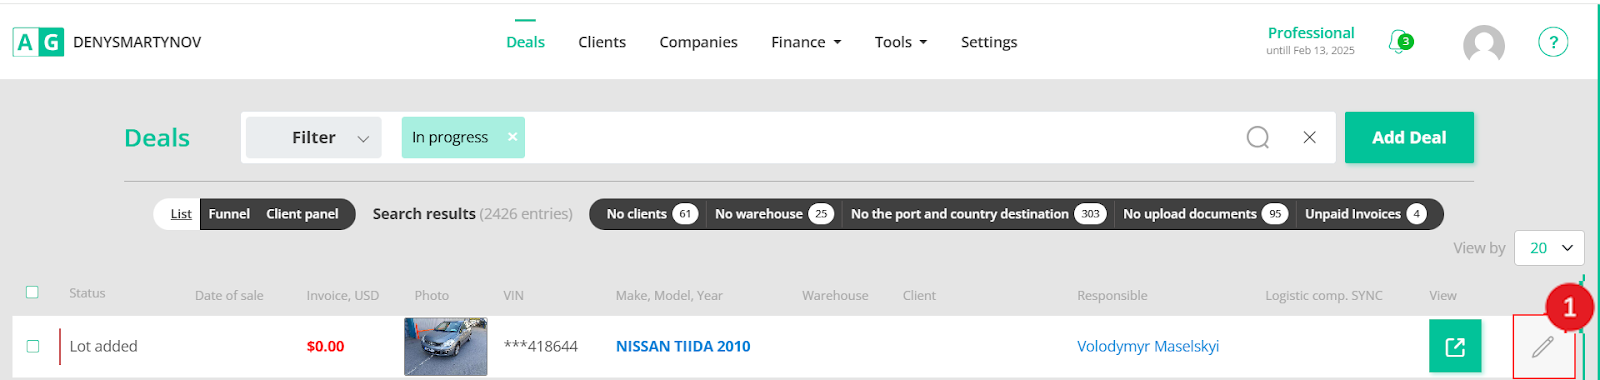 Figure 1 - Page “Deals”
A deal window will open, including the tabs "General", "Invoice", "Auction invoice", "Container", "Customs documents", "Customs payments", "Delivery Calculator", and "Synchronization". At the top of the window is a progress bar that allows quick navigation between the different stages of the deal (Figure 2, Pointer 1). Also, the "Deal History" block (Figure 2, Pointer 3) is available for notes, information exchange between deal participants, and notifications about the deal status.
The "General" tab (Figure 2, Pointer 2) contains the main information about the current deal, presented in 9 blocks with key details about the vehicle, participants, conditions, and other aspects.
 Figure 2 - Window “Deals”/Block "Deal information,Vehicle information "
- Block “Deal information” (Figure 2, Pointer 4) contains basic data about the current deal. To edit block data “Deal information”, click on the button, located in the upper right corner. Some parameters are selected from a drop-down list that opens when you click the button
, namely:
-
“Origin” – delivery method, which may include collection from an auction or self-collection from a warehouse;
Note: When choosing the shipping method “Warehouses”, the “Auction information” block will be unavailable.
-
“Client” – the counterparty with whom the deal is concluded;
Note: To add a client, click on the button , which will open the “Add client” window, where you need to enter and save information about the new client. When you press the button
page will open "Client" with a complete list of the company's clients. On this page you can view detailed information about each client, as well as make the necessary changes. A detailed description of the process can be found on the page “Client”.
-
“Receiver country” - the country to which the vehicle will be sent;
-
“Responsible” - the person responsible for entering and editing information on the deal;
-
“Stage” - current stage of the deal. Please note that at the “Delivered to the client” stage of the deal, it automatically goes into the archive and is considered completed.
The following parameters are set automatically by the system:
-
“Deal Creation Date” - date of creation of the deal;
-
“Deal Update Date” - deal update date.
Go to the “Settings” page, navigate to the “Automation” section, which allows you to automatically move the deal to the next stage when all required fields are filled in. Go to page “Settings” to section "Automation" or click on the button which will take you to this page.
- The “Vehicle information” block (Figure 2, Pointer 5) contains basic details about the auction lot. To edit block data, click on the button , located in the upper right corner of the block. This block contains the fields:
-
"VIN" - unique vehicle code;
-
“Make” - vehicle make;
-
“Model” - vehicle model;
-
“Year” - year of manufacture of the vehicle;
-
“Vehicle type” - type of vehicle;
-
“Engine type” - type of vehicle engine;
-
“Vehicle Cost” - vehicle cost.
 Figure 3 - Window “Deals”/Block "Auction information, Warehouse information"
- Block “Auction information” (Figure 3, Pointer 1) contains basic information about the auction. To edit the data in the “Auction information” block, click on the button located in the upper right corner of the block. This block contains the following fields:
-
“Auction” - the auction where the vehicle was purchased. If the auction is not listed or needs to be modified, select it from the drop-down list;
-
“Location” - the location of the auction. If missing, select it from the drop-down list;
-
“Buyer number” - the buyer's number;
-
“Lot, number” - the unique vehicle number for the auction;
-
“Date of purchase” - the date of the vehicle's purchase at the auction. To select a date, click on the empty field and choose the date from the calendar;
-
“Has Title” - whether the vehicle has a registration certificate. Select the availability from the drop-down list;
-
“Title” - the vehicle’s registration certificate;
-
“Key” - whether the vehicle key is available. Select the desired option from the drop-down list;
-
“Lot payment date” - the date when the lot was paid for by the buyer. To select a date, click on the empty field and choose the date from the calendar;
-
“Planed pickup date from auction” - the planned date for picking up the lot from the auction. Select the date from the calendar;
-
“Pickup date from auction” - the actual date when the lot was picked up from the auction. Choose the date from the calendar.
This block allows you to easily and accurately track all data related to the auction.
- Block "Warehouse information" (Figure 3, Pointer 2) contains essential information about the warehouse, including departure and arrival dates, as well as the availability of documents and keys for the vehicle. To edit the data in the "Warehouse information" block, click on the button located in the upper right corner of the block. This block includes the following fields , located in the upper right corner of the block. This block contains the fields:
-
“Warehouse” -the warehouse where the vehicle is stored. To select it from the drop-down list, click the
button. If the required warehouse is not in the list, you can manually add it.
Note: To add a warehouse, click on the button, which will open a window “Warehouse”, where you need to enter and save information about the new warehouse. A detailed description of the process can be found on the page “Warehouse”. When you press the button
page will open “Settings” section “Warehouse” with a complete list of warehouses. On this page you can view detailed information about each warehouse, as well as make the necessary changes. A detailed description of the process can be found on the website page “Settings” section “Warehouse”.
-
“Warehouse planned arrival date” - the planned arrival date of the vehicle at the warehouse. To select a date, click on the empty field and choose a date from the calendar;
-
“Warehouse arrival date” - the actual date of arrival at the vehicle warehouse. Select the date from the calendar;
-
“Key” - whether the vehicle key is available. Indicate availability from the drop-down list;
-
“Title” - whether the vehicle has a registration certificate. Specify availability from the drop-down list.
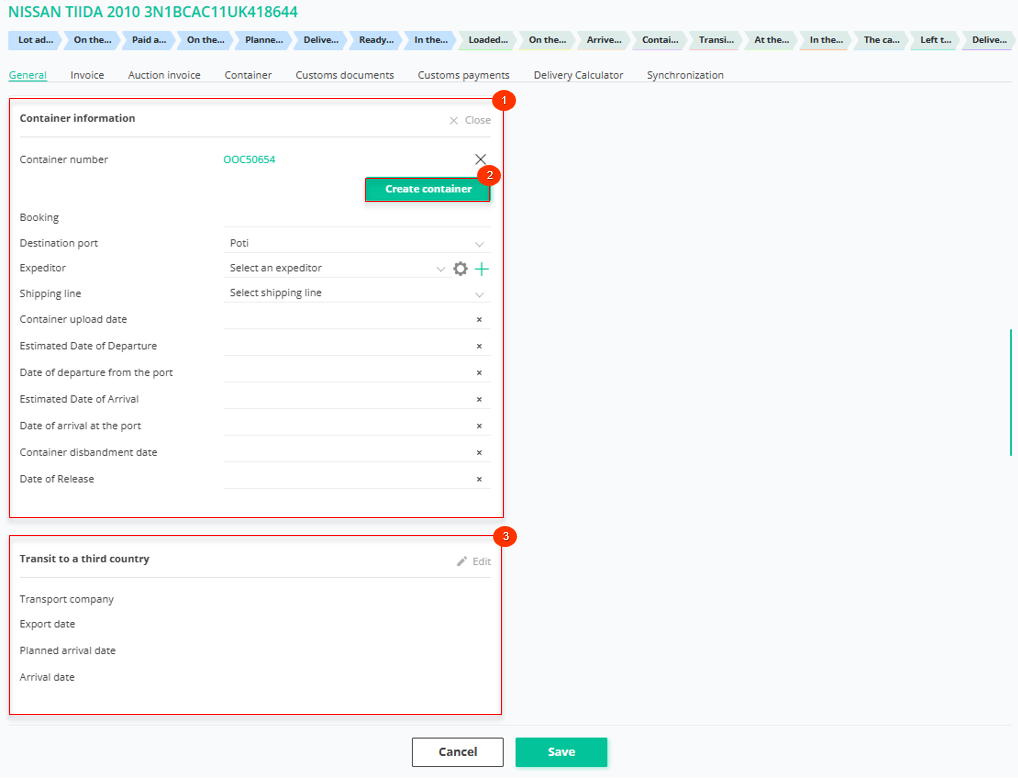 Figure 4 - Window “Deals”/ Block "Container information, Transit to a third country"
-Block "Container information" (Figure 4, Pointer 1) contains basic information about the container, including departure and arrival dates. To edit the data in the "Container information" block, click on the button located in the upper right corner of the block.
Note: To enter information about the container, you must specify the warehouse, and the deal stage must be “Ready for loading” or further.
In the field “Container number” enter the container number and click the button “Search Container”. If a container with the same number already exists, the system will suggest adding a vehicle to it. If no container exists, click “Create Container” (Figure 4, Pointer 2) and, depending on the stage of the deal, fill in the fields:
-
“Booking” - container reservation number;
-
“Destination port” - the port to which the vehicle is heading;
-
“Sender” - a company that deals with logistics within the framework of customs clearance. To select it from the drop-down list, click the button
Note: To add a forwarder, click on the button, which will open a window “Service companies”, where you need to enter and save information about the new forwarder. When you press the
button, the “Companies” page will open with a complete list of companies. On this page you can view detailed information about each company, as well as make the necessary changes. A detailed description of the process can be found on the website page “Companies”.
-
“Shipping line” - shipping line that owns the container with the vehicle;
-
“Container upload date” - the date the vehicle was loaded into the container;
-
“Estimated Date of Departure” - planned date of departure of the vehicle from the port;
-
“Date of departure from the port” - actual date of departure of the vehicle from the port;
-
“Estimated Date of Arrival” - planned date of arrival of the vehicle at the port of destination;
-
“Date of arrival at the port” - actual date of arrival of the vehicle at the port of destination;
-
“Container disbandment date” - date when the container was disbanded;
-
“Date of release” - date when the container was released.
Note: To set dates, click on the empty field and select a date in the calendar.
- Block "Transit to a third country” - used in a situation where the destination country does not correspond to the recipient country and there is no sea shipping in the destination country. This block provides the opportunity to indicate information about transit through a third country,by filling in the appropriate fields (Figure 4, Pointer 3):
-
“Transport company” - from the drop-down list that opens when you click the button, indicate the company that provides transit;
Note: When you click on the site page will open "Companies" with a complete list of companies where you can make the necessary changes. If you need to add a new terminal, click on
, which will open a window “Service companies”, where fill in the appropriate fields (see page description “Companies”).
-
“Export date” - indicate the date when the vehicle is planned to be sent to the transit country;
-
“Planned arrival date” - indicate the expected date of arrival of the vehicle in the third country;
-
“Arrival date” - indicate the actual date of arrival of the vehicle in the third country.
- Block “Customs information” (Figure 5, Pointer 1) contains basic information about customs procedures and provides a complete picture of the status and progress of customs clearance. To edit the block data in the “Container information” section, click on the button located in the upper right corner of the block. This block contains the fields:
-
“Terminal” - terminal responsible for customs clearance of this vehicle. To select it from the drop-down list, click the button
Note: To add a terminal, click on the button, which will open a window “Terminal”, where you need to enter and save information about the new terminal. When you press the button
page will open “Settings”, tab "Terminals” with a complete list of terminals. On this page, you can view detailed information about each company and make the necessary changes.
-
“Broker” - a company that deals with customs clearance. To select it from the drop-down list, click the button
Note: To add a broker, click on the button, which will open a window “Service companies”, where you need to enter and save information about the new broker. When you press the button
page will open “Companies” with a complete list of companies. On this page you can view detailed information about each company, as well as make the necessary changes. A detailed description of the process can be found on the website page “Companies”.
-
“Registration date” - date of registration of the customs declaration;
-
“Date of export from the customs terminal” - the date when the vehicle was removed from the customs terminal;
-
“Date of issue to the client” - the date when the vehicle was handed over to the client after completion of customs clearance. At this stage the deal is considered completed.
Note: To set dates, click on the empty field and select a date from the calendar.
Figure 5 - Window “Deals”/ Block "Customs information”
- Block "Photos” contains photos (Figure 6, Pointer 1) recording the appearance of the vehicle at different stages of its movement (“Photos from Auction”, “Photos from Pick-up auction”, “Photos from Unloading to warehouse”, “Photos from Warehouse”, “Photos from Warehouse loading”, “Photos from Port destination”, “Photos from Terminal”, “Photos from Uploading car into container”, “Photos from Unloading car from container”), which can be downloaded using the button. Additionally, it is possible to upload photos of batteries for electric vehicles “Photos from Battery”, if the deal involves the supply of this type of vehicle.
Note: Allowed file formats for uploading: .jpg, .png, .webp, .pdf. To save all photos from a block "Photos” to your computer, click the button in the upper left corner of the block . To view, delete, and download all uploaded photos related to the current deal, click the “See all” button (Figure 6, Pointer 2).
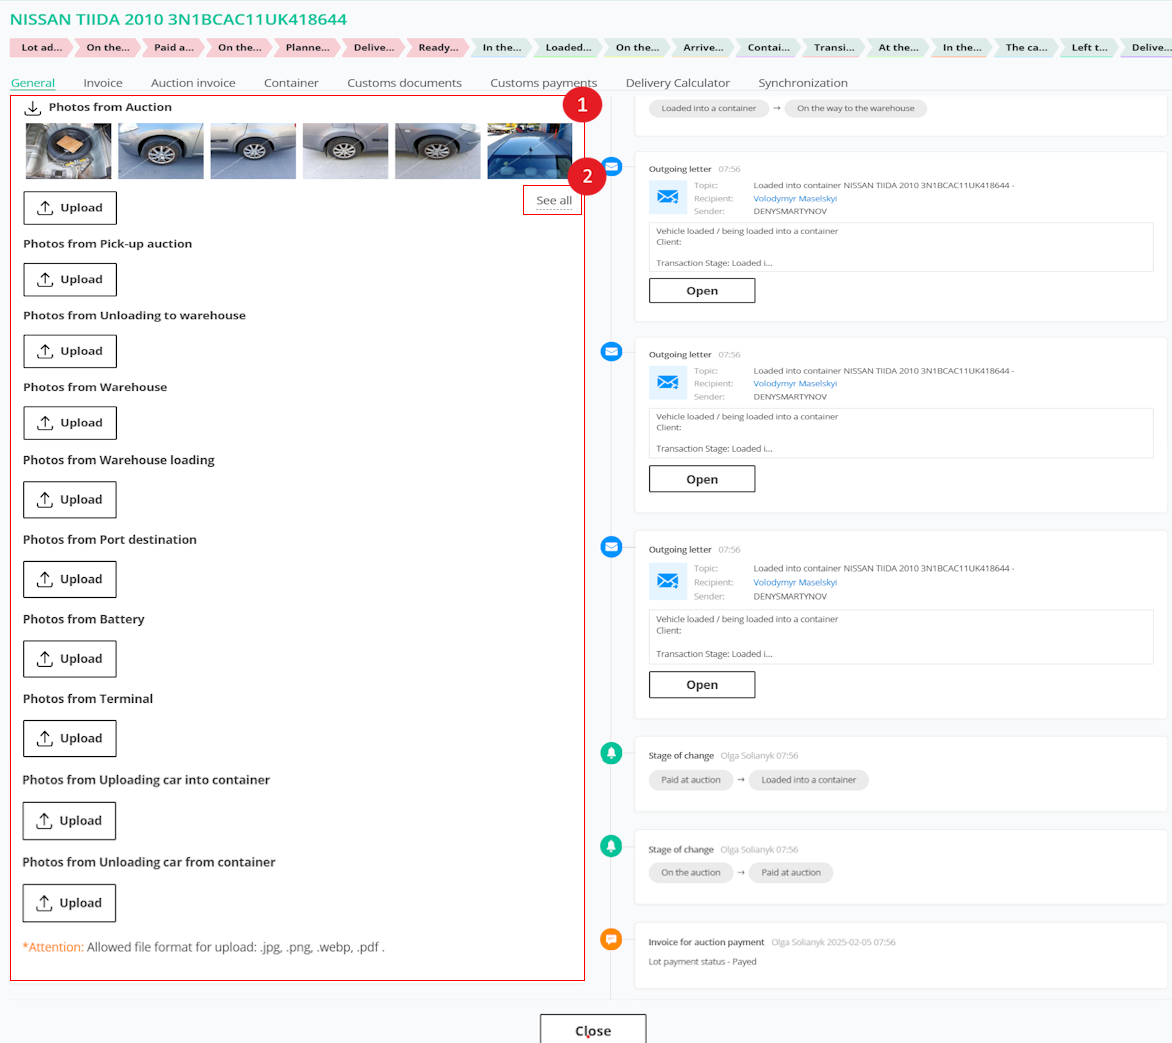 Figure 6 - Window “Deals”/Block "Photos”
- "Auction bill of sale” contains photos of documents confirming the sale of the vehicle (Figure 7, Pointer 1), which can be downloaded using the button ;
- "Lot title” document confirming ownership of the vehicle (Figure 7, Pointer 2), which can be downloaded using the button .
If you need to delete the current deal, click the button “Delete car” (Figure 7, Pointer 3). To confirm or cancel the action, press the button accordingly “Yes/No”.
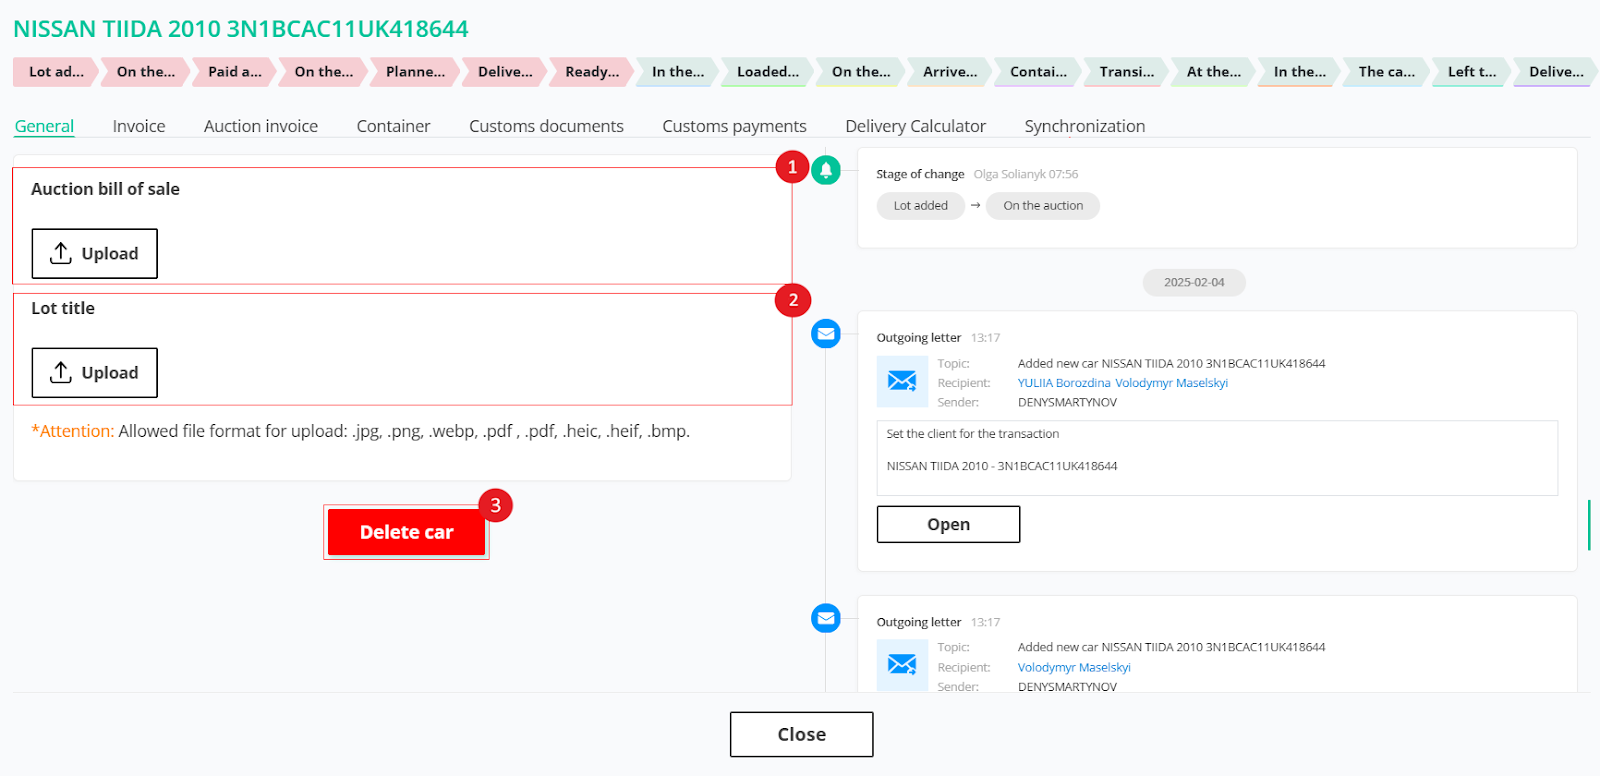 Figure 7 - Window “Deals”/ tab "General"
"Invoice" tab (Figure 8, Pointer 1) contains basic information about invoices issued to clients for services provided.
The block includes a filter displaying the number of invoices, their total amount, as well as the amounts of paid, unpaid and overdue invoices. To filter, just click on the desired parameter (Figure 8, Pointer 2).
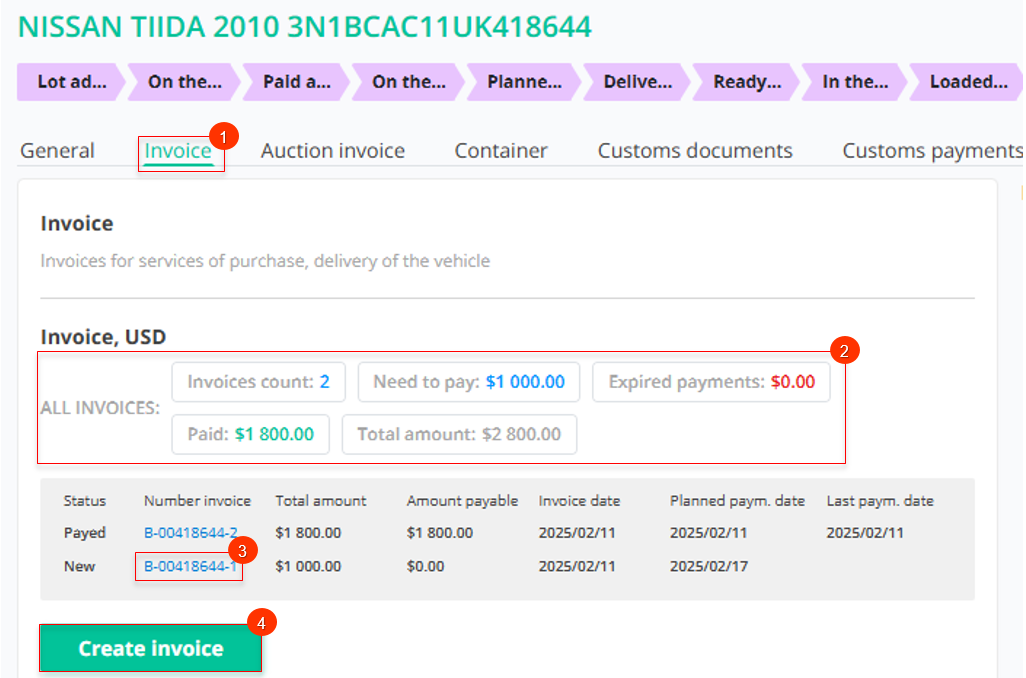 Figure 8 - Window “Deals”/ tab "Invoice"
To create a new account, click "Create invoice" (Figure 8, Pointer 4). In the window that opens "Invoices" (Figure 9), all fields will be filled in by default according to the deal data.If necessary, edit the company details, payment date and responsible employee. To confirm or cancel, press "Save" or "Cancel".
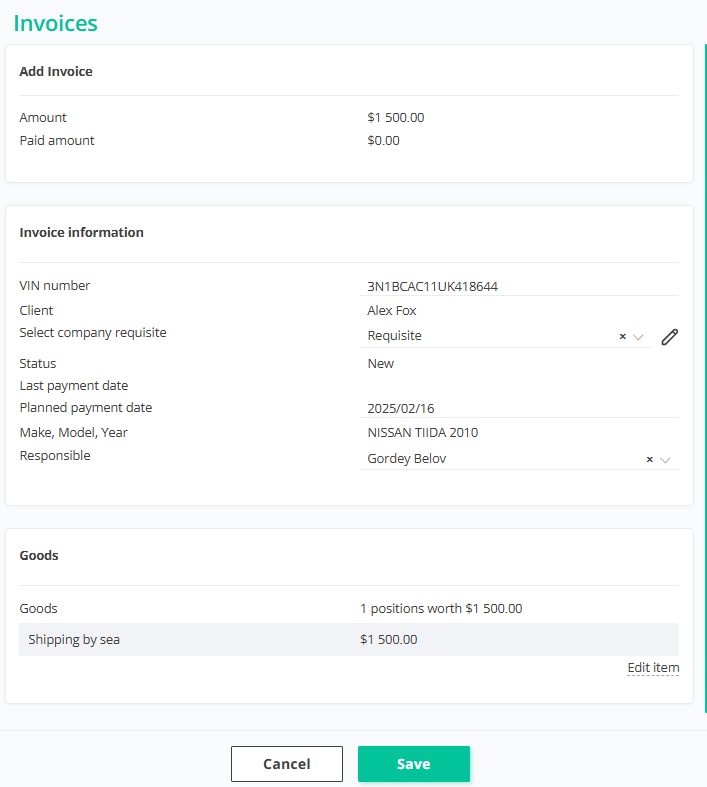
Figure 9 - Window “Invoices”
To view detailed information on an already created account, click on its number (Figure 8, Pointer 3), where you can familiarize yourself with the account data in detail and make the necessary changes (see page description “Bills”).
Tab "Auction invoice" (Figure 10, Pointer 1) displays auction invoices issued to clients for items.
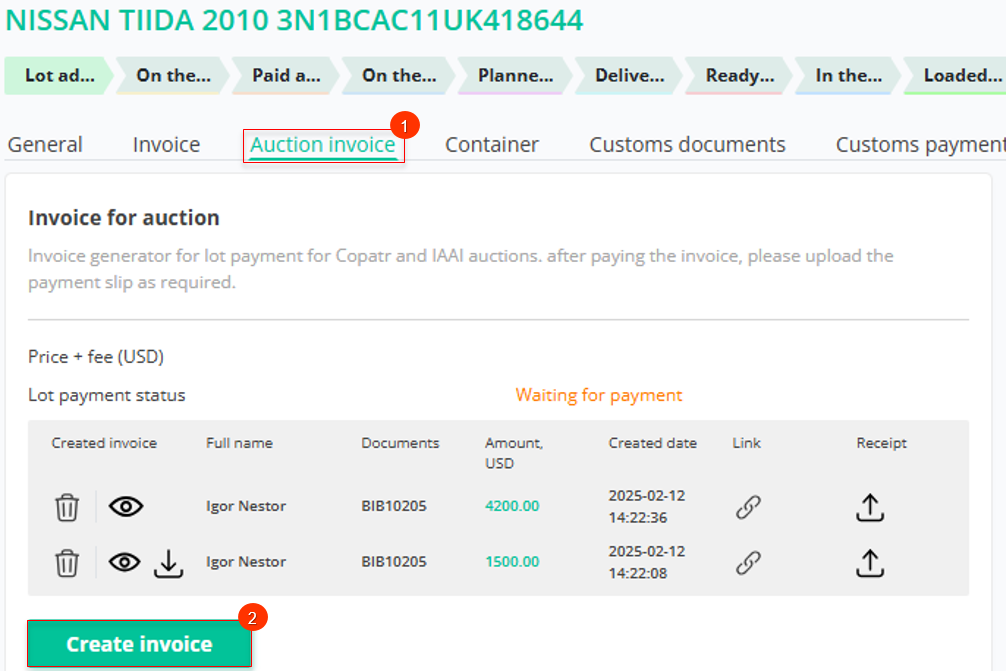 Figure 10 - Window “Deals”/ tab “Auction invoice”
To create a new account, click the button "Create invoice" (Figure 10, Pointer 2). In the "Invoice for auction" window that opens (Figure 11), fill in the client data and amount. To confirm or cancel, click the button “Create” or “Close”.
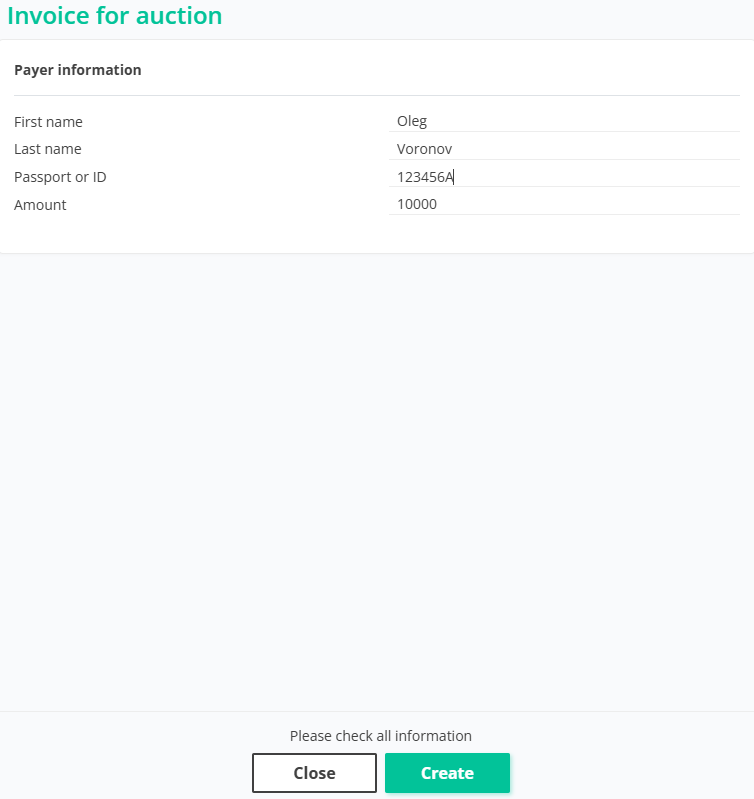 Figure 11 - Window "Invoice for auction"
To create a PDF invoice format, click on the button , after which the account will be opened in a new browser tab. To download the file, click on the button “Download PDF”, which is located at the top of the page (Figure 12, Pointer 1).
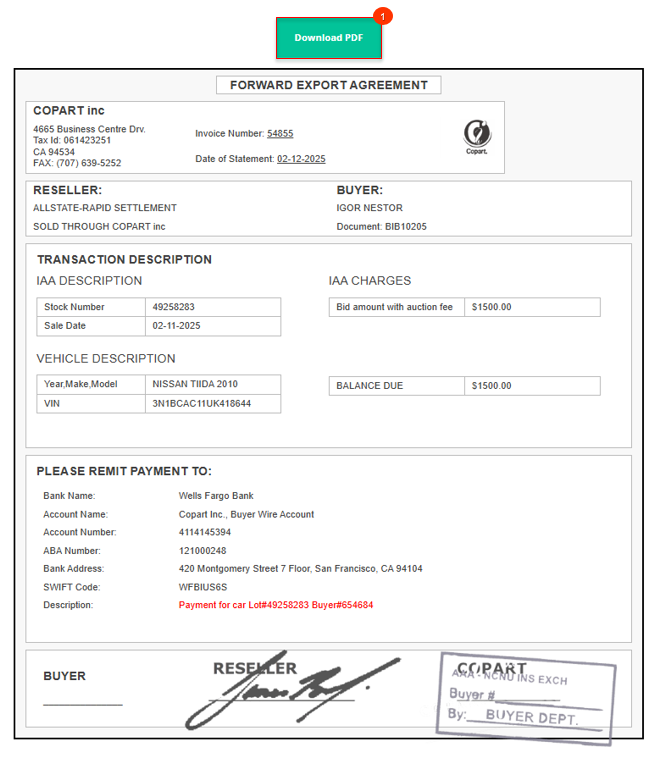 Figure 12 - View invoice
To download the payment receipt, click on the button , after which the download window will open. Select the appropriate receipt file on your computer or device and confirm the download.
You can also download your receipt by following the link. To do this, click on , after which a download window will open in a new browser tab. Click on the button "Upload", select the appropriate receipt file on your computer or device and confirm the download (Figure 13).
To delete an account, click the button , which will lead to the account being deleted from the system.
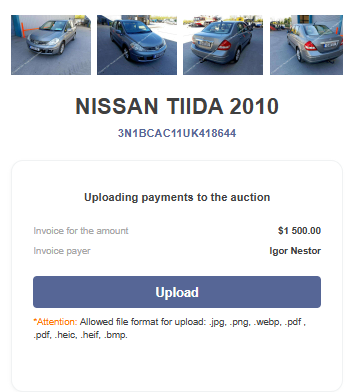 Figure 13 - Public receipt download page
Tab “Container information” (Figure 14, Pointer 1) consists of 3 blocks containing information about the container. Here you can create a container or edit its data (see description above).
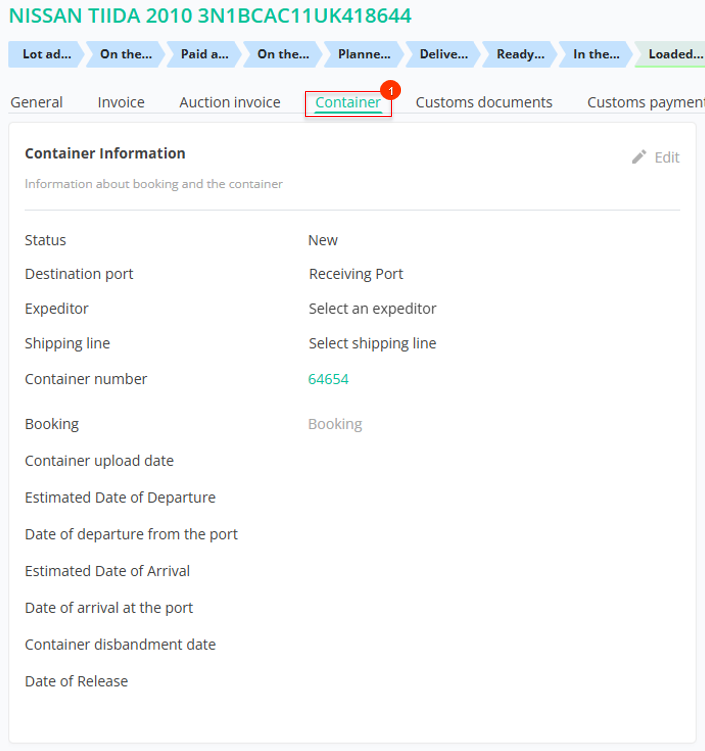 Figure 14 - “Deals” window / tab “Container”
In the block “Vehicle Information” (Figure 15, Pointer 1) information about all vehicles loaded into the container is displayed. There are several things you can do in this section (Figure 15, Pointer 2):
-
upload a photo of the process of loading a vehicle into a container. To do this, click on the icon
, then click on the button
, select the desired files on your device and confirm the download.
-
upload a photo of the vehicle unloading from the container. To do this, click on the icon
and repeat actions.
-
request the recipient's documents by clicking on the icon
;
-
send client documents, to do this, click on the icon
, then confirm your action.
Note: To send documents to a broker, you must first upload them in the “Customs documents” block, and also specify the broker and his email.
-
delete the container by clicking on the icon
.
The next block includes photos of the container documents, as well as photos of loading and unloading the container, which can be downloaded using the button (Figure 15, Pointer 3).
 Figure 15 - “Deals” window / tab “Container”
Tab "Customs documents" (Figure 16, Pointer 1) contains documents of the recipient for whom customs clearance will be processed sports equipment.
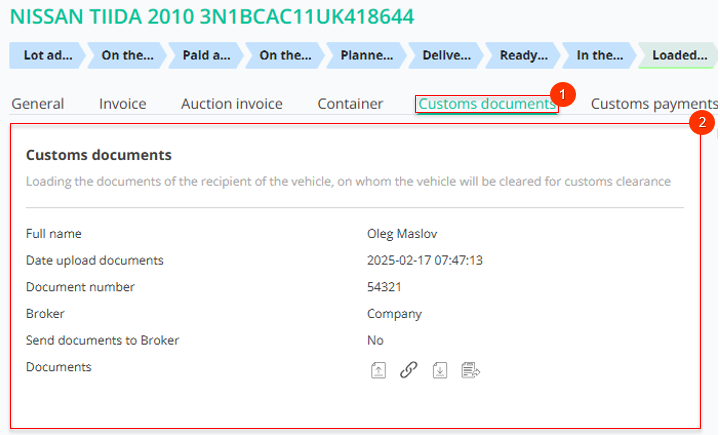
Figure 16 - “Deals” window / tab “Customs documents”
To upload documents, click on the button, after which the “Customs documents” window will open. In this window, fill in the client’s first and last name and document number, then select the file to upload by clicking on the button
. To save, click on the button “Save”.
Note: To automatically send documents to the broker, set “On” (Figure 17, Pointer 1).
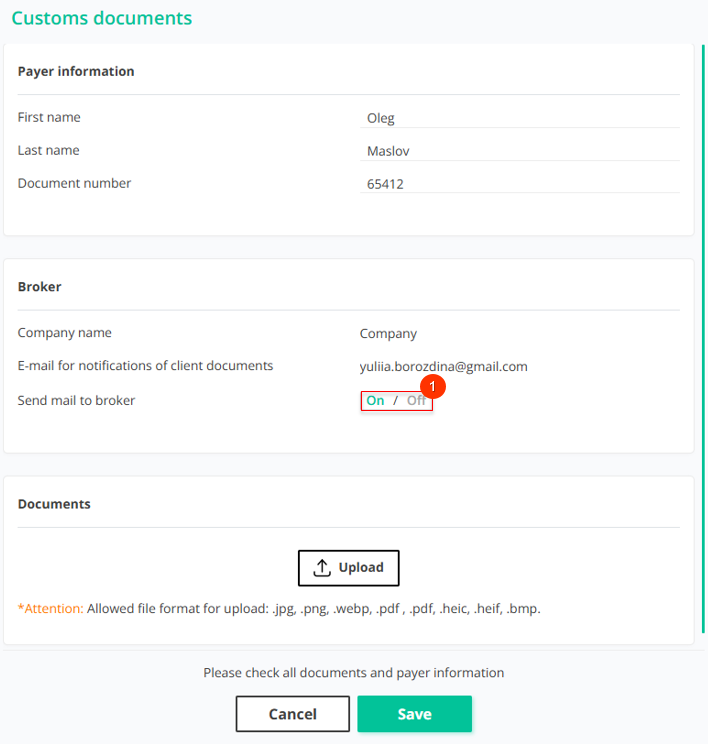 Figure 17 - Window “Customs documents”
You can also download documents by following the link. To do this, click on , after which a download window will open in a new browser tab. Click on the button "Upload", select the appropriate file on your computer or device and confirm the download by clicking the button “Send data” (Figure 18).
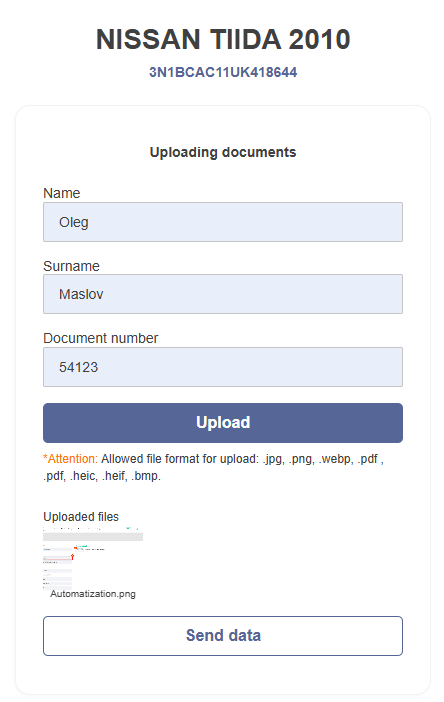 Figure 18 - Public page for downloading a document
As a result of the actions performed, information about the downloaded file will be displayed in the “Customs documents” (Figure 16, Pointer 2) . To download the uploaded document, click on the button , then select a location to save the file and click "Save".
If you need to delete a document, click on the icon. A window will open where you can confirm the deletion by clicking the “Yes” button or cancel by clicking “No”. To send a document to a broker, click on the
button, which will open the “Send mail to broker” window. To send the document, click on the button "Send" (Figure 19).
Note: To send documents, the broker must have an email address.
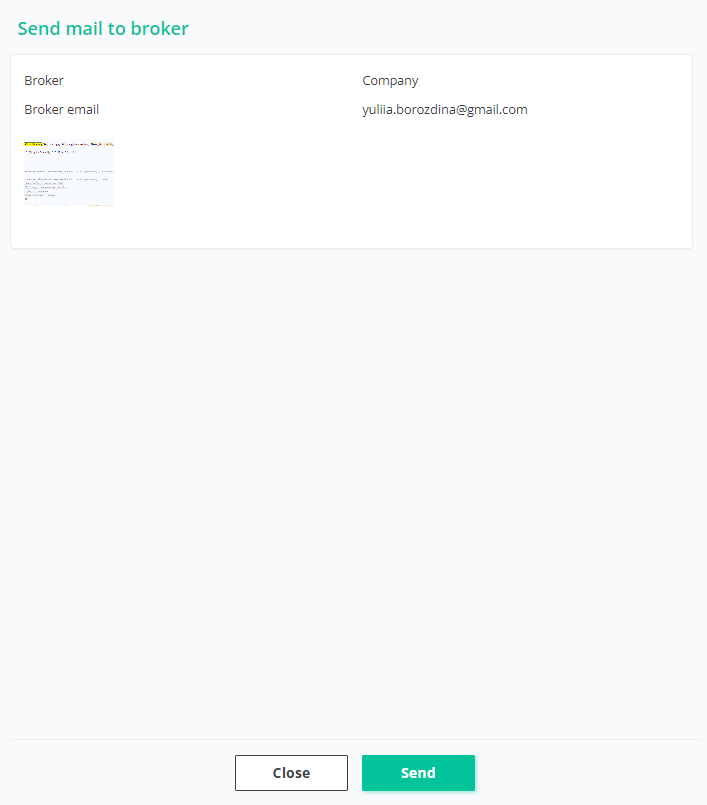 Figure 19- Window for sending a letter to a broker
Tab "Customs payments" (Figure 20, Pointer 1) contains information about invoices for paying customs duties when registering cars.
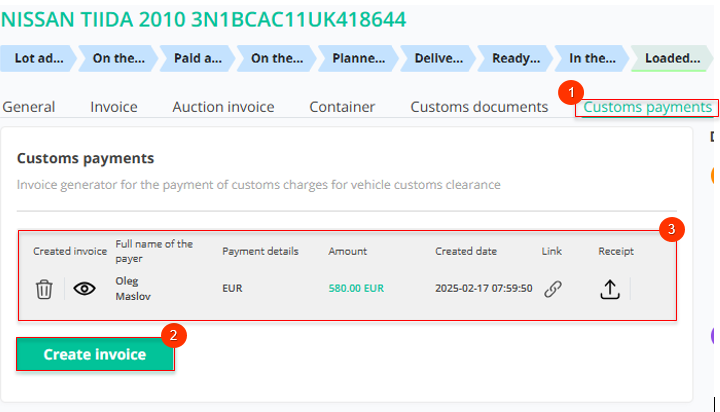 Figure 20 - Window "Deals" / tab “Customs payments”
To create an invoice for customs payment, click on the button “Create invoice” (Figure 20, Pointer 2), after which the “Customs payments”, in which fill in the amount, select details and indicate the client’s first and last name (Figure 21).
Note: If you need to add details, click on , which will open the “Requisites”, where fill in the appropriate fields.
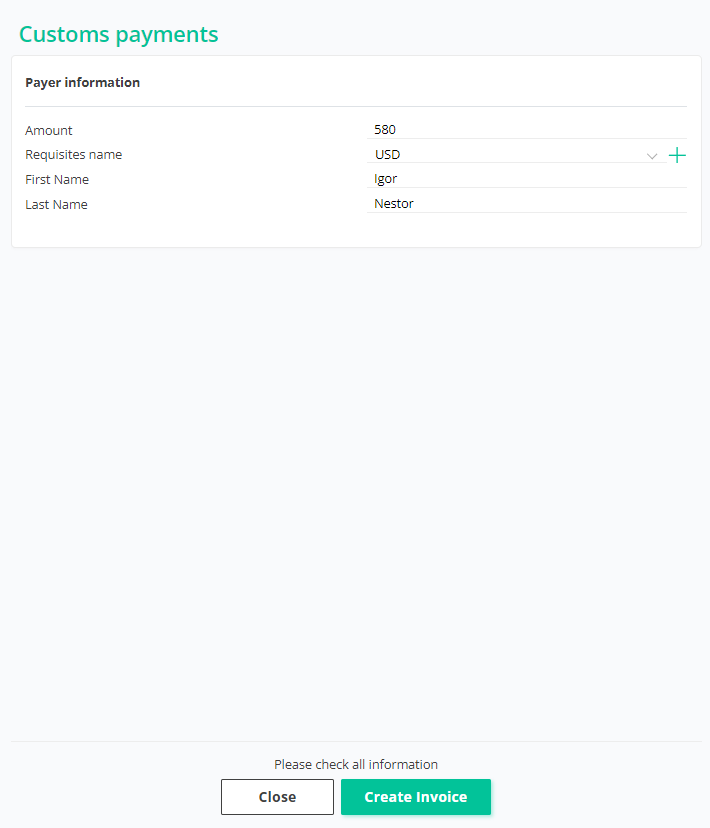 Figure 21 - “Customs payments” window
To save, click the “Create invoice” button. As a result, an invoice for payment will be created and displayed above (Figure 20, Pointer 3).
When you press the button, the details document will open in a new browser tab.
To download the payment receipt, click on the button , after which the download window will open. Select the appropriate receipt file on your computer or device and confirm the download.
You can also download your receipt by following the link. To do this, click on , the link, and a download window will open in a new browser tab. Click on the button "Upload", select the appropriate receipt file on your computer or device and confirm the download (Figure 22).
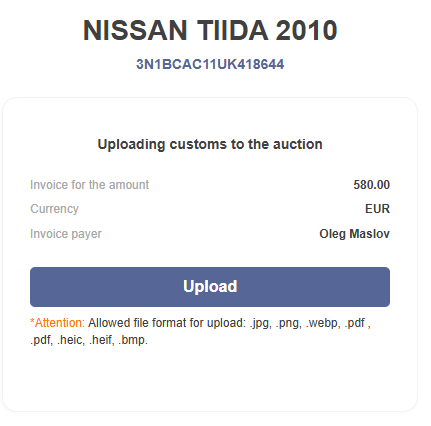 Figure 22 - Public receipt download page
To delete an account, click the button , which will lead to the account being deleted from the system.
Tab "Delivery Calculator” contains functionality for calculating the cost of delivery of a vehicle and creating an invoice based on the calculation (Figure 23, Pointer 1).
To calculate, please provide the following details:
-
"Price list" – select the price list to be used for the calculation
-
"Vehicle" – select the vehicle type
Note: If the price list doesn't include a price for the specified vehicle type, the default price for “Sedan” will be applied.
Next, select the auction and its location from the drop-down list, where the vehicle will be sent from. Then specify the vehicle storage warehouse by selecting it in the field Warehouse.
Next, provide the destination details:
-
"Country / Destination Port" – select the port to which the vehicle will be delivered for further transportation;
-
"Country / Destination Location" – from the drop-down list, select the country of final delivery destination;
-
"Destination City" – enter the city where the vehicle will be delivered.
After filling in all fields, click “Calculate” (Figure 23, Pointer 2).
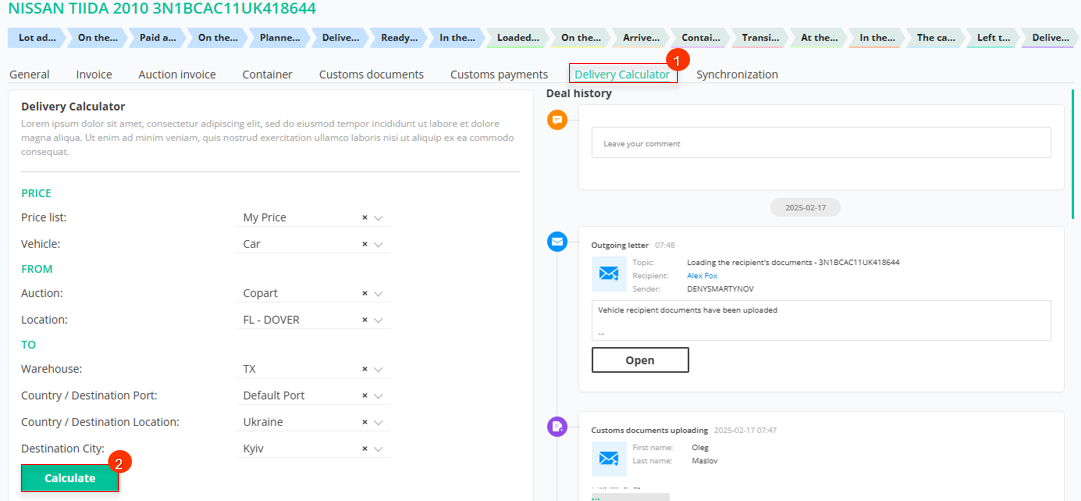 Figure 23 - Window "Deals" / tab “Delivery Calculator”
Below, in the “Result” block, the final delivery cost calculation is shown, including:
-
“Delivery to the Yard” – cost of delivery to the warehouse
-
“From warehouse to port of destination” – cost of transportation from the warehouse to the port of destination;
-
“Port to destination country” – cost of delivery from the port to the destination country;
-
“Service” – the cost of the additional service included in the calculation.
All these parameters are calculated based on data from the price list, where each of them corresponds to a product with a predetermined price.
Note: If an individual price is set for the client for whom the deal is made, and the product is included in the price list, then it will be applied.
When you press the “Create invoice” button, an invoice is generated based on this calculation. To save it, click “Save”. Afterward, the invoice will appear on the “Invoices” page or in the “Deals” modal window, under the Invoice tab (Figure 8, Pointer 1).
Tab “Synchronization” (Figure 24, Pointer 1) shows active connections with logistics companies. Synchronization ensures automatic exchange of data between the logistics company and the deal.
To set up synchronization, fill in the following fields:
-
"Logistic companies" – select the logistics company with which synchronization will be carried out;
Note: Note: When you press the button the “Synchronization of logistic companies” page will open, where you can add a shipping company.
-
"Logistic company accounts" – enter your logistics company account.
To synchronize the selected deal, click “Sync lot” (Figure 24, Pointer 2). After successful synchronization, the status “Yes” will appear in “Synchronize lot”. To cancel synchronization, click “Disable Sync lot”, and the status in “Synchronize lot” will change to “No”.
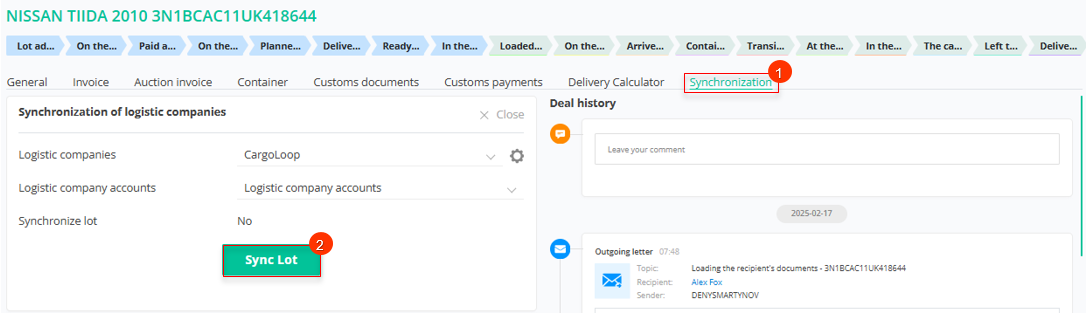 Figure 24 - Window "Deals" / tab “Synchronization”