AuctionGate | Logistic CRM system - Site page "Bills"
The site page "Bills" is intended for creating and managing invoices that have been issued to customers for services rendered.
The "Bills" page of the site contains a search bar, a filter area and a tabular area that displays all the invoices that have been created on the site (Figure 1).
The page also displays a counter that shows the total number of invoices, the total amount of invoices, and the amount of paid, unpaid, and past due invoices (Figure 1,Pointer 2). To filter by account, select the required record in the table and check the ![]() box next to it (Figure 1, Pointer 3). After performing these actions, a similar counter will appear below the counter displaying information about all accounts, which will display information only for the selected account (Figure 1, Pointer 4). To reset the filter, uncheck the box.
box next to it (Figure 1, Pointer 3). After performing these actions, a similar counter will appear below the counter displaying information about all accounts, which will display information only for the selected account (Figure 1, Pointer 4). To reset the filter, uncheck the box.
The functionality that is available on the page:
-
Searching by specified filters;
-
Creating a bill;
-
Editing a bill;
-
Bill Payment;
-
Creating a PDF of the bills;
-
Deleting a bills;
-
Creating a export;
-
Mass bills editing function.
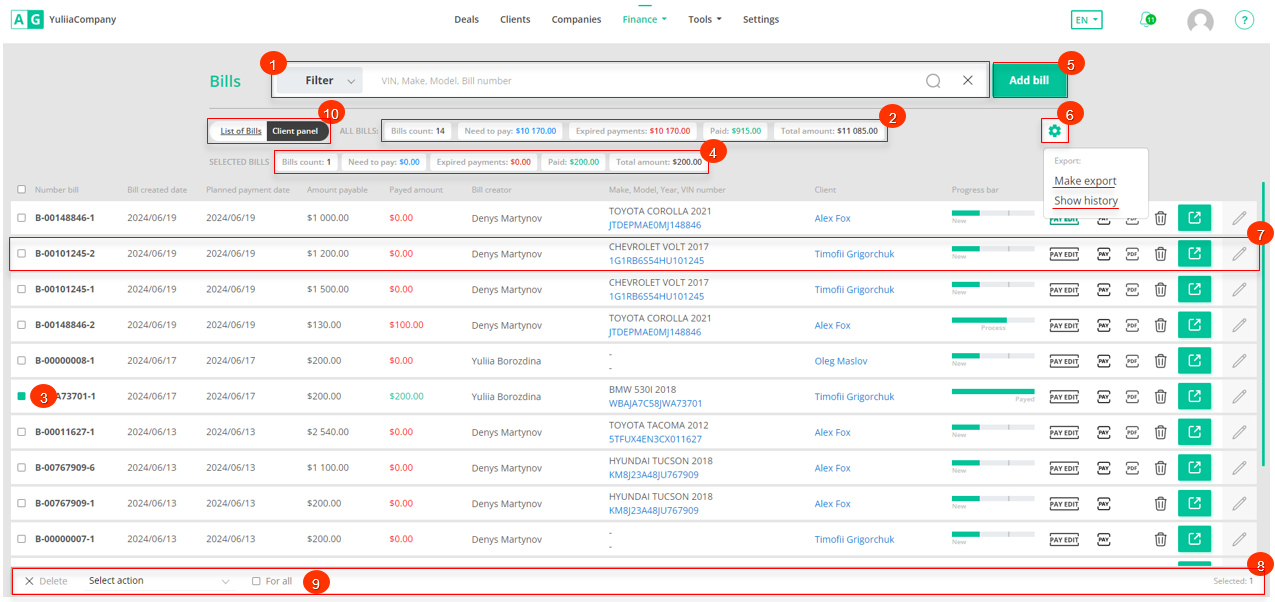 Figure 1 - " Bills" page
Searching by specified filters
Clicking on the "Filter" button (Figure 1, Pointer 1) will open a window where the search parameters are set (Figure 2):
-
“VIN, Make, Model, Bill number” - enter the desired value to search for;
-
“Clients” - select a client from the drop-down list that opens when you click on the
 button;
Note: It is possible to set one or more parameters to perform a search.
-
“Payment date” - select a payment date or time period by clicking on the empty field and using the calendar;
-
“Bill created date ” - select the date or time period for creating the invoice by clicking on the empty field and using the calendar;
-
“Planned payment date” - select the date or time period of the planned invoice payment date by clicking on the empty field and using the calendar;
-
“Select progress bar” -select the financial status of the account from the drop-down list that opens when you click on the
 button.
After entering the parameters, click on the "Search" button to generate the list of accounts, in case of cancelation - the "Rezet" button.
As a result, the table will display data according to the set filter parameters.
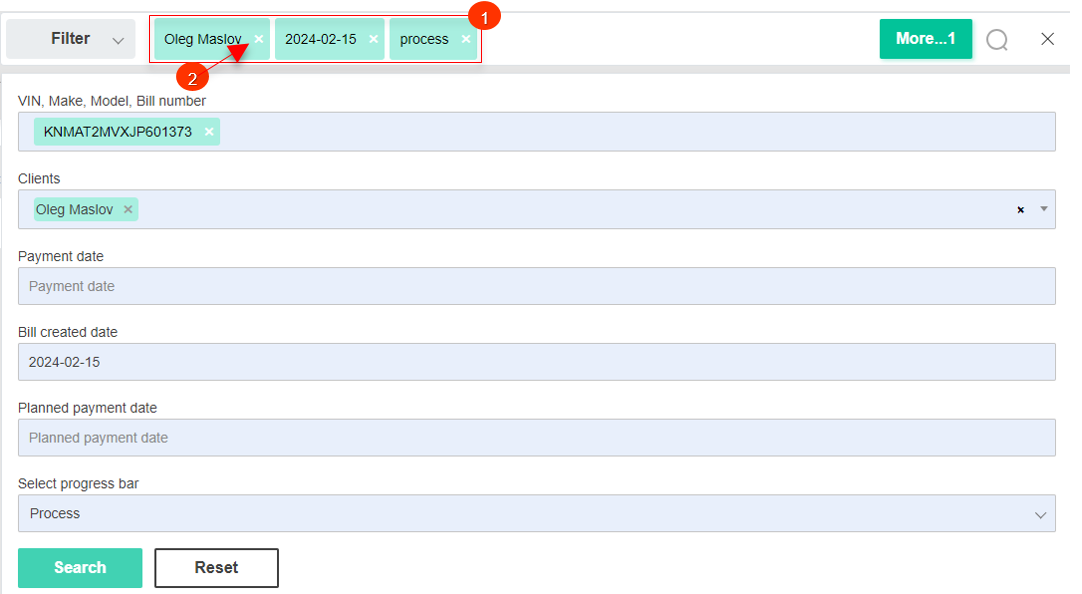
Figure 2 - Filter area
The search bar allows you to search by any parameter (Figure 2, Pointer 1). To do this, enter any query and click on the ![]() button located in the search bar or on the "Enter" button located on the keyboard. As a result, the found records corresponding to the entered parameters will be displayed in the table.
button located in the search bar or on the "Enter" button located on the keyboard. As a result, the found records corresponding to the entered parameters will be displayed in the table.
To clear the entire search window and reset the filter, click on the ![]() button. If you want to remove one of the parameters, click on the cross that is located in the query window itself (Figure 2, Pointer 2).
button. If you want to remove one of the parameters, click on the cross that is located in the query window itself (Figure 2, Pointer 2).
Creating a bill
To create a bill, click on the "Add bill" button (Figure 1, Pointer 5). This will open the "Bills" window (Figure 3), which presents 3 blocks of information:
- The "Add bill" block. This box displays general account information (Figure 3, Pointer 1):
-
“Amount” - bill amount;
-
“Payed amount” - bill amount paid.
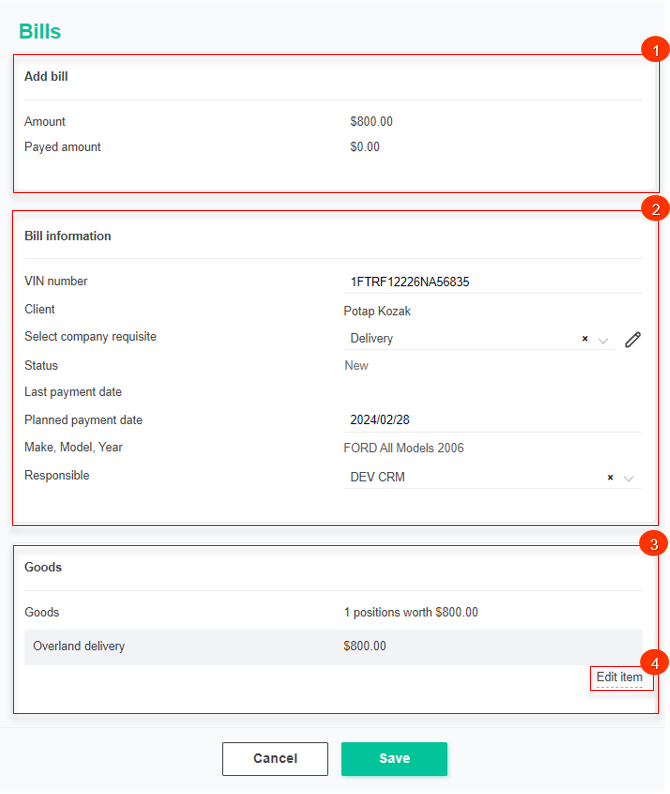
Figure 3 - "Accounts" window
-
Block “Bill information”. This block contains basic information about the bill (Figure 3, Pointer 2).
-
“VIN number” - enter the VIN number of the vehicle;
-
“Client” - select a client from the drop-down list that opens when you click on the
 button;
Note: You can bill a customer even if the customer does not have a VIN number assigned to it. However, you cannot create an invoice that is linked only to a VIN number without a linked customer.
-
“Select company requisite” - from the drop-down list that opens when you press the
 button , select the company details template;
Note: Details are created on the "Finance Settings" page in the "Company and Requisite" section. You can also edit or delete existing details there.
-
“Status” -financial status of the account, can have the following values: "New", "Partially paid", "Paid". This status is assigned by the system automatically and indicates the current financial status of the invoice and its payment;
-
“Last payment date” -enter the date on which the last payment was made on this account;
-
“Planned payment date” - deadline for invoice payment, which is set automatically based on the financial settings;
-
“Responsible” - from the drop-down list that opens when you click on the
 button, select the employee who will be in charge of its current maintenance.
- Block “Goods”. This block is for adding products or services related to this account (Figure 3, Pointer 3). To add a product, click on "Edit Item" (Figure 3, Pointer 4), which will open the "Products" window where you fill in the fields:
-
“Goods” - from the drop-down list that opens when you click on the
button, select the desired product or service;
-
“Price” - using keyboard input or by pressing the
 buttons, enter the cost of the service.
To create multiple items, add the required number of rows by clicking on the "Add item" button (Figure 4, Pointer 1) and repeat the process of filling in the fields. If you need to delete a row, click on the ![]() button.
button.
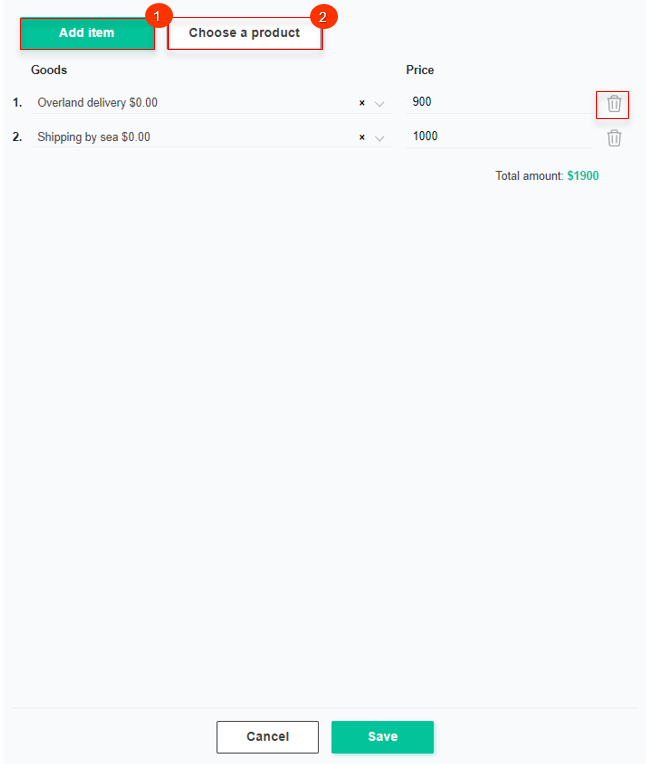
Figure 4 - "Add Product" window
If you want to create a new product, click on the "Choose a product" button (Figure 4, Pointer 2) and the "Edit item" window will open, which is used to create, edit and delete a product and its category.
To create a product category in which to place the product, click on the "Create category" button (Figure 5, Pointer 1), which will open the "Create category" window where you enter a name and check the "Active" box (Figure 6, Pointer 1).
Note: If unchecked, this category will not appear in the list of available categories when adding a new product.
To save the data click on the "Save" button, in case of canceling click on the "Cancel" button. As a result of the actions performed, a category will be created, which will be displayed in the "Sections" list.
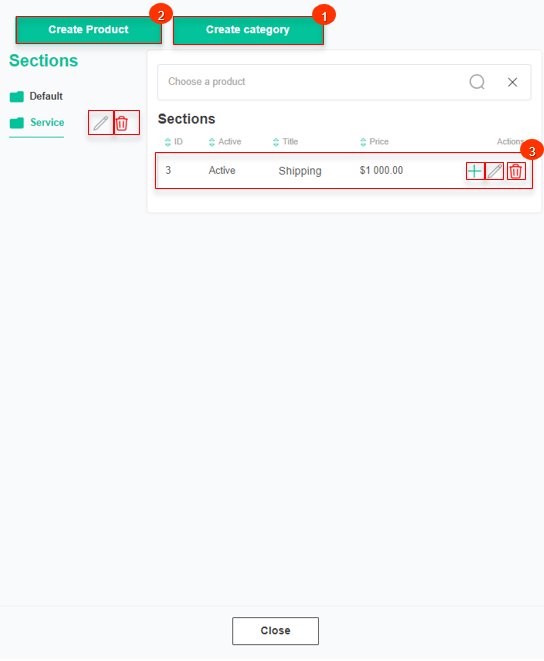
Figure 5 - "Edit item" window
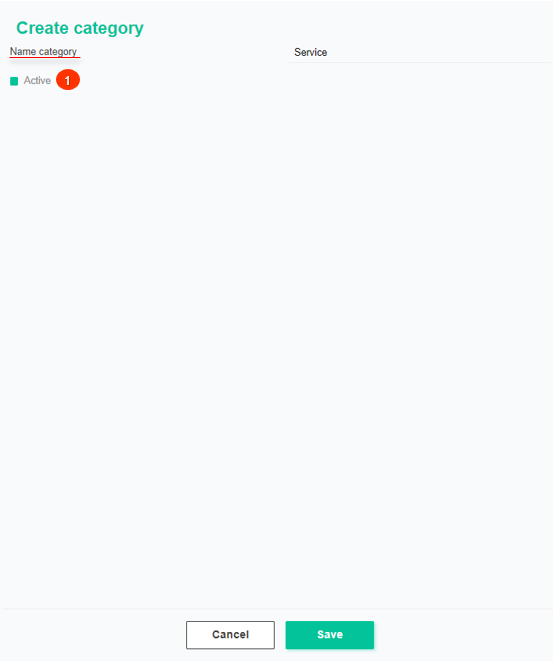
Figure 6 - "Create category" window
In order to edit a category, click on the button located on the left . After that, the "Create category" window opens (Figure 6), where data changes are performed in the same way as when creating a category (see above).
To delete a category, click on the button. As a result, the category will be removed from the list.
Note: The "Default" category cannot be edited or deleted.
To create a product, click on the "Create Product" button (Figure 5, Pointer 2) and fill in the fields in the "Create Product" window that opens:
-
“Name product” - enter the product name;
-
“Select category” - select a category from the drop-down list that opens when you click on the
button;
-
“Price” - using the keypad input or by pressing the
 buttons to enter the cost;
Check the ![]() box next to Active (Figure 7, Pointer 1).
box next to Active (Figure 7, Pointer 1).
Note: If not checked "Active," this product will not be available to be added to the account.
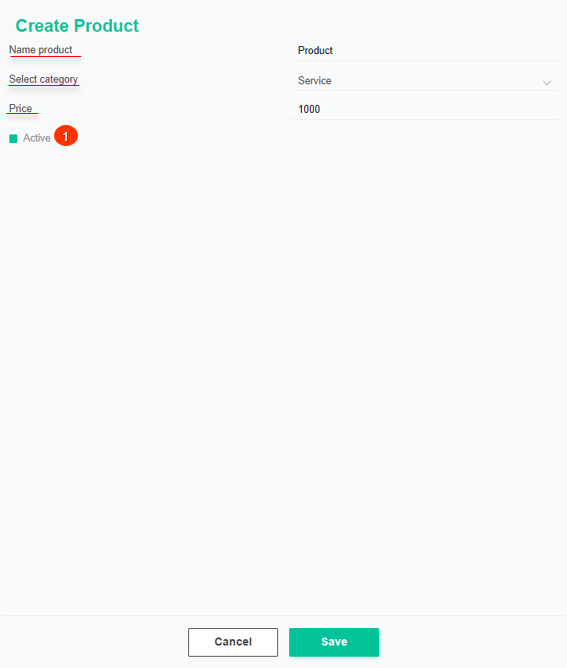
Figure 7 - "Create Product" window
To save the data click on the "Save" button, in case of canceling click on the "Cancel" button . As a result of the actions performed, the product will be created and displayed in the table (Figure 5, Pointer 3).
To edit a product, click on the ![]() button, which is located on the right side of the entry in the table (Figure 5, Pointer 3). After that the "Create Product" window opens (Figure 7), where data changes are performed in the same way as when creating a category (see above).
button, which is located on the right side of the entry in the table (Figure 5, Pointer 3). After that the "Create Product" window opens (Figure 7), where data changes are performed in the same way as when creating a category (see above).
Note: The "Default" product cannot be edited except for the amount.
To delete a product, click on the ![]() button (Figure 5, Pointer 3), which is located on the right side of the entry in the table. As a result, the product will be absent from the table.
button (Figure 5, Pointer 3), which is located on the right side of the entry in the table. As a result, the product will be absent from the table.
To add a product to an invoice, click on the ![]() button (Figure 5, Pointer 3), which will add the product to the invoice without the need for additional steps.
button (Figure 5, Pointer 3), which will add the product to the invoice without the need for additional steps.
To save the invoice click on the "Save" button, in case of cancelation click on the "Cancel" button . As a result of the actions performed, an invoice will be created and displayed in the table (Figure 1, Pointer 7).
Editing a bill
To edit a bill, click on the ![]() button located on the right side of the record in the table, which will open the "Bills" window (Figure 8), which presents 4 blocks of information:
button located on the right side of the record in the table, which will open the "Bills" window (Figure 8), which presents 4 blocks of information:
- Block “Edit bills”. This box displays general account information (Figure 8, Pointer 1):
-
“Status” - financial status of the invoice, can be new, partially paid, paid;
-
“Amount” - total invoice amount;
-
“Payed amount” - bill amount paid.
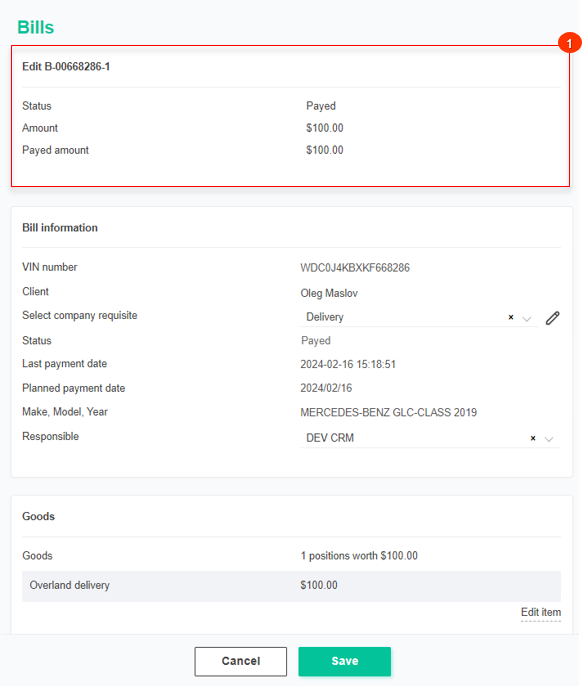
Figure 8 - "Edit bills" window
In the "Bill information" and "Goods" blocks, data changes are made in the same way as in the account creation process (see above).
-Block “History”. This block details all information about past changes and actions related to the account. This includes records of each step and change, as well as additional comments and events, to provide complete clarity and transparency in tracking the entire process (Figure 9, Pointer 1).
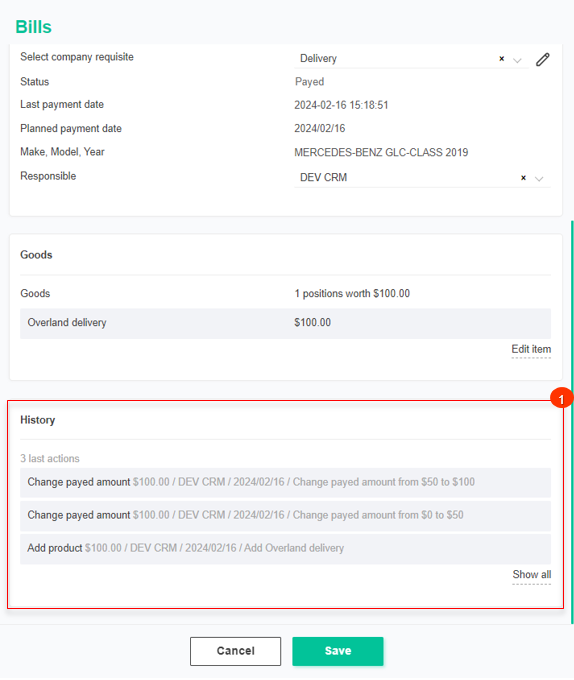
Figure 9 - Continuation of the "Edit bills" window
After editing the account, to save the data, click on the "Save" button, to cancel the button - "Cancel".
Bill Payment
To pay a bill, click on the ![]() button located on the right side of the table entry (Figure 1, Pointer 7). This action will open the "Bills Payment" window (Figure 10), where the information will be automatically filled in the appropriate fields:
button located on the right side of the table entry (Figure 1, Pointer 7). This action will open the "Bills Payment" window (Figure 10), where the information will be automatically filled in the appropriate fields:
-
“VIN” - Vehicle VIN number;
-
“Make, Model, Year” - information on the make, model and year of manufacture of the vehicle;
-
“Client name” - displays information about the customer to whom this invoice is issued;
-
“Balance” - displays the balance of the customer to whom this account is written;
Note: If the amount of funds available on the client's balance does not allow to pay the invoice in full, the client can make a partial payment of the invoice. In this case, the client pays the available amount and the remaining amount remains outstanding.
-
“Amount payable” - bill amount;
-
“Payable date” - date of full or partial payment, automatically set when opening the "Bill Payment" window;
In the "Amount" field, enter the payment amount using keyboard input or by pressing the ![]() buttons. If necessary, add a note in the corresponding "Note" field.
buttons. If necessary, add a note in the corresponding "Note" field.
To save the payment click on the "Pay" button, in case of cancelation click on the "Cancel" button. As a result of the performed actions the financial status of the account will be changed to "Process" or "Paid".
Note: If payment has been made in full, the status will change to "Paid". In case of partial payment, the status will change to "Partially paid".
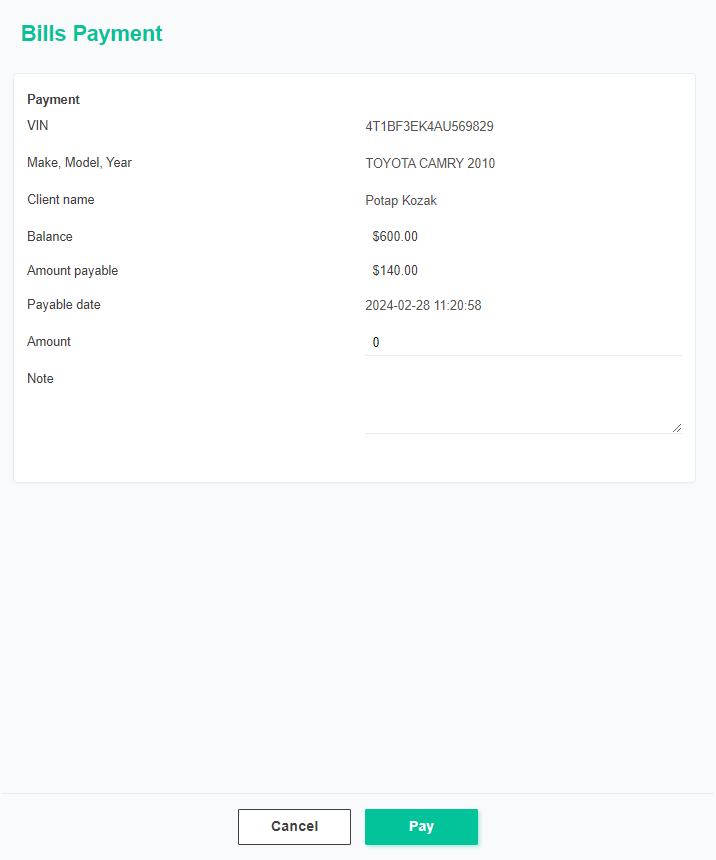
Figure 10 - "Bills Payment" window
To edit a bill payment, click on the ![]() button located on the right side of the table entry (Figure 1, Pointer 7). This action opens the "Bills Payment" window (Figure 10), where data changes are performed in the same way as for bill payments.
button located on the right side of the table entry (Figure 1, Pointer 7). This action opens the "Bills Payment" window (Figure 10), where data changes are performed in the same way as for bill payments.
Note: The payment amount can only be changed downwards. To increase the amount, make the payment again.
Creating a PDF of the bills
In order to generate PDF format for the price list, select the required entry in the table and click the ![]() button located on the right side of the entry in the table (Figure 1, Pointer 7).
button located on the right side of the entry in the table (Figure 1, Pointer 7).
After performing the specified actions, an invoice will be generated in a new browser tab, specifying the payment details (Figure 11, Pointer 1).
In the "Seller Information" section, information about the seller's company name, physical address, and email address is provided (Pointer 2).
Note: The information is automatically pulled from the "Company and Requisite" section on the "Finance Settings" page for the company selected in the current invoice.
In the "Customer Information" section, details about the customer's company name, physical address, and email address are provided (Pointer 3).
The table contains information about the services, including their quantity and cost. Each row represents a separate service, with columns specifying the service name, quantity, and cost. Below the table, the total invoice amount, the amount paid, and the remaining amount to be paid are indicated.
To generate a PDF file, click on the "Make PDF" button (Pointer 4).
To download the PDF file, click on the "Download" button (Pointer 5), or click on the ![]() button located to the right of the record in the table (Figure 1, Pointer 7). Afterward, choose the destination to save the file and click "Save".
button located to the right of the record in the table (Figure 1, Pointer 7). Afterward, choose the destination to save the file and click "Save".
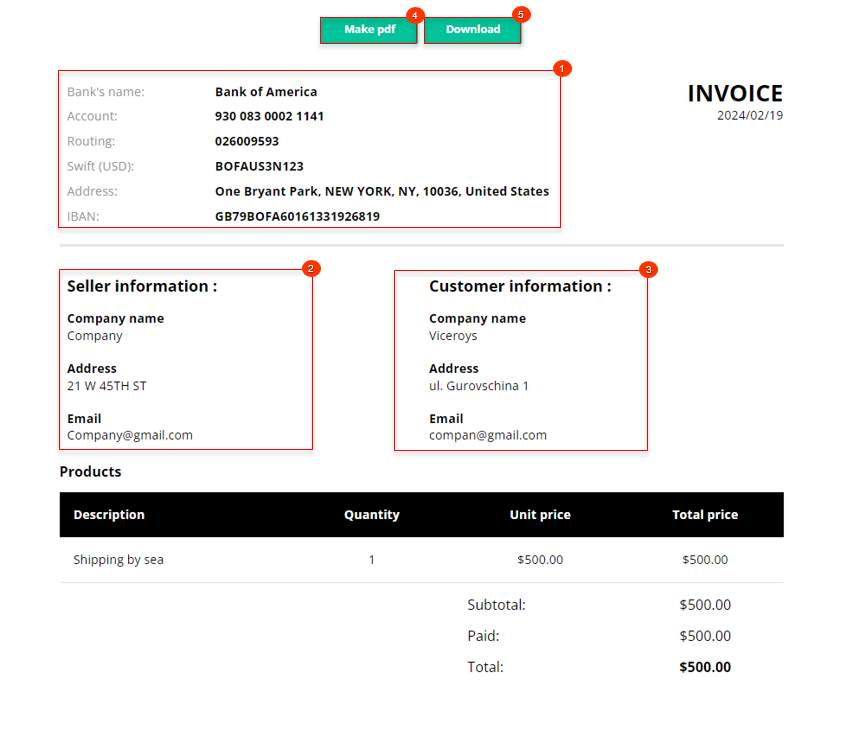
Figure 11 - Bill Preview
Deleting a bills
To delete the invoice, click on the button located to the right of the record in the table (Figure 1, Pointer 7). Then, a window will appear; to confirm the deletion, click "Yes", and to cancel, click "No" (Figure 12). As a result, the invoice will be removed from the table.
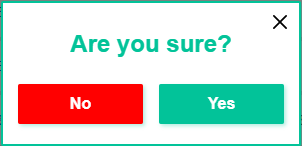
Figure 12 - Confirmation Window for Deleting the Invoice
Creating a export
The "Bills" page provides an important function to export data to various formats such as Excel spreadsheets or CSV files. This allows you to save and analyze data off-site.
To export an invoice, click on the ![]() button (Figure 1, Pointer 6). When choosing "Make export," a window called "Export" will open, consisting of two tabular blocks, "Current export" and "Completed export." To export the file, select the desired file format and click on the "Start" button (Figure 13, Pointer 1/Pointer 2). Once the export is complete, the file will be available in the "Completed Export" section. Then, click on the "Download" button (Figure 13, Pointer 3), choose the destination to save the file, and click "Save".
button (Figure 1, Pointer 6). When choosing "Make export," a window called "Export" will open, consisting of two tabular blocks, "Current export" and "Completed export." To export the file, select the desired file format and click on the "Start" button (Figure 13, Pointer 1/Pointer 2). Once the export is complete, the file will be available in the "Completed Export" section. Then, click on the "Download" button (Figure 13, Pointer 3), choose the destination to save the file, and click "Save".
In case of canceling the export, click on the "Cancel" button (Figure 13, Pointer 4). After performing this action, the file will be removed from the "Current Export" table.
To close the window, click on the "Close" button.
If needed, you can apply a filter to the exported file using the filter function (Figure 2) or by setting checkboxes in the table (Figure 1, Pointer 3).
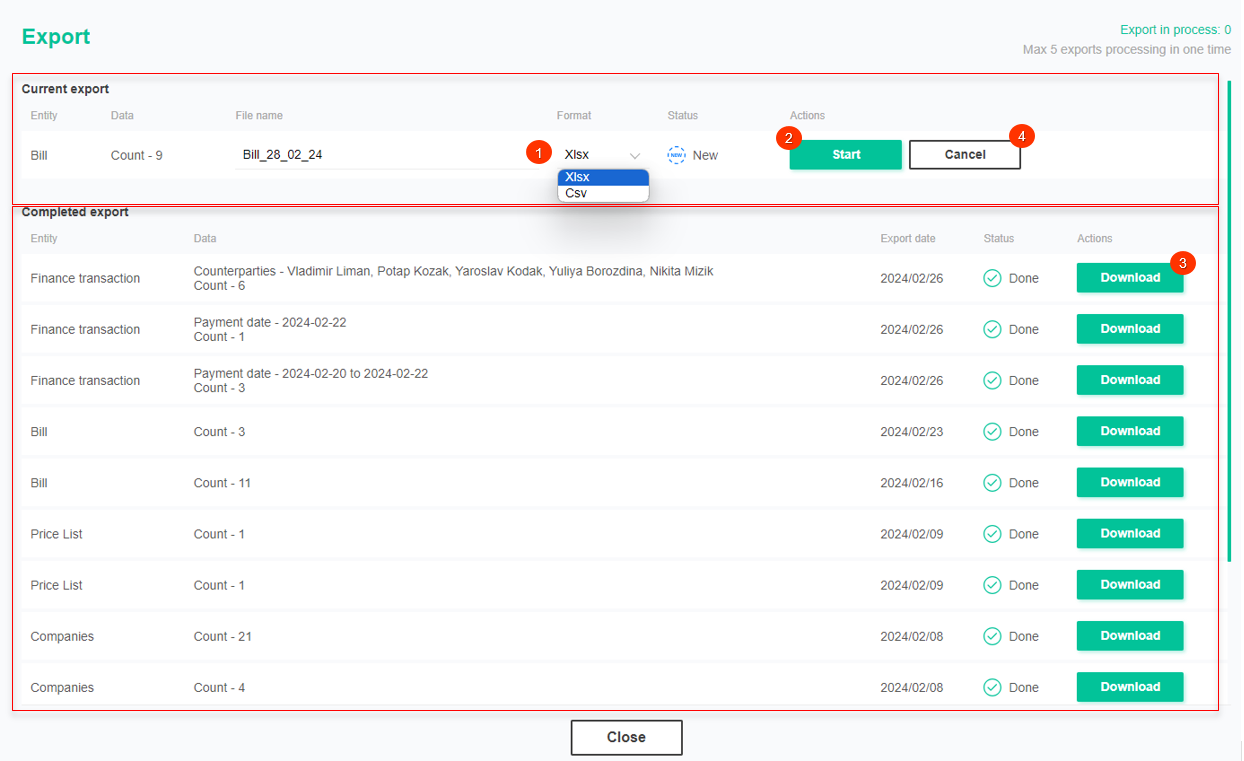
Figure 13 - Export Window
To view the export history, click on the ![]() button (Figure 1, Pointer 6). When choosing "Show export," the "Export" window will open, identical to the window used for performing exports.
button (Figure 1, Pointer 6). When choosing "Show export," the "Export" window will open, identical to the window used for performing exports.
Mass bills editing function
The bulk editing feature for invoices provides a convenient way to simultaneously modify repetitive data across multiple records when needed.
To use this feature, follow these steps:
-
In the table, place a checkmark
 next to each invoice to which you want to apply changes (Figure 1, Pointer 3).
 -
After marking the invoices, a panel with bulk editing options will appear at the bottom of the table. Use the available options in this panel to modify parameters (Figure 1, Pointer 8).
Note: If you check "Select All" (Figure 1, Pointer 9), it will select all invoices, allowing you to apply changes to all of them at once.
Available options:
-
Deletion of invoices - on the bulk editing panel, select the "Delete" option (Figure 14, Pointer 1). Subsequently, a window will open, where to confirm the deletion, click the "Yes" button, and to cancel, click the "No" button.

Figure 14 - Deletion Option
-
Setting an employee - choose the "Set employee" option (Figure 15, Pointer 1), then select the desired employee from the available options and click the "Apply" button (Pointer 2) to save the changes.

Figure 15 - Employee Change Option
Note: The list of employees available for selection only displays those with an "Active" status.
-
Sending a notification - select the "Send notification" option (Figure 16, Pointer 1), then choose the desired notification type from the available options and click "Apply" (Pointer 2) to save the changes made.
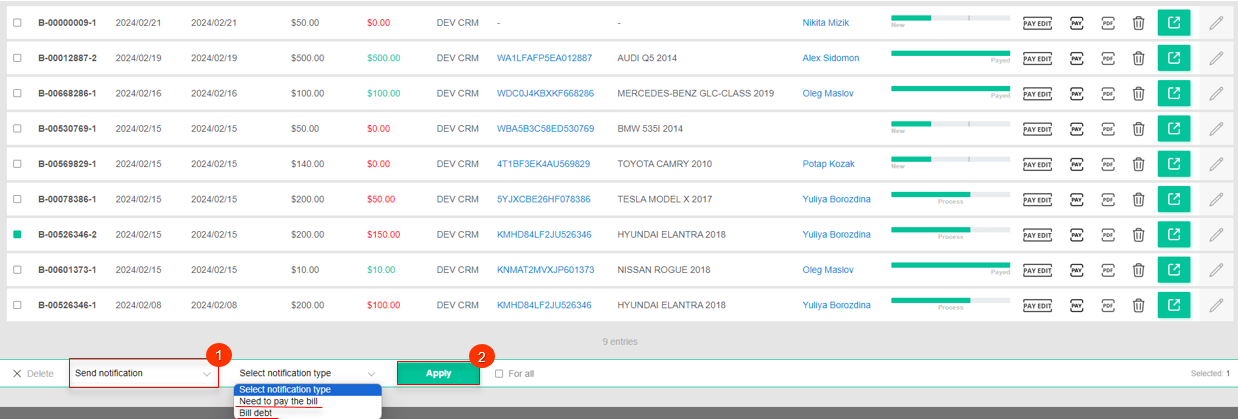
Figure 16 - Pricing Assignment Option
Bills. Client panel.
On the "Bills" page there is a switch that provides the option to select the page view mode (Figure 1, Pointer 10). If the "Client panel" option is selected, you will be redirected to a page where a list of all clients is available, as well as the balance amount for each client. If you click on a client's name, the table displays the accounts that are associated with that client only (Figure 17, Pointer 1).
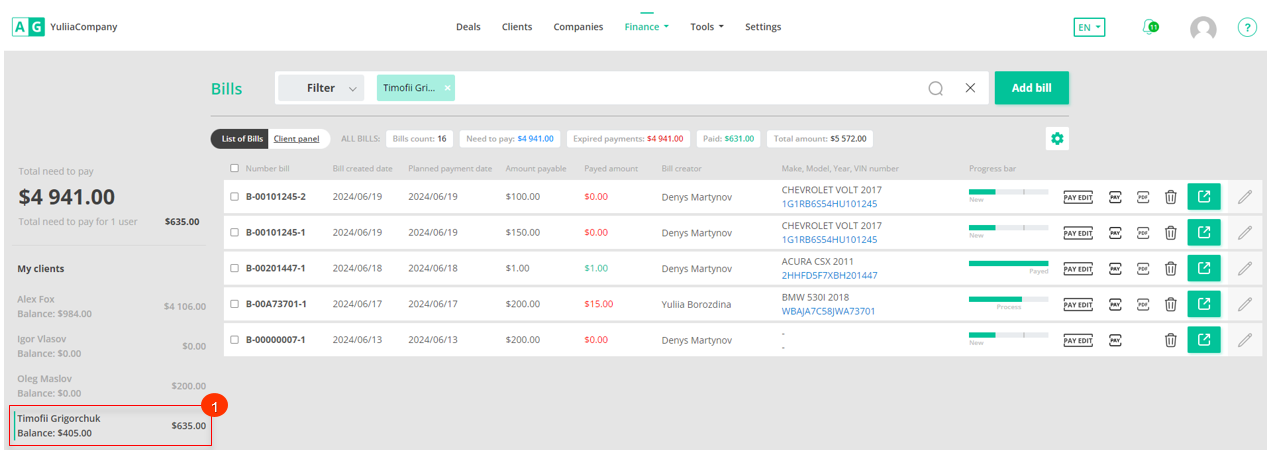 Figure 17 - Site page " Bills. Client panel"


