AuctionGate | Account management - How to perform bulk user editing?
The bulk user editing function provides a convenient way to simultaneously edit the same type of data in several records.
To use this feature, follow these steps:
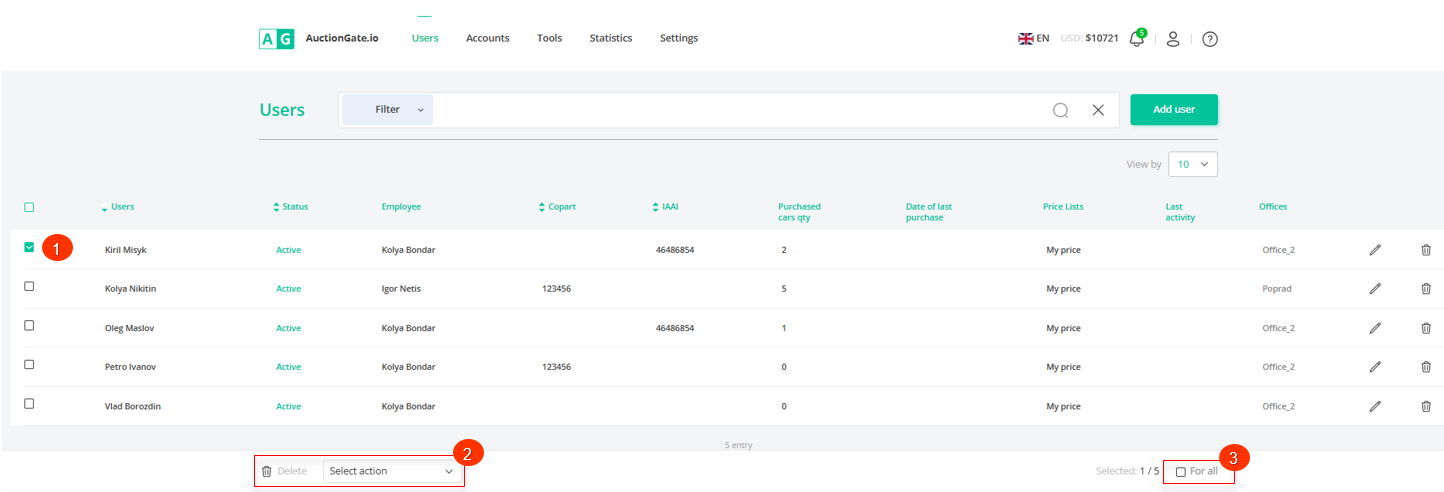
In the table, select the checkbox next to each user you want to edit (Figure 1, Pointer 1).
After marking the users, a panel with bulk editing options appears at the bottom of the table, where you can use the available options to change the parameters (Pointer 2).
Note: Selecting the For All checkbox (Pointer 3) will select all users, so that changes can be applied to all at once.
 Figure 1 - Site page "Users"
Available options:
-
Deleting a user - in the bulk editing panel, select the "Delete" option (Figure 2, Pointer 1), after which a window opens in which you can click the "Yes" button to confirm the deletion, or the "No" button to cancel it. As a result, the user will be deleted from the table.
 Figure 2 - Delete option
-
Change the user status - in the bulk editing panel, select the "Set status" option (Figure 3, Pointer 1), then select the status from the drop-down list and confirm the changes by clicking the "Apply" button (Pointer 2).
 Figure 3 - Option to change the user status
-
Install an employee - select the "Set employee" option (Figure 4, Pointer 1), then select the desired employee from the available options and click the "Apply" button (Pointer 2).
Note: For an employee with the role of "Operator," this option is not available, as this employee has access only to users assigned to them.
 Figure 4 - The option to change an employee
-
Setting up a Copart/IAAI/Manheim account - select the "Set account Copart/IAAI" option (Figure 5, Pointer 1), then select the required account from the available options and click "Apply" (Pointers 2) to save the changes.
 Figure 5- Account assignment option
-
Setting the price list - select the "Set price list" option (Figure 6, Pointer 1), then select the required account from the available options and click "Apply" (Pointer 2) to save the changes.
 Figure 6- Option to assign a price list
Note: The list of employees, accounts, and price lists available for use displays only those with the "Active" status.
-
To display purchased lots, select the "Set Purchased Lot" option (Figure 7, Pointer 1). Then, decide whether to show the purchased lots to the client fully, partially, or not at all. Click "Apply" (Pointer 2) to save the changes.
 Figure 7 - Purchased Lots Display Option


