AuctionGate | Account management - Site page "Accounts"
The "Accounts" menu section of the site is intended for managing accounts, including creation, editing and deletion. It also provides the possibility of mass editing of accounts.
To open the "Accounts" page on the website, click the left mouse button on the "Accounts" menu section located in the site menu (Figure 1, Pointer 1). As a result, the corresponding page will open (Figure 2).

Figure 1- The "Accounts" menu section
Search by specified filters
Clicking on the “Filter” button (Figure 2, Pointer 1) opens a window where you can set the search parameters (Figure 3):
-
"Select status" - from the dropdown list that opens when you click the button
 , select account status;
 -
“Select auction” - from the drop-down list that opens when you click the button
 , select auction;
 -
“Select employee” - from the drop-down list that opens when you click the button
 , select the employee assigned to this account;
 -
“Select office” - from the drop-down list that opens when you click the button
 , select the office that is assigned to this account.
After entering the parameters, click the “Apply” button to generate the list of accounts in the table area, or in case of cancellation, click “Clear”.

Figure 2 - The "Accounts" page on the website.

Figure 3 - Filter operation
Account creation
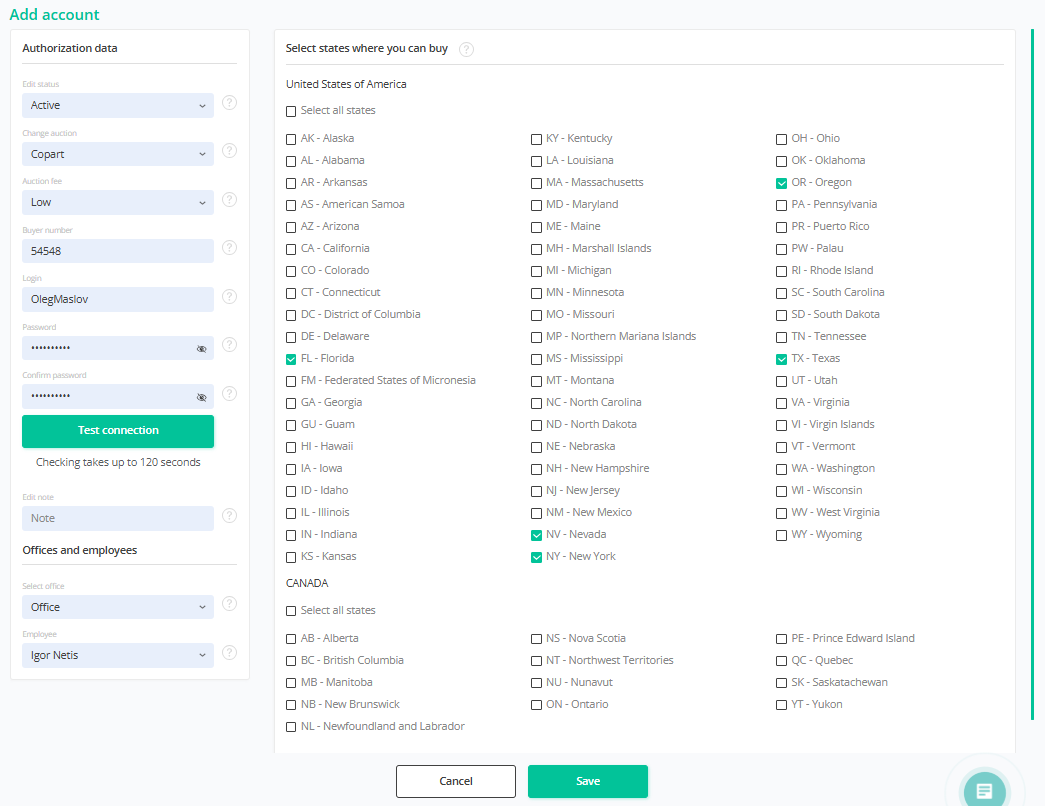
To create an account, click on the "Add account" button (Figure 2, pointer 2). Then in the "Add account" window that opens (Figure 4), fill in the fields:
Authorization data
-
"Select Status" - from the drop-down list that opens when you click on the button
 , select account status;
 -
"Select auction" - from the drop-down list that opens when you click on the button
 , select the auction for which you are creating an account;
 -
"Auction Fee" - from the drop-down list that opens when you click on the button
 , select the type of auction fee. When selecting, the value:
- "High" - the account has purchased fewer than 25 vehicles or total vehicle purchases of less than $75,000;
- "Low" - the account has purchased more than 25 vehicles or the total vehicle purchases exceed $75,000.
-
"Buyer number" - enter the account number used to log into your auction account;
-
"Login" - enter the login of the account used to log into the auction account;
-
"Password" - enter the password of the account used to log into the auction account;
-
"Confirm Password" - re-enter the password used to log into your auction account;
Then click on the "Test connection" button to verify the entered data and connect the new account from the auction site.
-
"Note" - enter additional information about the account.
Offices and employees
-
"Select an office" - from the drop-down list that opens when you click on the button
 select the desired office;
 -
"Employee" - from the drop-down list that opens when you click on the button
 select an employee.
Select states where you can buy
-
"United States of America" - left mouse button to check the box
 in the field, if necessary to select all locations where the user can participate in auctions ;
If you want to select one or more locations, check the box next to the corresponding value.
After entering the parameters, click on the "Save" button, in case of cancelation click on the "Cancel" button. As a result of the actions performed, a new account will be created and displayed in the table area.
Figure 4 - "Add account" window
Editing an account
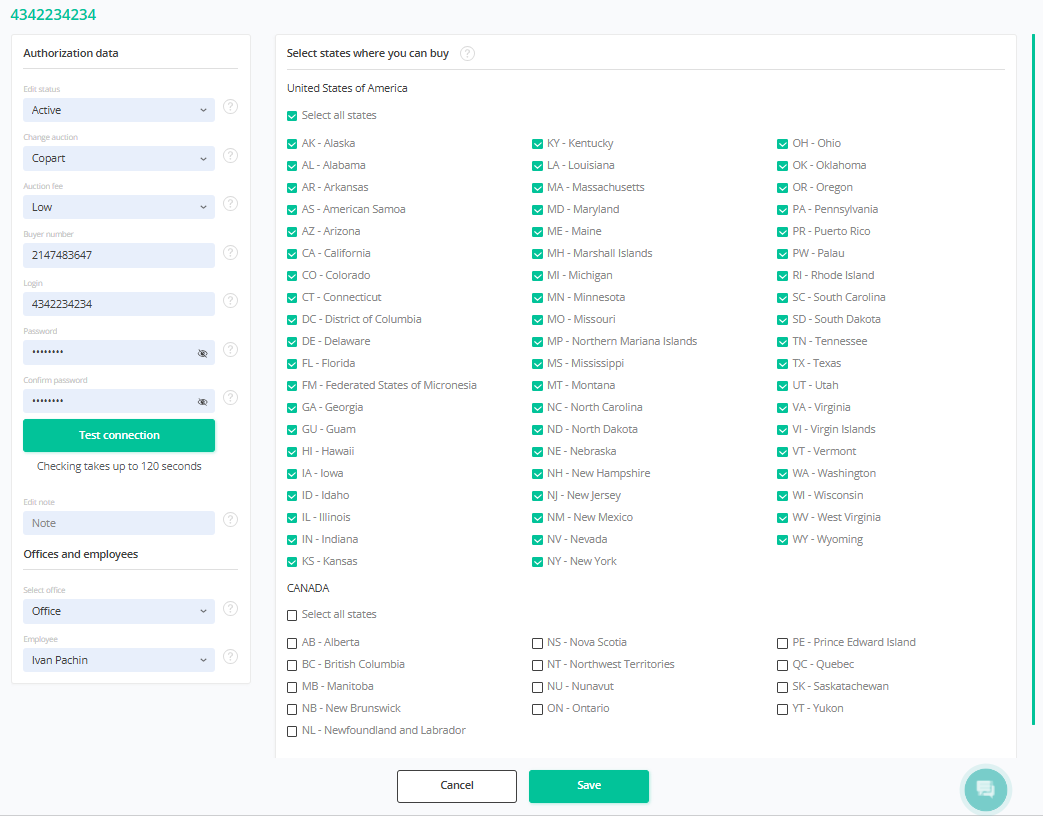
In order to edit the account data, click on the button ![]() , which is located on the right side of the record in the tabular area (Figure 2, Pointer 3). After that, the "Edit account" window opens (Figure 5), where data modification is performed similarly to creating an office (see above)
, which is located on the right side of the record in the tabular area (Figure 2, Pointer 3). After that, the "Edit account" window opens (Figure 5), where data modification is performed similarly to creating an office (see above)

Figure 5 - "Edit account" window
Account Deletion
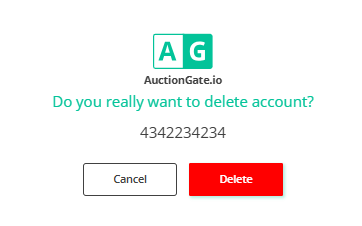
To delete an account, click on the button ![]() , located on the right side of the record in the table area (Figure 2, Pointer 4). This will open a window where you can confirm the deletion by clicking on the "Delete" button and cancel by clicking on the "Cancel" button (Figure 6). As a result, the account will be deleted from the table area.
, located on the right side of the record in the table area (Figure 2, Pointer 4). This will open a window where you can confirm the deletion by clicking on the "Delete" button and cancel by clicking on the "Cancel" button (Figure 6). As a result, the account will be deleted from the table area.

Figure 6 - Confirming/Canceling Account Deletion
Mass editing of accounts
Mass account editing feature provides a convenient way to simultaneously modify identical data in multiple records when necessary.
To use this feature, follow these steps:
-
In the Accounts table, select the checkbox
 next to each account you want to edit
 -
After marking the accounts, a panel with mass editing options will appear at the bottom of the table, where you can use the available options to change parameters (Pointer 6).
Note: If you check "For all" (Pointer 7), it will select all accounts, allowing changes to be applied to all accounts at once.
Available options:
-
Delete account - on the mass editing panel, select the "Delete" option (Figure 7, Pointer 1), after which a window will open. To confirm deletion, press "Yes" to cancel, press "No". As a result, the account will be removed from the table.

Figure 7 - Delete option
-
Change account status - on the mass editing panel, select the "Set status" option (Figure 8, Pointer 1), then choose the status from the drop-down list that appears when you press the button
 , and confirm the changes by clicking "Apply" (Pointer 2).

Figure 8 - Change account status option
-
Assign employee - choose the "Set employee" option (Figure 9, Pointer 1), then select the desired employee from the available options and press "Apply" (Pointer 2) to save the changes.

Figure 9 - Change employee option


