AuctionGate | Account management - Site page "Users"
The Users section of the website menu is intended for creating, editing, and deleting users. It also provides the possibility of mass editing of accounts.
To open the "Users" page of the site, click on the "Users" menu section, which is located in the site menu (Figure 1, pointer 1). This will open the corresponding page (Figure 2).

Figure 1 - Site menu section "Users"
Search by specified filters
Clicking on the “Filter” button (Figure 2, Pointer 1) opens a window where you can set the search parameters (Figure 3):
-
“Select status” - from the dropdown list that opens when you click the button
 , select the user's status;
 -
“Select account Copart ” - from the dropdown list that opens when you click the button
 , choose the Copart auction account;
 -
“Select account IAAI” - from the dropdown list that opens when you click the button
 , choose the IAAI auction account;
 -
“Select account Manheim” - from the dropdown list that opens when you click the button
 , choose the Manheim auction account;
 -
"Select employee" - from the drop-down list that opens when you click on the button
 , select the employee assigned to the user;
 -
"Select office" - from the drop-down list that opens when you click on the button
 , select the office assigned to the user.
After entering the parameters, click the "Apply" button to generate the list of users in the tabular area. In case you want to cancel, use the "Clear" button.
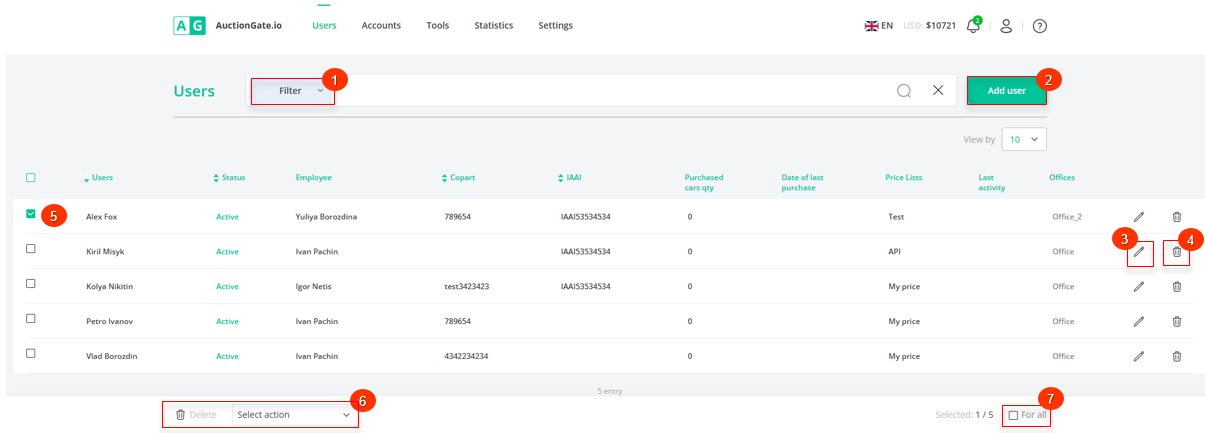 Figure 2 - Site Users Page
 Figure 3 - Filter area
User Creation
To create a new user, click the "Add user" button (Figure 2, Pointer 2). Then in the "Add user" window that opens (Figure 4), fill in the fields:
Authorization data:
-
"Select status" - from the drop-down list that opens when you click on the button
 , select the status of the user.
Note: If "Inactive" is selected, the user will not be able to participate in auctions.
-
"User Name" - enter the user's first and last name in Latin characters;
-
"Login" - enter the login, which will be further used for authorization in the extension and mobile app;
-
"Email" - enter the user's e-mail address;
-
"Password" - enter the user password, which will be further used for authorization in the extension and mobile application. The password must contain at least five characters;
-
"Confirm Password" - re-enter the password that was entered in the field above.
Price lists
-
"Select price list" - from the drop-down list that opens when you click on the button
 , select the price list that will be used to calculate the cost of delivery;
 -
“Display the calculator block in the extension” - select from the dropdown whether to display the calculator in the extension;
Doc Type
-
“Display the block of document types in the extension” - select from the dropdown whether to display document types in the extension;
-
“Consider the cost of documents” - select from the dropdown whether to consider or not consider the cost of documents.
General
-
“Edit bid limit” -using the keyboard enter the bid limit amount;
Note: If the user's bid at the auction exceeds the set limit specified in the fields above, the user's bid will not be accepted.
-
“Edit limit on the number of active lots” - using the keyboard enter the maximum number of lots that can be active simultaneously;
-
“Edit quantity limit of purchased cars (Q-ty)” - using the keyboard enter the limit on the number of cars purchased across all auctions;
-
“Edit limit sum of the active lots” - enter the maximum allowable total value of all active lots simultaneously.
Note: If the value "0" is selected in any of the fields, there will be no restrictions for the user.
Prebid status
-
"Prebid status" - from the drop-down list that opens by clicking on the button
 , select the required value in the pre-betting mod
Live Bid Status
-
"Live Bid Status" - from the drop-down list that opens when you click on the button
 , select the required value in the online bidding mode;
Note: If "Inactive" is selected in the ""Bid Limits" or "Online Bid Status" field, the user will not be able to place bets in pre-bid or online bidding mode.
Auction pages
-
"Purchased lots" - from the drop-down list that opens when you click on the
 button, select the required value that will display information about the purchased lots in the extension;
-
"Lots event" - from the drop-down list that opens after clicking the
 button, select the required value that will display information in the betting history extension.
Copart Accounts
-
"Select Copart master account" - from the drop-down list that opens when you click on the button
 , select your Copart auction account;
 -
"Select Copart slave account" - from the drop-down list that opens when you click on the button
 , select your Copart auction account;
Note: If there is no auction location on the primary account, the extension will automatically switch to the second account where the required location is present.
IAAI Accounts
-
“Select IAAI master account” - from the drop-down list that opens when you click on the button
 , select your IAA auction account;
 -
"Select IAAI slave account" - from the drop-down list that opens when you click on the button
 , select your Copart auction account;
Note: If there is no auction location on the primary account, the extension will automatically switch to the second account where the required location is present.
Manheim Accounts
-
“Select Manheim master account” - from the drop-down list that opens when you click on the button
, select your Manheim auction account;
-
“Auction Options” - configure the available auction parameters — view only or participation.
-
“Allow user to manage account” - select from the dropdown whether the user can independently manage the Manheim account.
Note: For all auctions, when the "End Active Sessions" button is clicked, authorized accounts will be logged out of the auction.
After entering the parameters, click on the "Save" button, in case of cancelation click on the "Cancel" button.
As a result of the actions performed, a new user will be created and displayed in the table area.
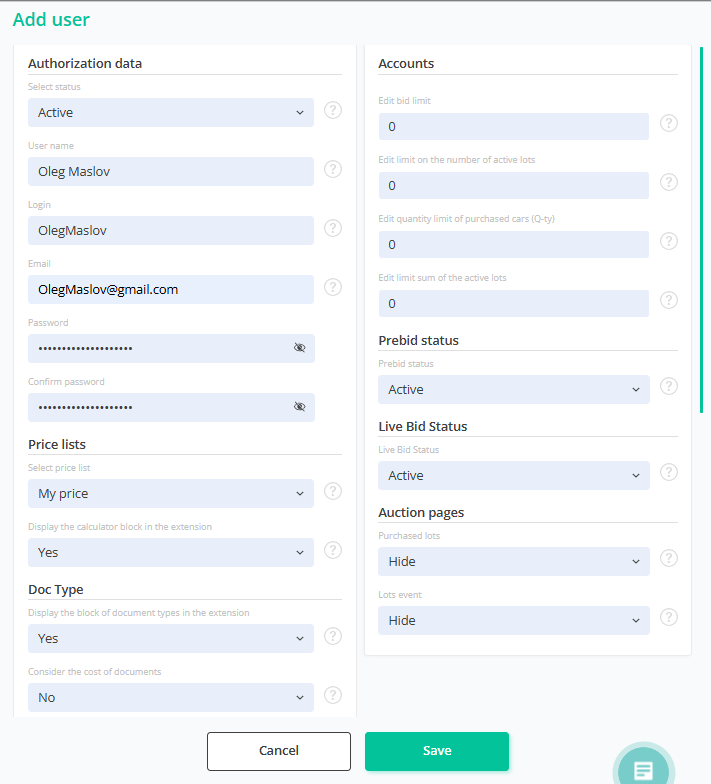
Figure 4 - "Add user" window
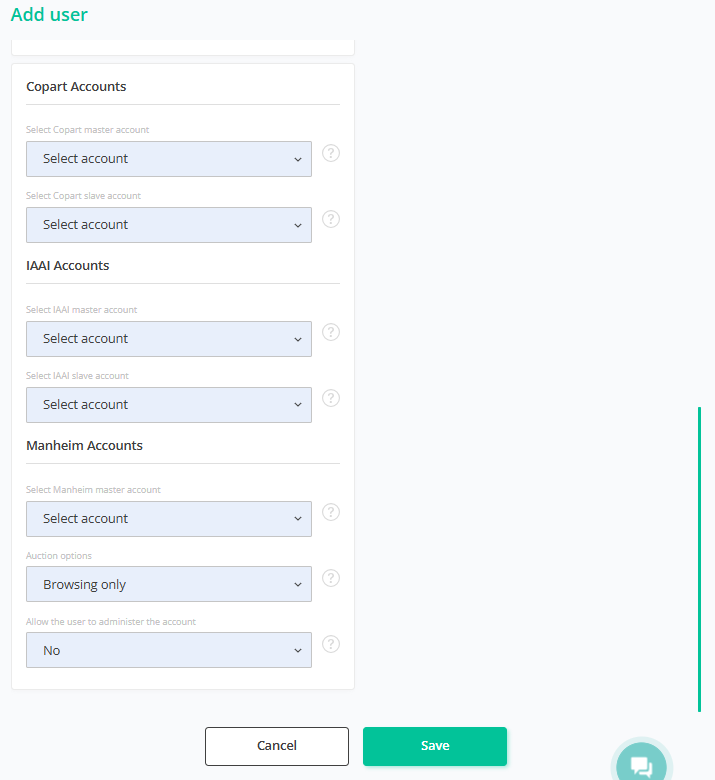
Figure 5 - Continuation of the “Add user” window
Editing a user
In order to edit the user data, click on the button ![]() , which is located on the right side of the record in the table area (Figure 2, Pointer 3). After that, the user window will open, including the tabs “General”, “Purchased lots”, “Bid statistics”, “Viewed lots” (Figure 6, Pointer 1), where data changes are similar to the creation of a user (see above).
, which is located on the right side of the record in the table area (Figure 2, Pointer 3). After that, the user window will open, including the tabs “General”, “Purchased lots”, “Bid statistics”, “Viewed lots” (Figure 6, Pointer 1), where data changes are similar to the creation of a user (see above).
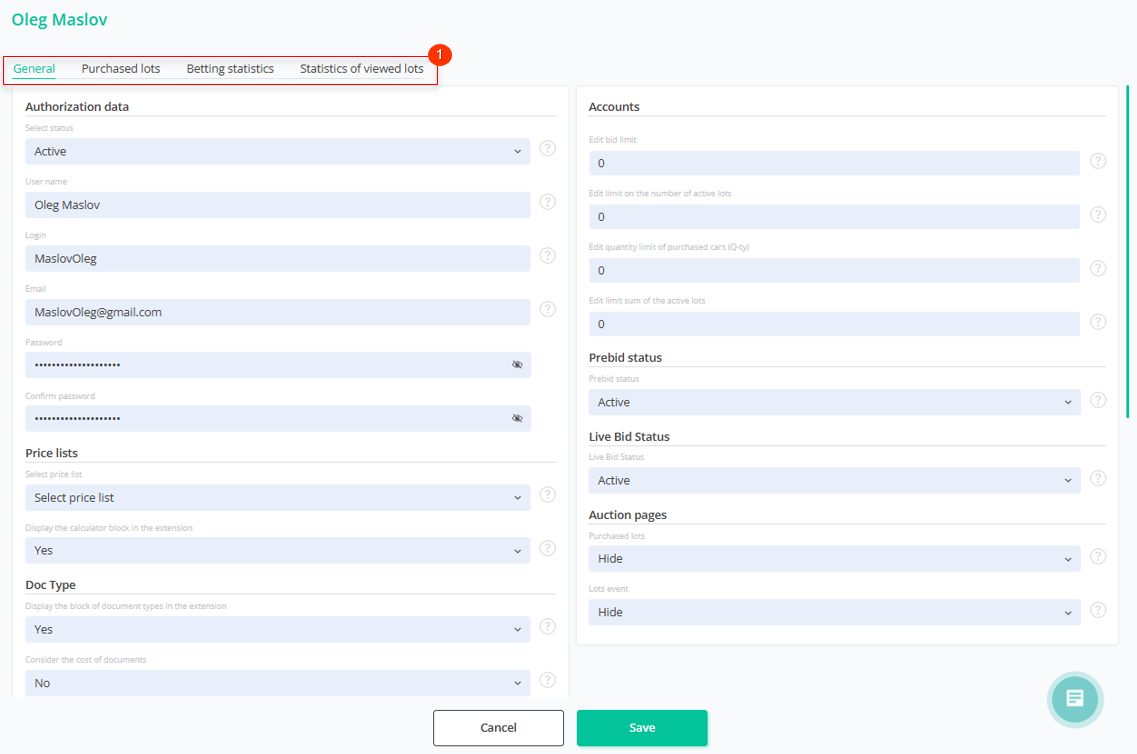 Figure 6 - The “User. General” window
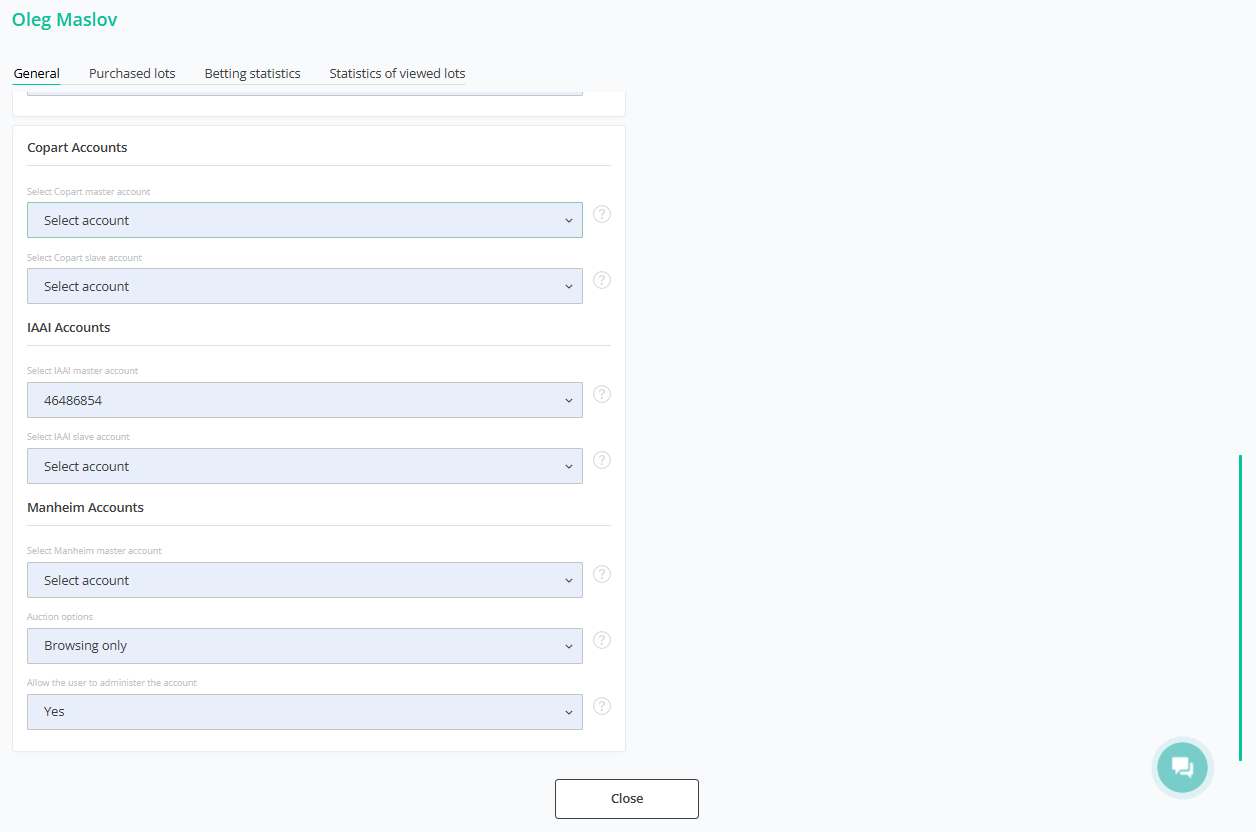 Figure 7 - Continuation of the “User. General"
The General tab contains basic information about the user, presented in the form of 6 data blocks. These blocks contain key information such as user data, price list, limit settings, as well as restrictions on placing bids and viewing auction pages.
The Purchased lots tab is used to view information about vehicles that have been successfully purchased. Here you can get information about each purchased item, including the VIN, make, model, year of manufacture of the vehicle, which auction the item was purchased at, the winning price, and the date and time of placement (Figure 8).
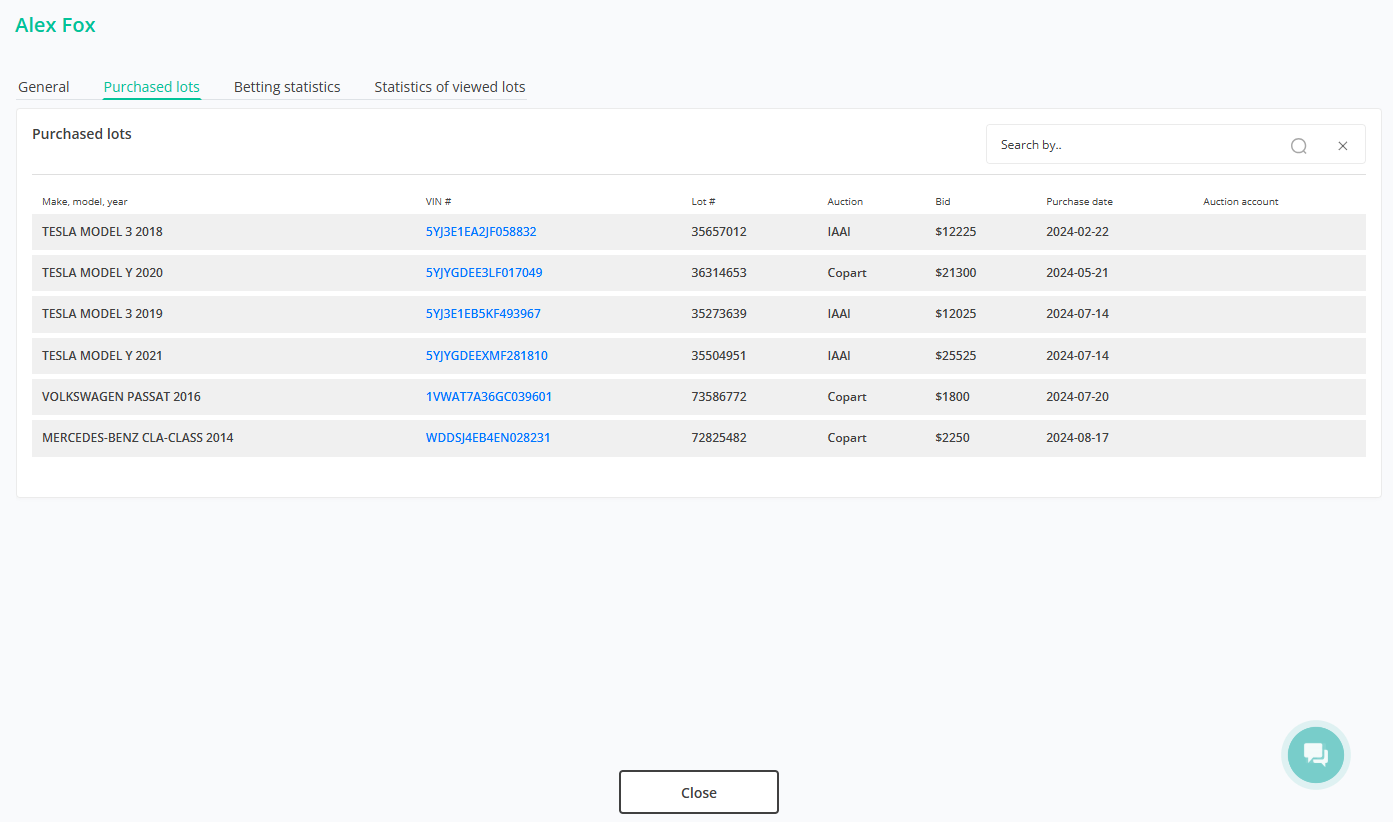 Figure 8 - The “User. Purchased lots”
The Bidding Statistics tab contains information such as VIN, lot number, auction at which the lot was purchased, event type (live or not), bids placed, country and city of participation, and the type of device used to participate (Figure 9).
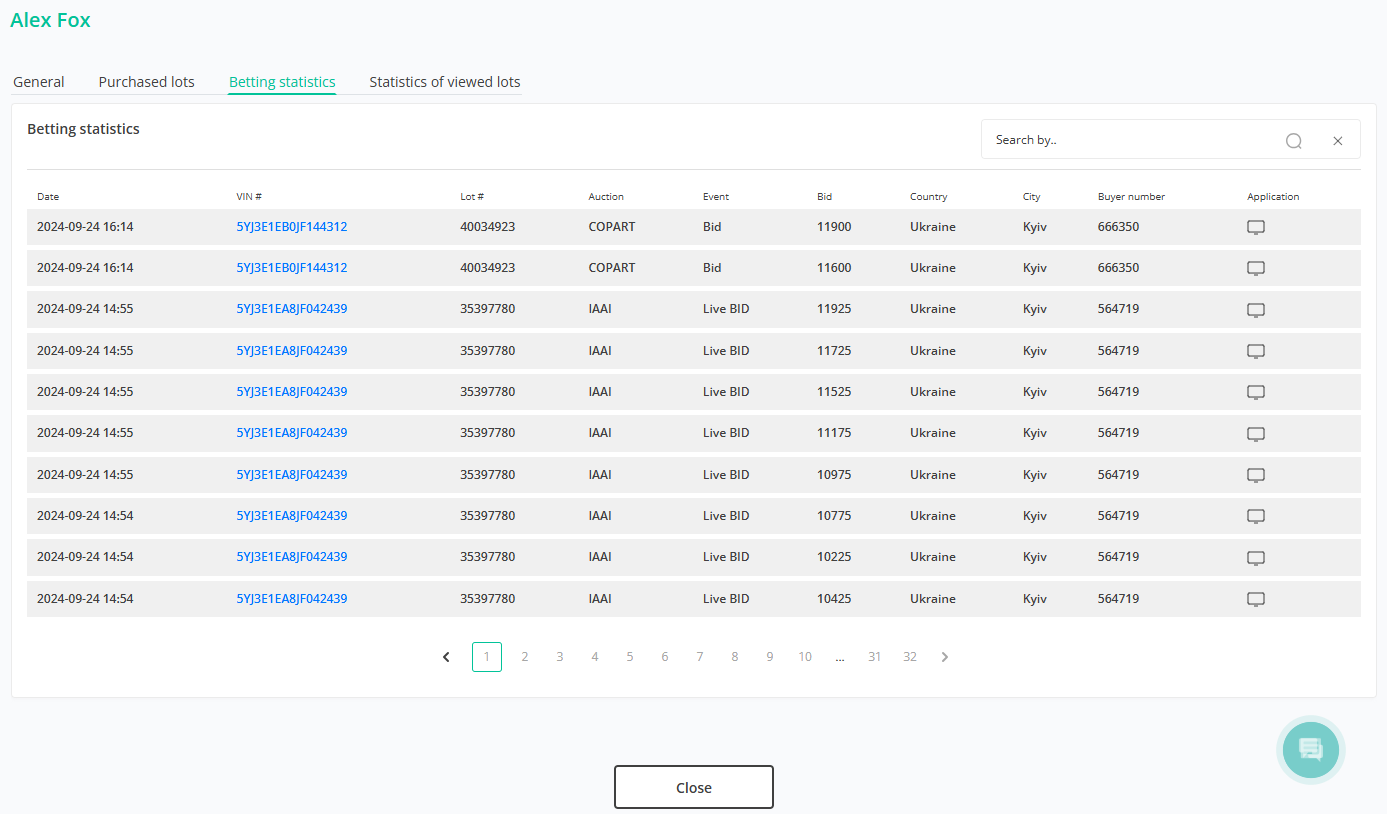 Figure 9 - The “User. Statistics of bets”
The Viewed Lots tab is used to display information about vehicles that have been viewed. Here you can keep track of the lots that have attracted the user's attention, getting detailed information about each viewed vehicle, including VIN, make, model, year of manufacture, auction where the lot is posted, country and city of the user, and account number (Figure 10).
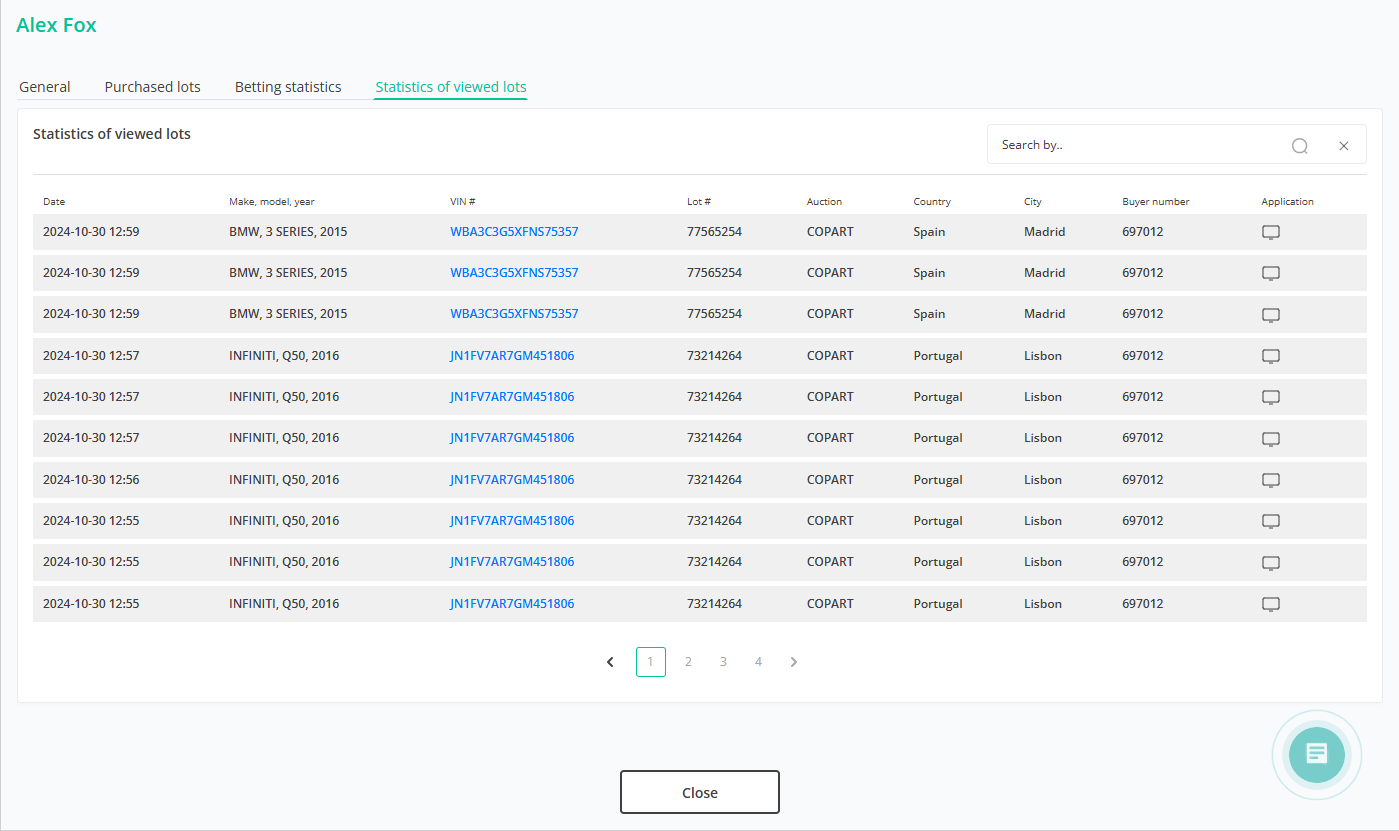 Figure 10 - The “User. Viewed lots”
After editing the user, to save the data, click on the “Save” button, to cancel, click on the “Cancel” button.
Deleting a user
In order to delete a user, click on the button ![]() , which is located on the right side of the entry in the table area (Figure 2, Pointer 4). After that, a window will open in which to confirm the deletion, click on the “Delete” button, and to cancel, click the “Cancel” button (Figure 11).
, which is located on the right side of the entry in the table area (Figure 2, Pointer 4). After that, a window will open in which to confirm the deletion, click on the “Delete” button, and to cancel, click the “Cancel” button (Figure 11).
As a result, the user will be absent from the tablespace.
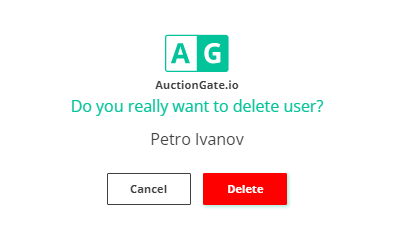 Figure 11 - Confirming/Canceling User Deletion
Mass editing function for users
The bulk user editing function provides a convenient way to simultaneously edit the same type of data in several records.
To use this feature, follow these steps:
In the table, select the checkbox ![]() next to each user you want to edit (Figure 2, Pointer 5).
next to each user you want to edit (Figure 2, Pointer 5).
After marking the users, a panel with bulk editing options appears at the bottom of the table, where you can use the available options to change the parameters (Pointer 6).
Note: Selecting the For All checkbox (Pointer 7) will select all users, so that changes can be applied to all at once.
Available options:
-
Deleting a user - in the bulk editing panel, select the "Delete" option (Figure 12, Pointer 1), after which a window opens in which you can click the "Yes" button to confirm the deletion, or the "No" button to cancel it. As a result, the user will be deleted from the table.
 Figure 12 - Delete option
-
Change the user status - in the bulk editing panel, select the "Set status" option (Figure 13, Pointer 1), then select the status from the drop-down list and confirm the changes by clicking the "Apply" button (Pointer 2).

Figure 13 - Option to change the user status
-
Install an employee - select the "Set employee" option (Figure 14, Pointer 1), then select the desired employee from the available options and click the "Apply" button (Pointer 2).
Note: For an employee with the role of "Operator," this option is not available, as this employee has access only to users assigned to them.
 Figure 14 - The option to change an employee
-
Setting up a Copart/IAAI/Manheim account - select the "Set account Copart/IAAI" option (Figure 15, Pointer 1), then select the required account from the available options and click "Apply" (Pointers 2) to save the changes.
 Figure 15- Account assignment option
-
Setting the price list - select the "Set price list" option (Figure 16, Pointer 1), then select the required account from the available options and click "Apply" (Pointer 2) to save the changes.
 Figure 16- Option to assign a price list
Note: The list of employees, accounts, and price lists available for use displays only those with the "Active" status.
-
To display purchased lots, select the "Set Purchased Lot" option (Figure 17, Pointer 1). Then, decide whether to show the purchased lots to the client fully, partially, or not at all. Click "Apply" (Pointer 2) to save the changes.
 Figure 17 - Purchased Lots Display Option


