


AuctionGate | Account management - Page "Auction"
The “Auctions” page is a section that provides information on all vehicles purchased through auction accounts. It displays detailed information for each lot.
The “Auctions” page offers users a convenient and multifunctional tool for managing lots purchased through various auction accounts.
To get started, you need to connect your auction accounts. To do this, go to the menu and open the “Accounts” section. Add accounts from the Copart and IAAI auctions. After adding the accounts, the system will automatically activate synchronization, and all purchased lots will begin to appear in the table.
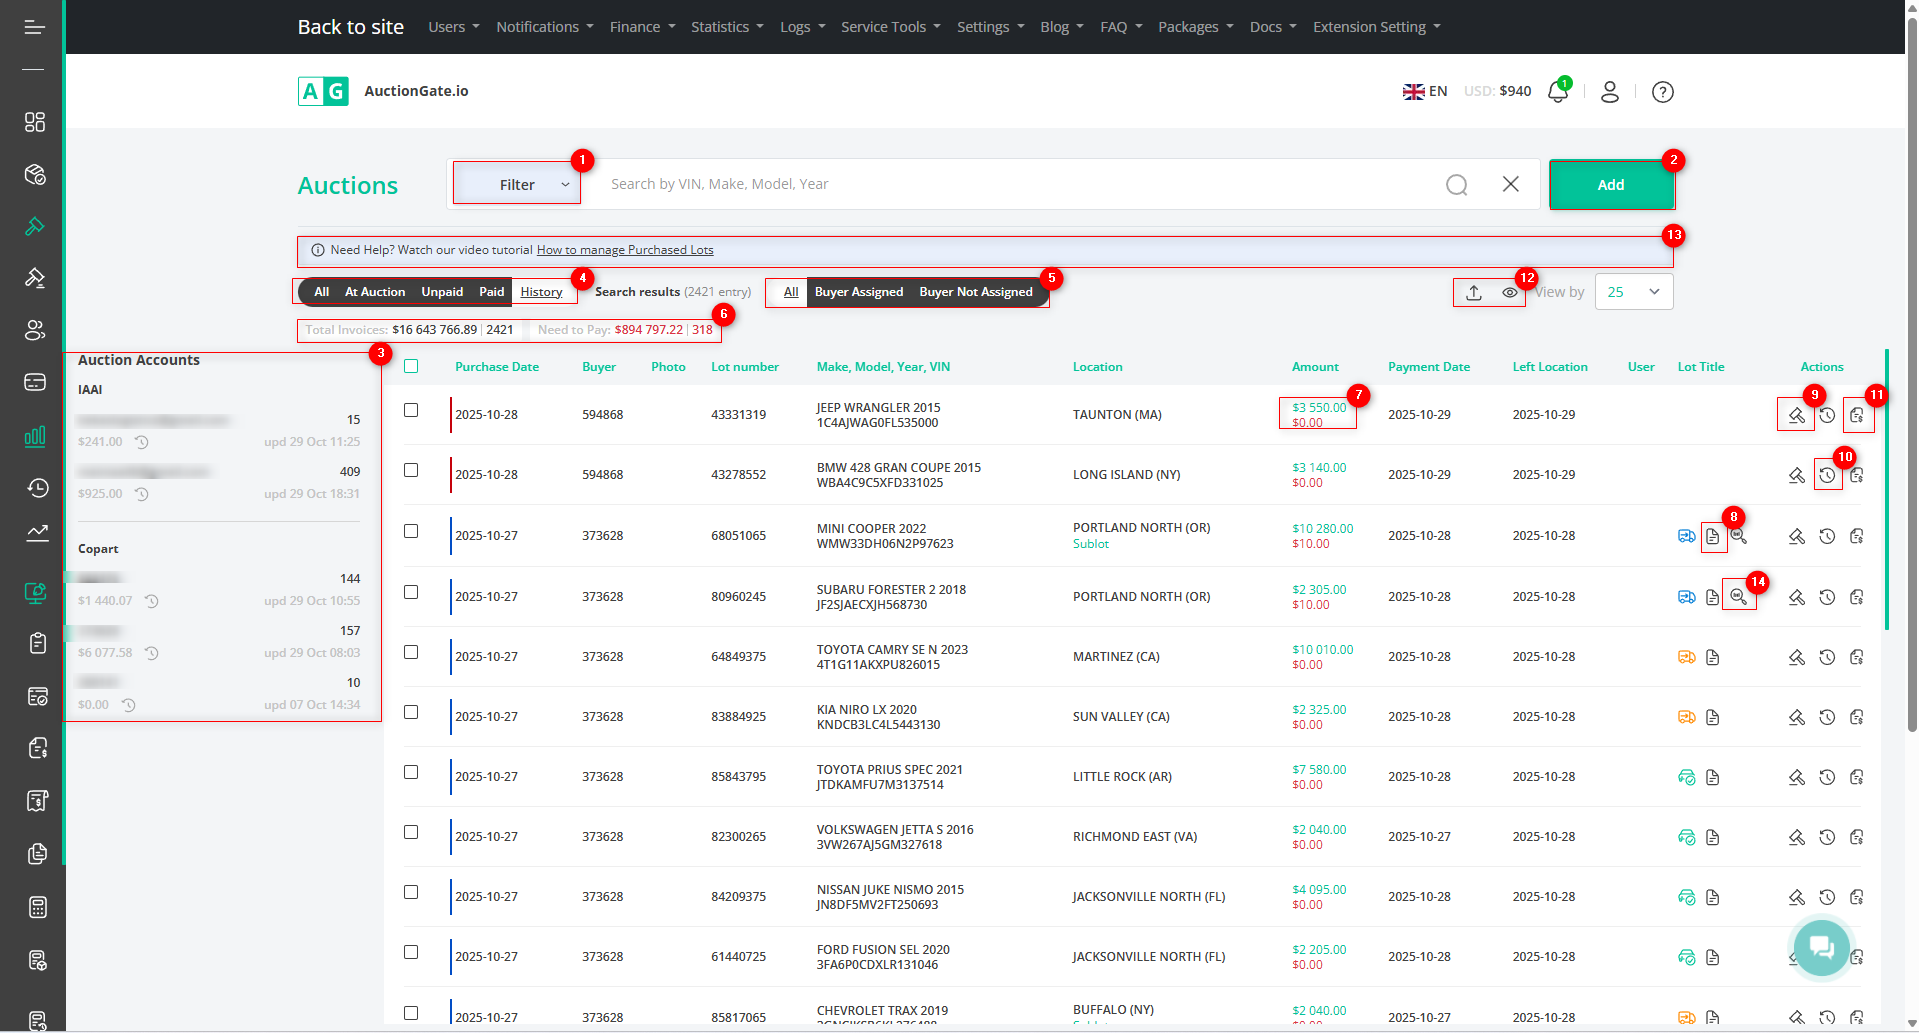
Figure 1 – “Auctions” site page
The page features a table displaying information such as purchase date, account, make, model, year
Search
Click the “Filter” button (Figure 1, Pointer 1) to open the filter window, where you can set the search parameters (Figure 2):
-
“VIN, Make, Model, Year” – enter the required value to perform the search;
-
“Auction Location” – select the auction from the dropdown list that appears when you click the button
 , выберите аукциона;
 -
“User” – select the user from the dropdown list;
-
“Auction Account” – select the auction account from the dropdown list;
-
“Purchase Date Range” – click the empty field to select the time period for the search;
-
“Payment Date Range” – click the empty field to select the time period for the search;
-
“Departure Date from Location Range” – click the empty field to select the time period for departure from the location.
Note: You can set one or multiple parameters to perform a search.
After entering the parameters, click the corresponding button ![]() to apply the filter.
to apply the filter.
As a result, the table will display data according to the filter parameters you have set.
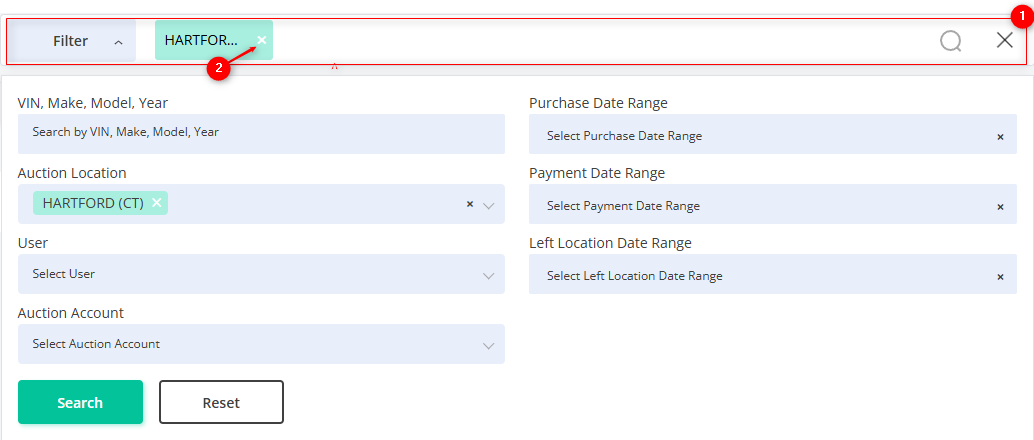
Figure 2 – “Filter” Window
The search bar allows you to search by any parameter (Figure 2, Pointer 1). To do this, enter any query and click the button ![]() located in the search bar, or press the “Enter” key on your keyboard. The table will then display the records matching the entered parameters.
located in the search bar, or press the “Enter” key on your keyboard. The table will then display the records matching the entered parameters.
To clear the entire search window and reset the filter, click the corresponding button ![]() . To remove a single parameter, click the cross icon located within the query field (Figure 2, Pointer 2).
. To remove a single parameter, click the cross icon located within the query field (Figure 2, Pointer 2).
Deals Table
The deals table displays information about each vehicle, providing the following key details:
-
“Purchase Date” – the date the lot was purchased.
-
“Account” – the account number from which the purchase was made.
-
“Photo” – image of the vehicle.
-
“Lot Number” – the lot’s identification number.
-
“VIN” – the vehicle identification number.
-
“Make, Model, Year” – information about the vehicle.
-
“Location” – information about the auction location.
-
“Amount” – the amount paid for the lot.
-
“Payment Date” – the date the vehicle was paid for.
-
“Departure Date” – the date the vehicle left the auction location.
-
“User” – information about the user who completed the transaction.
-
“Document” – information on the availability of documents for the vehicle.
Note: Clicking on the amount (Figure 1, Pointer 7) will open a window displaying information with the invoice date, and by clicking on ![]() a PDF invoice will open, which can be printed or downloaded to your computer.
a PDF invoice will open, which can be printed or downloaded to your computer.
Filtering by status is also available. The page includes a toggle to select lots by status (Figure 1, Pointer 4):
-
“All” – displays all available lots regardless of status;
-
“On Auction” – lots currently on auction and not yet removed;
-
“Paid” – lots that have been paid for but do not have a departure date;
-
“Unpaid” – lots for which payment has not been made;
-
“History” – lots that have been removed from the auction site.
There is also a toggle to filter lots by buyer availability (Figure 1, Pointer 5):
-
“All” – displays all available lots without restrictions.
-
“Buyer Assigned” – lots that have an assigned buyer;
-
“Buyer Not Assigned” – lots without an assigned buyer.
The page also includes a counter displaying the number of lots in the following categories: “Total Amount”, “Need to Payment”. To work with the counter, use the checkbox to select the desired lots (Figure 1, Pointer 6).
On the left, in the “Auction Accounts” block, a list of connected accounts is displayed (Figure 1, Pointer 3). By clicking the button ![]() , a window with the account balance history will open, showing all incoming funds, all deductions from the balance, and allocations to specific lots (Figure 3).
, a window with the account balance history will open, showing all incoming funds, all deductions from the balance, and allocations to specific lots (Figure 3).
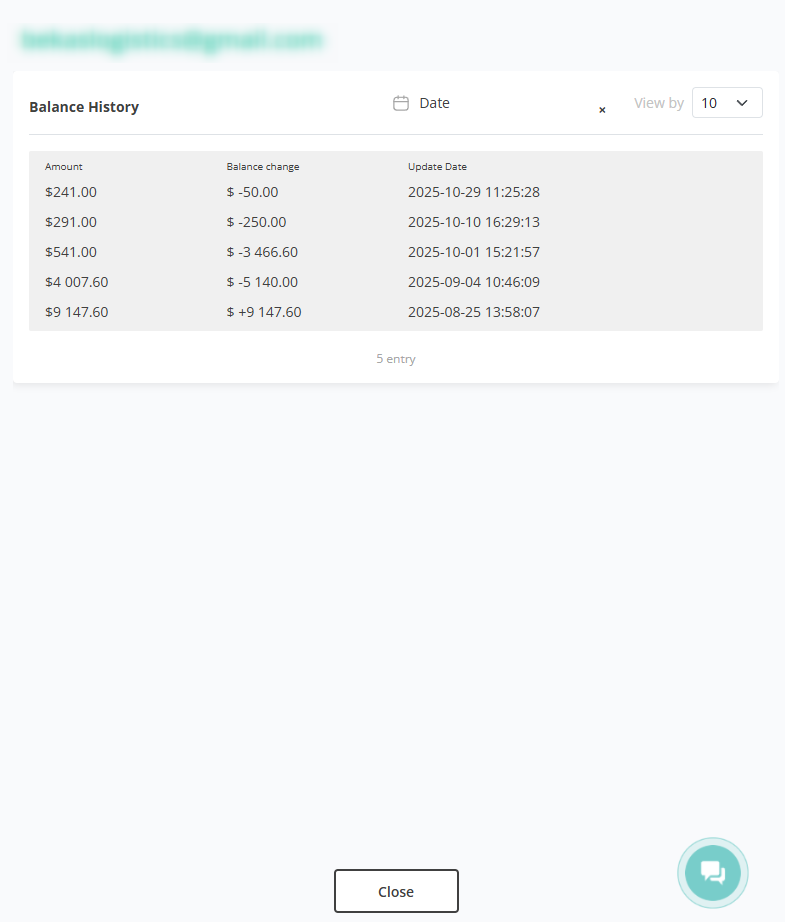
Figure 3 – Account Balance History Window
Add a Purchased Lot
To add a lot, click the “Add” button (Figure 1, Pointer 2). This will open the “Add Purchased Lot” window (Figure 4) with the following fields to fill out:
-
“Select Auction” – choose the required auction from the dropdown list that appears when you click the button
 , choose the required auction;
 -
“VIN” – enter the vehicle’s VIN number;
-
“Lot Number” – enter the purchased lot number;
-
“Make” – enter the vehicle’s make;
-
“Model” – enter the vehicle’s model;
-
“Year” – enter the vehicle’s year of manufacture;
-
“Purchase Price” – enter the amount paid for the lot;
-
“Account” – select the account from which the purchase was made from the dropdown list.
To save the data, click “Create”. To exit the add window without saving, click “Cancel”.
By clicking the button ![]() (Figure 1, Pointer 9) opens a window displaying bid statistics for the given VIN number, and by clicking
(Figure 1, Pointer 9) opens a window displaying bid statistics for the given VIN number, and by clicking![]() (Figure 1, Pointer 10) opens a window showing the lot history for the given VIN number.
(Figure 1, Pointer 10) opens a window showing the lot history for the given VIN number.
By clicking the button![]() ((Figure 1, Pointer 8) opens a document in PDF format, which can be printed or downloaded to your computer.
((Figure 1, Pointer 8) opens a document in PDF format, which can be printed or downloaded to your computer.
By clicking the button ![]() (Figure 1, Pointer 14) will redirect you to the tracking service page to monitor the lot.
(Figure 1, Pointer 14) will redirect you to the tracking service page to monitor the lot.
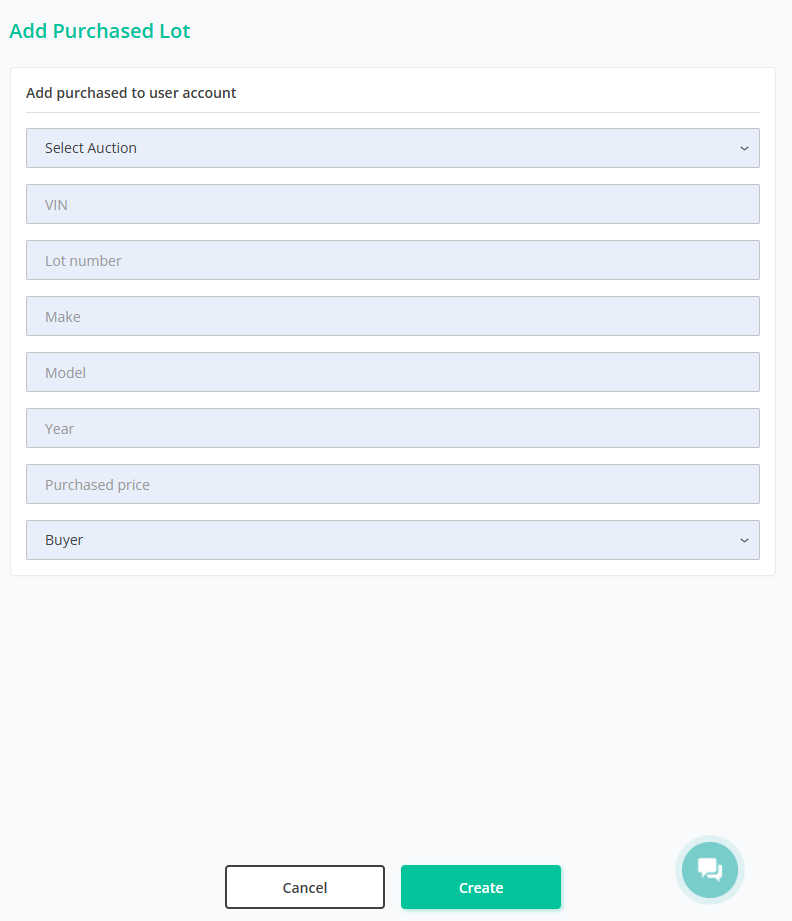
Figure 4 – “Add Purchased Lot” Window
To create an invoice for the lot, click the button![]() (Figure 1, Pointer 11). This will open the “Create Invoice” window (Figure 5) with the following field to fill out:
(Figure 1, Pointer 11). This will open the “Create Invoice” window (Figure 5) with the following field to fill out:
-
“VIN” – enter the required vehicle VIN number.
Note: By clicking the “Search” button at the top of the “VIN” field (Figure 5, Pointer 1), the fields “Lot”, “Auction”, and “Year, Make, Model” will be filled in automatically.
-
“Auction” – select the required auction from the dropdown list that appears when you click the button
 ;
; -
“Year, Make, Model” – enter the required information;
-
“Payer Full Name” – enter the required information;
-
“Lot” – enter the lot number;
-
“Account” – select the required account number from the dropdown list;
-
“Amount” – enter the amount paid for the lot;
-
“Payer Document Number” – enter the required information;
-
“Payer Registration” – enter the payer’s registration details.
To save the data, click “Save”. To exit the add window without saving, click “Cancel”.
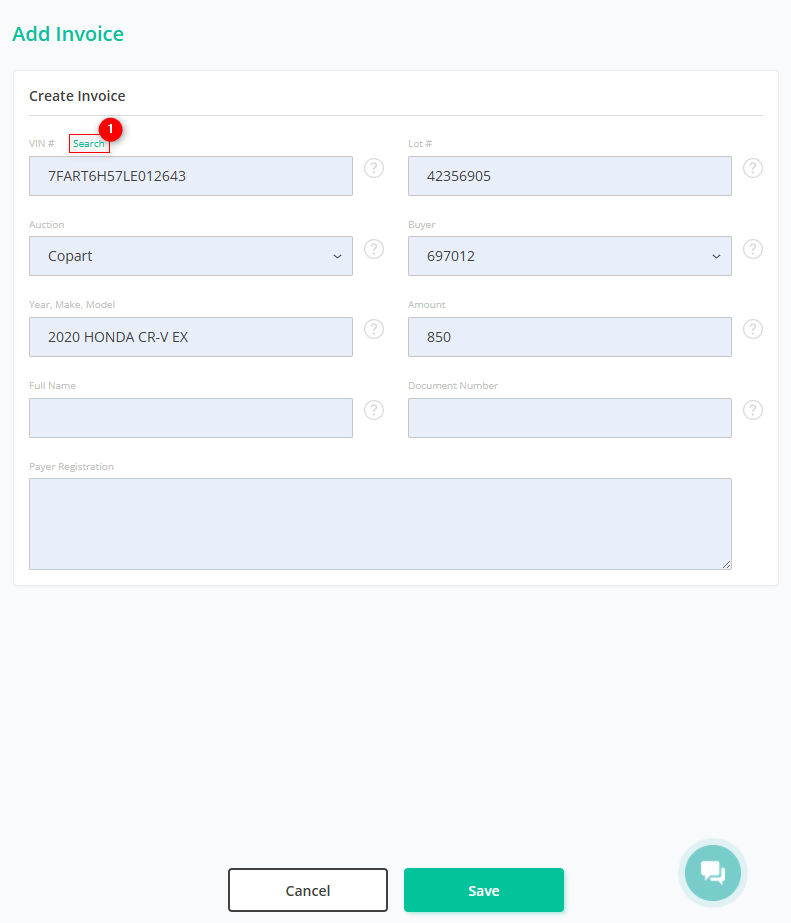
Figure 5 – “Create Invoice” Window
By clicking on ![]()
![]() (Figure 1, Pointer 7) opens the export window, where you can download information about the purchased lot. To select the desired format, click the button and choose from the dropdown list (Figure 4, Pointer 1). To download updated information about the lot, click “Start” (Figure 4, Pointer 2). To cancel, click “Cancel” (Figure 4, Pointer 3). To download the completed export in XLSX format, click “Download XLSX” (Figure 4, Pointer 4).
(Figure 1, Pointer 7) opens the export window, where you can download information about the purchased lot. To select the desired format, click the button and choose from the dropdown list (Figure 4, Pointer 1). To download updated information about the lot, click “Start” (Figure 4, Pointer 2). To cancel, click “Cancel” (Figure 4, Pointer 3). To download the completed export in XLSX format, click “Download XLSX” (Figure 4, Pointer 4).
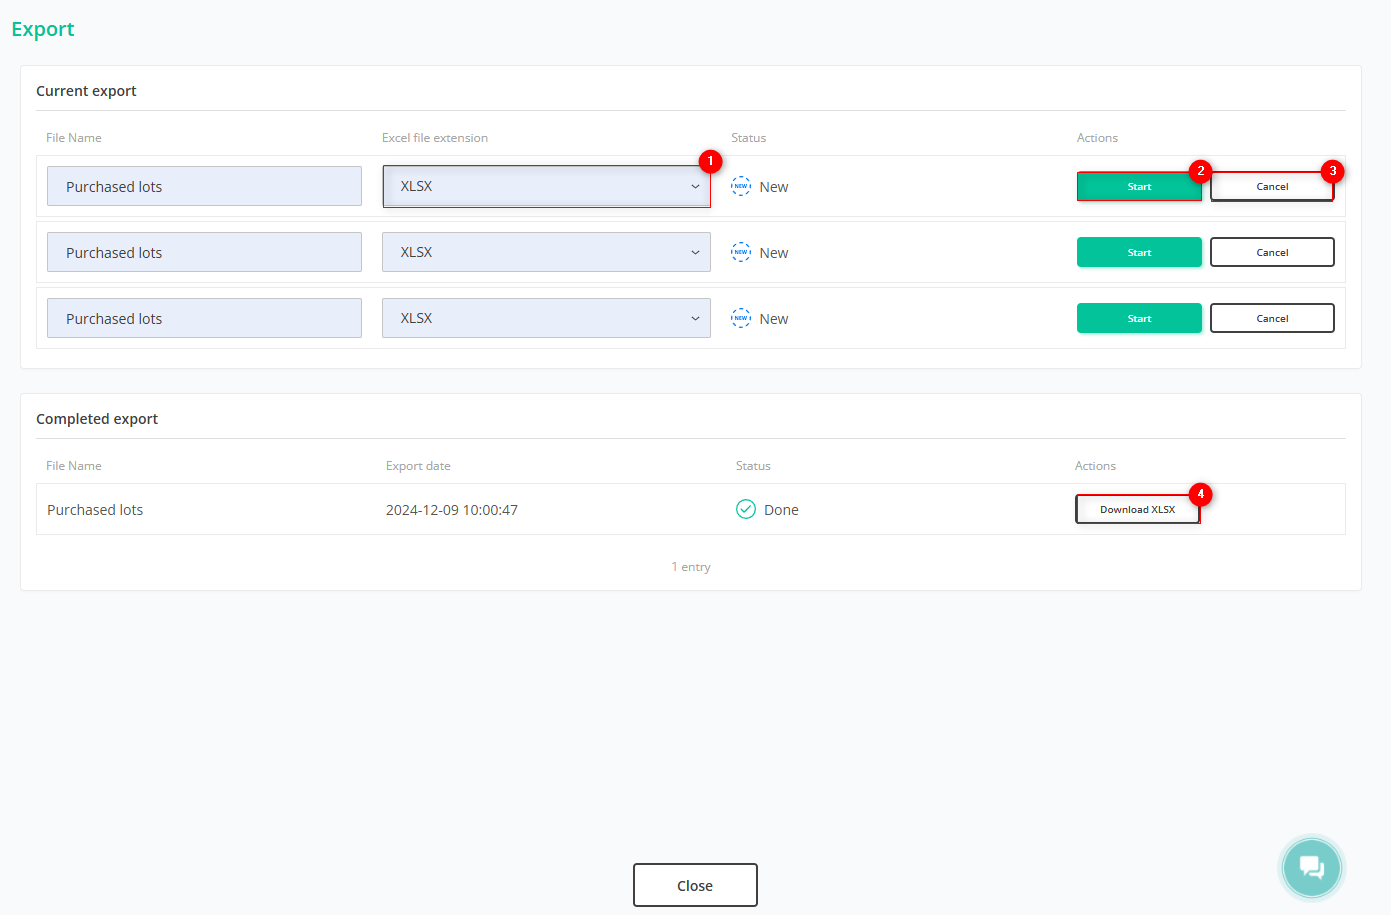
Figure 6 – “Export” Window
Note: If you need help using the page, click the link at the top of the table (Figure 1, Pointer 13) to open a window with a video tutorial.