


AuctionGate | Logistic CRM system - How to edit a client?
To edit a client, select the required entry in the table and click the button (Figure 1, Pointer 1).

Figure 1 - Client website page
As a result, the “Client” window will open, which includes three tabs: “General”, “Deals”, “Invoice” and “Invoices settings” (Figure 2, Pointer 1) .
Tab General:
Includes general information about the client, to make fields editable, click "Edit" (Figure 2, Pointer 2).
- Block “Authorization data”. This block displays information with general information about the client:
-
“Select status” - set client activity;
-
“Responsible” - from the drop-down list that opens when you click the button
 , select the employee who will be assigned to the client;
 -
"First name” - enter the client's name;
-
"Last name" - enter the client's last name;
-
“Email” - indicate the client's email address;
-
"Phone" - indicate the client's phone number;
-
"Password" - specify the password for the client. The password must be 5 or more characters.
-
“Confirm password” - Repeat password.
Note: The fields Status, First Name, Last Name, Email, Password, Confirm Password are mandatory.
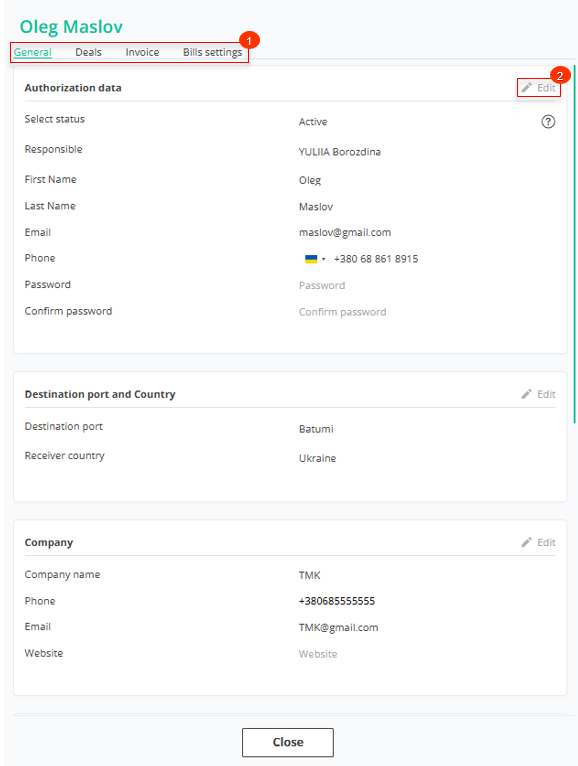 Figure 2 - User” window/General tab
- Block "Destination port and Country" serves to indicate the port of destination and the country where the shipment is intended:
-
“Destination port” - from the drop-down list that opens when you click the button
, select the port to which the vehicle is heading; -
“Receiver country” - from the drop-down list that opens when you click the button
, select the country to which the vehicle is heading;
- Block “Company” This block displays general information about the client’s company:
-
“Company name” - enter the client's company name;
-
“Phone” - enter the company phone number;
-
“Email” - provide the company email address;
-
"Website" - company website;
- Block “Company Address”. This block displays information about the company's location:
-
“Address line 1” - enter the main address of the company;
-
“Address line 2” - indicate an additional address (if necessary);
-
“Country” - indicate the country where the company is located;
-
“City” - enter the city where the company is located;
-
“State” - indicate state;
-
“ZIP code” - enter postal code;

Figure 3 - Continuation of the “Client” window
- “Note” block provides the ability to add notes or additional information that may be useful to describe features or additional customer data .
- Block “Price lists” intended for setting a price list for the client. From the drop-down list that opens when you click the button ![]() select the desired price list for the client. To edit, click “Edit”, then select the desired price list.
select the desired price list for the client. To edit, click “Edit”, then select the desired price list.
- Block "Synchronization of AuctionGate" which allows you to enable synchronization with the "AuctionGate" account management. When synchronization is activated, the lots purchased through "AuctionGate" will be automatically synchronized with your account, and transactions will be created for them.
To do this, enable synchronization on the "Settings" page under the "Automation" tab. Then, fill in the “API key” field — enter the key found in the "AuctionGate" account management section in the client window in the CRM key field. After that, click the “Synchronize customer lots” button (Figure 3, Pointer 1). After successful synchronization, the status “Yes” will be displayed in the “Synchronization of lots by client” field.
To save data, click on the button “Save” , in case of cancellation button “Close” .
To save the changes, click the "Save" button. Use the "Close" button to close the window.
Deals tab:
The Transactions tab provides a summary of the customer's transactions, including the stage the vehicle is in. Data is also provided on the date of sale, VIN number, make, model, year of manufacture of the vehicle, and also indicates the warehouse where the vehicle is located.
When you click on the vehicle (Figure 4, Pointer 1), a transaction window will open with full information about the transaction, providing the opportunity to enter or edit data.
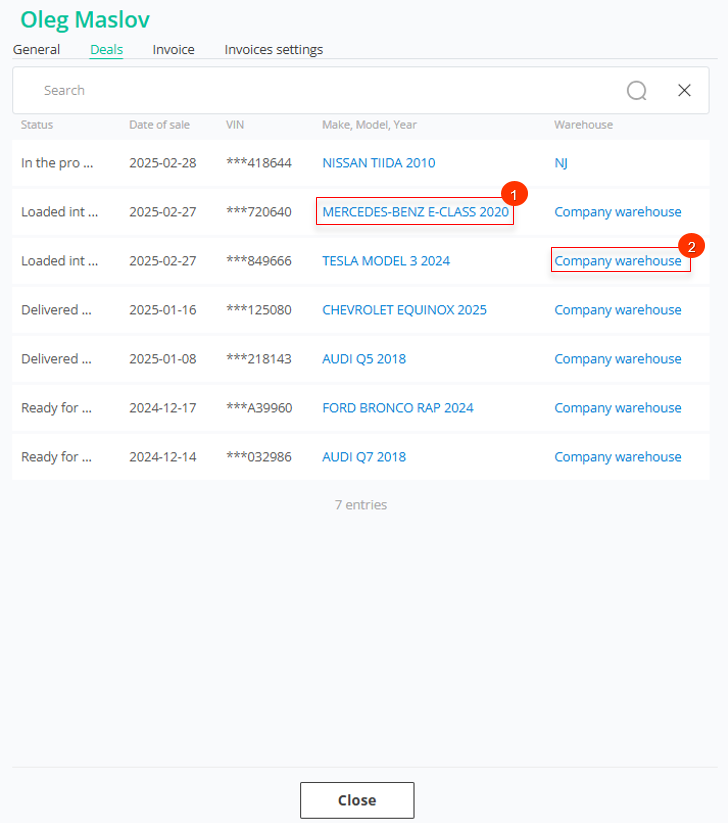
Figure 4 - "User"/Deals window
Clicking on a warehouse (Figure 5, Pointer 2) will open the "Warehouse" window, which will show all the vehicles in that warehouse. For each of them, information about the current stage of the transaction, the customer and the delivery date will be available (Figure 6).
Note: Only those vehicles that are at the stages Delivery to warehouse, Ready for loading, In the process of loading will be displayed in the warehouse.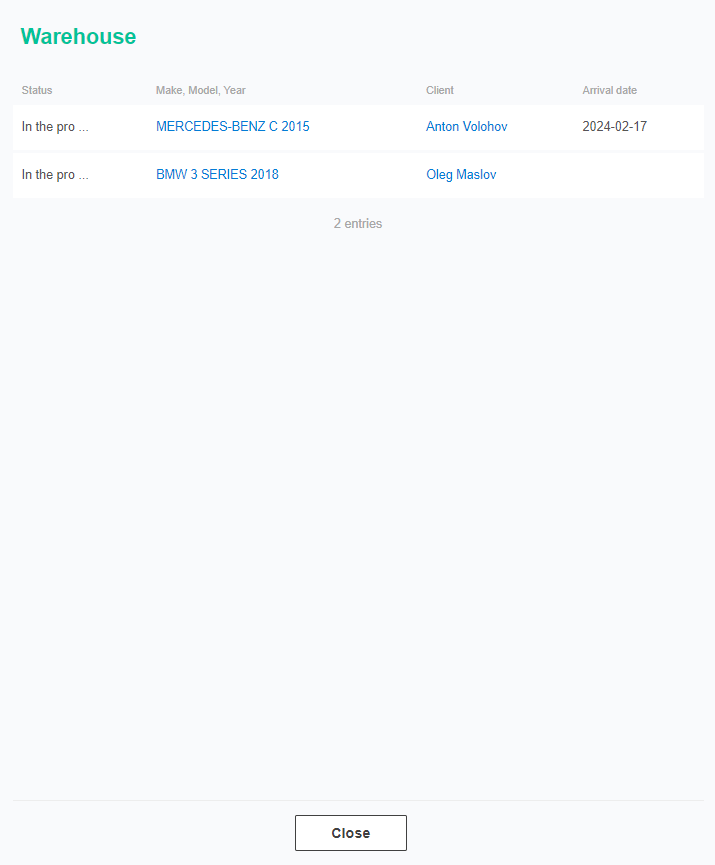
Figure 5 - "Warehouse" window
Invoice tab:
The Account tab summarizes information about the client's invoices, including status, invoice number, creation date, invoice amount, payment date, and payment amount. It also displays a counter showing the total number of invoices, the total amount of invoices, and the amount of paid, unpaid, and overdue invoices (Figure 6, Pointer 3).
 Рисунок 6 - "User"/Invoice window
When you click on the account number (Figure 6, Pointer 1), the account window will open, which will provide detailed information about the specific client account. Here you can edit and make changes to the invoice details. For a detailed description of the page, see the "Accounts" website page.
When you click on the vehicle (Figure 6, Pointer 2), a window will open with complete information about the transaction, providing the opportunity to enter or edit data.
For a detailed description of the page, see the "Transactions" page of the site.
Tab Invoices settings:
This tab is used to configure client products and services. This functionality is designed to individually set prices for each client.
To add a product, click the button "Add line" (Figure 7, Pointer 1), then select a product from the drop-down list, set its price, as well as its activity status (Pointer 2).
To remove a product, click ![]() . To save the list of products, click on the “Save” button (Pointer 3).
. To save the list of products, click on the “Save” button (Pointer 3).
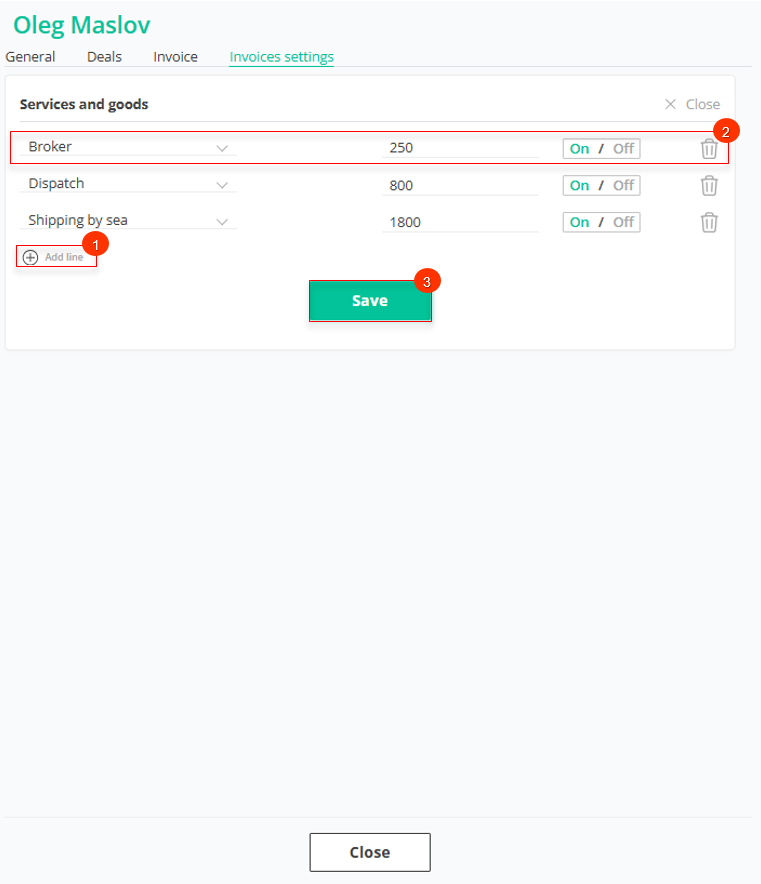
Figure 7 - "User" window / Bills settings
After setting an individual price for a customer, it will be applied when calculating the delivery in the Deals modal window. If the customer has a price set for a product that matches an item from the price list, and the product is active, the customer’s price will be used. If the product is disabled or missing from the customer's settings, the price from the general price list will be applied.