AuctionGate | Logistic CRM system - Page "Deals" - List
On the "Deals" page, you will find a search bar, a filter for specified parameters, an option to add a vehicle, and a deals table displaying a full list of vehicles purchased at auction with all relevant information. This includes details such as the make, model, year of manufacture, VIN, deal status, client, auction, and more (Figure 1). Additionally, a bulk editing feature for deals is available.
 Figure 1 - "Deals" page
Search
Search by Specified Parameters:
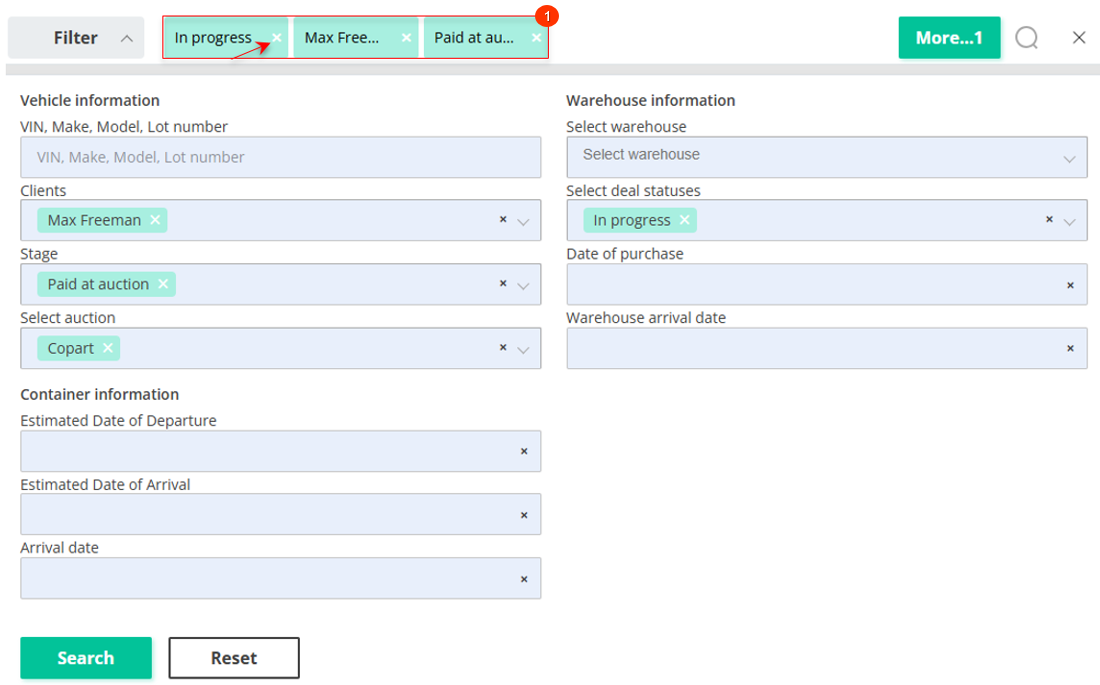
Click the “Filter” button (Figure 1, Pointer 1) to open the filter window, where you can set search parameters (Figure 2):
- “Clients” - from the dropdown menu that opens when clicking the
 button , select a client;
 - “Stage” - set the deal stage;
- “Select auction” - from the dropdown menu, select an auction;
- “Select warehouse” - select a warehouse;
- “Select deal statuses” - choose the deal status;
- “Date of purchase” - when clicking on the empty field, select a specific date or date range for the search;
- “Warehouse arrival date” - set a specific date or date range for the warehouse arrival to search for;
- “Estimated Date of Departure” - when clicking on the empty field, select a specific date or date range for the departure date to search for;
- “Estimated Date of Arrival” - when clicking on the empty field, select a specific date or date range for the estimated arrival date to search for;
- “Arrival date” - when clicking on the empty field, select a specific date or date range for the arrival date to search for.
Note: You can search using one or multiple parameters.
Once the parameters are set, click the ![]() button to display the filtered results in the table.
button to display the filtered results in the table.

Figure 2 - "Filter" Window
Search Using the Search Bar:
The search bar enables searches by any parameter (Figure 2, Pointer 1). Enter a query and click the ![]() button in the search bar or press "Enter" on your keyboard. Matching records will be displayed in the table.
button in the search bar or press "Enter" on your keyboard. Matching records will be displayed in the table.
To clear the search and reset the filter, click the ![]() button. To remove an individual parameter, click the cross icon in the query field (Figure 2, Pointer 2).
button. To remove an individual parameter, click the cross icon in the query field (Figure 2, Pointer 2).
Search by Counters:
The page features counters that provide information about deals missing a client, warehouse, port, destination country, required documents, or unpaid invoices (Figure 1, Pointer 3). Clicking on a counter item automatically filters and displays the relevant deals, offering a convenient way to quickly address incomplete information.
Deals Table
The deals table contains details about each vehicle, highlighting key aspects such as:
- Status - provides information about the current stage of the vehicle;
- Date of sale;
- Invoice, USD - the total amount of invoices issued for the vehicle. If the amount is highlighted in red, it indicates that the invoices for this amount have not been paid. If the amount is highlighted in green, it means that the invoices have been paid (Figure 3, Pointer 1);
- VIN - the table displays the last 6 characters of the VIN. Clicking on it opens a window where the full VIN is displayed. To copy it, click the
 button (Pointer 2);
 - Make, Model, Year - clicking on the information about the make, model, and year of the vehicle in the deals table (Pointer 3) opens the lot view page, where detailed information about the selected vehicle is provided (see the "Lot View" description);
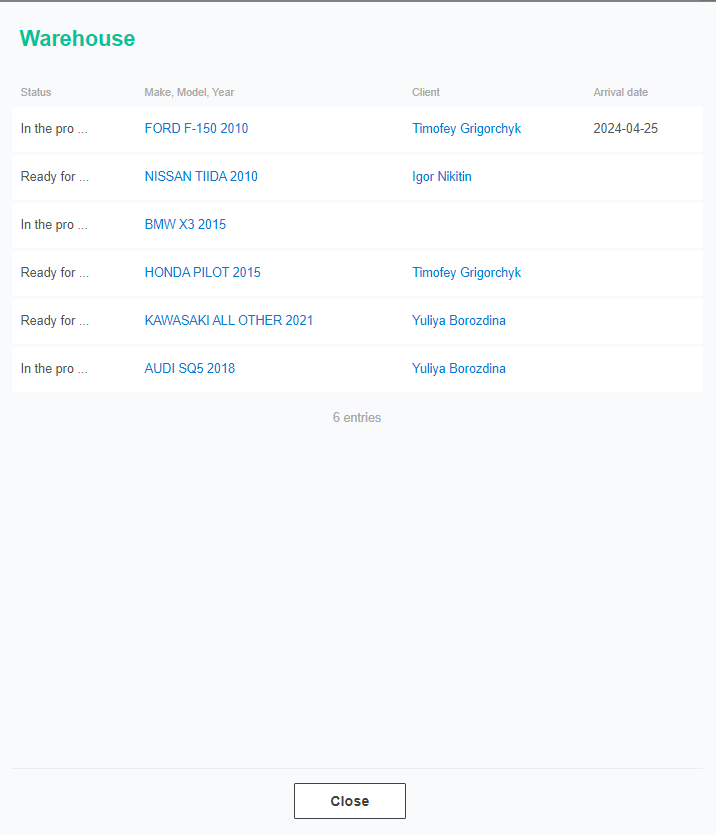
- Warehouse - clicking on the warehouse name (Pointer 4) opens a window containing information about the deal stage, all vehicles located at the warehouse, client information, and arrival date (Figure 4);
- Client - clicking on the client's name (Pointer 5) opens a window with complete information about the client, where you can make necessary changes (see the "Clients" page description);
- Responsible - clicking on the employee's name (Pointer 6) opens a window with general information about the employee, where you can make necessary changes (see the "Employees" page description);
- Logistic comp. SYNC - the table displays the logistics company responsible for transporting the vehicle.
 Figure 3 - Functionality in the table of transactions
 Figure 4 - "Warehouse" window
To view a lot, click the ![]() button (Figure 3, Pointer 7). This opens the lot viewing page with full vehicle details, enabling invoice creation and customs document uploads (see the "Lot View" description).
button (Figure 3, Pointer 7). This opens the lot viewing page with full vehicle details, enabling invoice creation and customs document uploads (see the "Lot View" description).
To edit deal data, click the ![]() button (Figure 3, Pointer 8) located to the right of the table entry. This opens a window where you can review and modify deal information (see the "Lot Editing" description).
button (Figure 3, Pointer 8) located to the right of the table entry. This opens a window where you can review and modify deal information (see the "Lot Editing" description).
Bulk Editing Deals
The bulk editing feature on the "Deals" page simplifies the process of applying uniform changes to multiple records at once.
Steps to Use Bulk Editing:
In the deals table, mark the ![]() next to each deal you want to edit (Figure 1, Pointer 4).
next to each deal you want to edit (Figure 1, Pointer 4).
A bulk editing panel will appear at the bottom of the table. Use the available options to modify deal parameters (Pointer 5).
Available Options:
- Delete Deals - Select the “Delete” option on the bulk editing panel (Figure 5, Pointer 1). A confirmation window will appear; click “Yes” to delete or “No” to cancel.
 Figure 5 - Delete Option
- Change Deal Stage - Select "Set stage" on the bulk editing panel (Figure 6, Pointer 1). Choose a stage from the dropdown menu and confirm by clicking “Apply” (Pointer 2).
 Figure 6 - Change Deal Stage Option
- Assign Employee - Select "Set responsible" (Figure 7, Pointer 1). Choose an employee and click “Apply” (Pointer 2) to save changes.
 Figure 7 - Assign Employee Option
- Assign Client - Select "Set client" (Figure 8, Pointer 1). Choose a client and click “Apply” (Pointer 2) to save changes.
 Figure 8 - Assign Client Option
- Assign Warehouse and Destination Country - Select the corresponding options on the bulk editing panel and follow the instructions above.
Note: Checking the "Select All" box applies changes to all deals simultaneously.
Kanban and Client Panel
The "Deals" page features a toggle switch, allowing you to choose the page view mode (Figure 1, Pointer 2).
If the "Funnel" option is selected, you will be redirected to the sales funnel page, displaying the entire deal process from start to finish (see the "Kanban Block" description).
If the "Client panel" option is selected, you will be redirected to a page displaying a list of all clients with the number of deals for each. Clicking on a client’s name shows invoices associated with that client only (see the "Client Panel" description).


