AuctionGate | Logistic CRM system - Section "Company and requisites"
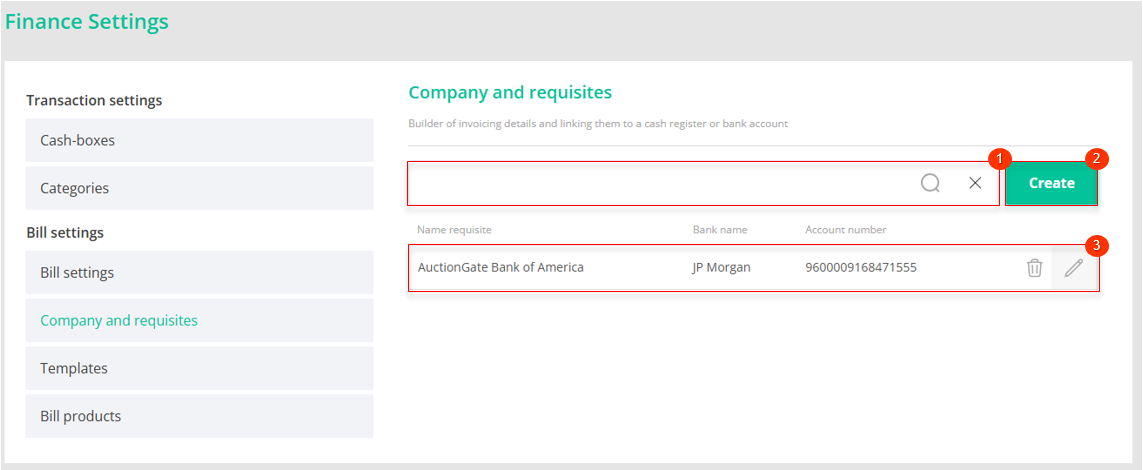
The "Company and requisites" section provides an opportunity to manage information about company details. In this section a search bar and a table displaying the list of details are available. This section is intended for creating, editing and deleting details.

Figure 1 - Section "Company and requisites"
This section is searched by Name requisite, Bank name and Account number (Figure 1, Pointer 2). Enter a value in the search bar and press the ![]() button which is located in the search bar or press the "Enter" key on the keyboard. As a result, the found records will be displayed in the table on the page.
button which is located in the search bar or press the "Enter" key on the keyboard. As a result, the found records will be displayed in the table on the page.
To clear the search box and reset the filter, click on the ![]() button.
button.
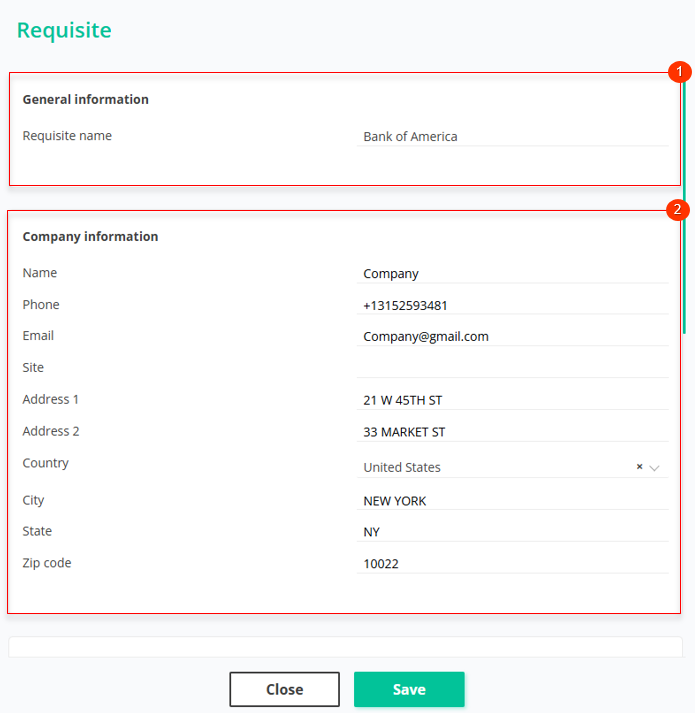
In order to create requisites, click on the "Create" button (Figure 1, Pointer 1). This will open the "Requisite" window (Figure 2), which presents 5 blocks of information:
- The "General information" block. This block displays information with general information about the requisite (Figure 2, Pointer 1):
-
“Requisite name” - enter the name of the requisite;
Note: this field is mandatory.
- Block "Company information". This block displays general information about the company necessary for interaction within the services provided. Fill in the following fields:
-
“Name” - enter the name of the company that will provide the service;
-
“Phone” - provide a company phone number;
-
“Email” - provide the company's e-mail address;
-
“Site” - company website;
-
“Address 1” - enter the main address of the company;
-
“Address 2” - provide an additional address (if necessary);
-
“Country” - select a country from the drop-down list that opens when you click on the
button;
Note: To reset the country, press the button.
-
“City” - enter the city where the company is located;
-
“State” - specify the state;
-
"Zip code" - enter the zip code of the company;

Figure 2 - "Requisite" window
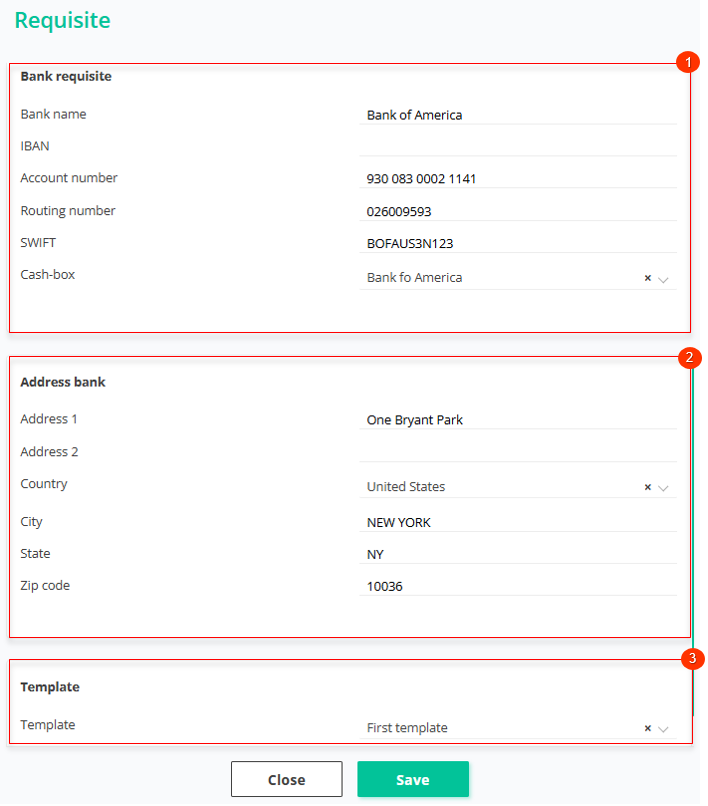
- The "Bank Requisite" block (Figure 3, Pointer 1) contains detailed information about the bank details, including:
-
“Bank name” - enter bank name;
-
“IBAN” - enter the international bank account number;
-
“Account number” - enter the account number;
-
“Routing number” - enter the routing number;
Note: Used in North America. This number identifies the specific bank where a person or company has an account and is part of the bank code of the national payment system.
-
“SWIFT” - add SWIFT code of the bank.
-
“Cash-box” - from the drop-down list that opens when you click on the
button, select a cash register;
Note: To reset the cash register, press .
- Block “Address bank”. This block contains basic information about the bank (Figure 3, Pointer 1). Fill in the following fields:
-
“Address 1” - enter the bank's primary address;
-
“Address 2” - provide an additional address (if necessary);
-
“Country” - specify the country where the bank is located;
-
“City” - enter the city where the bank is located;
-
“State” - specify the state;
-
“Zip code” - enter the bank's zip code;
- Block "Template" is intended for template installation. To select the required template, open the drop-down list that appears after clicking the button and select the appropriate option from the list. (Figure 3, Pointer 3).

Figure 3 - Continuation of "Requisite" window
To save the data, click on the "Save" button, if canceled, click on the "Cancel" button.
As a result of the actions performed, new details will be created and displayed in the table (Figure 1, Pointer 3).
To edit details, click on the ![]() button located on the right side of the record in the table. This will open the "Details" window (Figure 2), where each block will be available for changes. Clicking the
button located on the right side of the record in the table. This will open the "Details" window (Figure 2), where each block will be available for changes. Clicking the ![]() button in each block unlocks the fields, allowing you to make the necessary changes just as you did when creating (see above).
button in each block unlocks the fields, allowing you to make the necessary changes just as you did when creating (see above).
In order to delete details, click the ![]() button located on the right side of the record in the table. As a result of this action the record will be deleted from the table.
button located on the right side of the record in the table. As a result of this action the record will be deleted from the table.


