AuctionGate | Logistic CRM system - Site page "Finance Settings"
The Finance Settings page of the site includes the following sections: "Cash-boxes", "Categories", "Counterparties", "Bill Settings", "Company and requisites" and "Templates".
Sections "Cash-boxes"
In the "Cash boxes" section there is a search line and a tabular area where the whole list of cash desks is displayed. This section is intended for creating, editing and deleting a cash box.
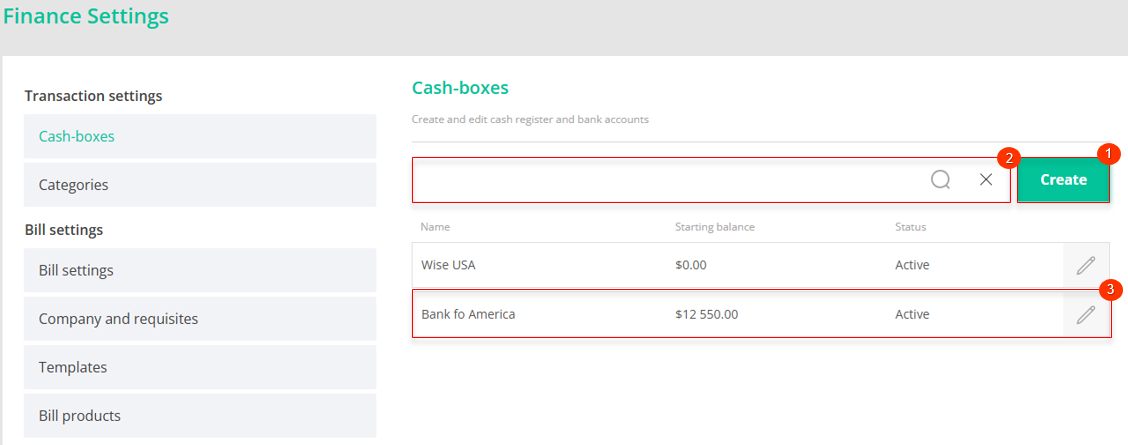
Figure 1 -Finance Settings page
In the "Cash boxes" section the search is performed by the name of the cash box (Figure 1 , Pointer 2). Enter the name in the search line and press the button ![]() located in the search bar or press the "Enter" key on the keyboard. As a result, the found records will be displayed in the tabular area on the page.
located in the search bar or press the "Enter" key on the keyboard. As a result, the found records will be displayed in the tabular area on the page.
To clear the search window and reset the filter, click on the button ![]() .
.
To create a cash box, click on the "Create" button (Figure 1, Pointer 1). After that, in the opened "Cash boxes" window (Figure 2), fill in the fields:
-
"Name" - enter the name of the cash register;
-
"Starting balance" - enter the amount of the initial balance on the account
Note: By default, the cash box will be marked as active (Figure 2, Pointer 1). If you uncheck the box, this cash box will not appear in the list of cash box when creating a transaction.
To save the data, click on the "Save" button, if canceled, click on the "Close" button.
As a result of the actions performed, a new cash box will be created and displayed in the table area (Figure 1, Pointer 3).
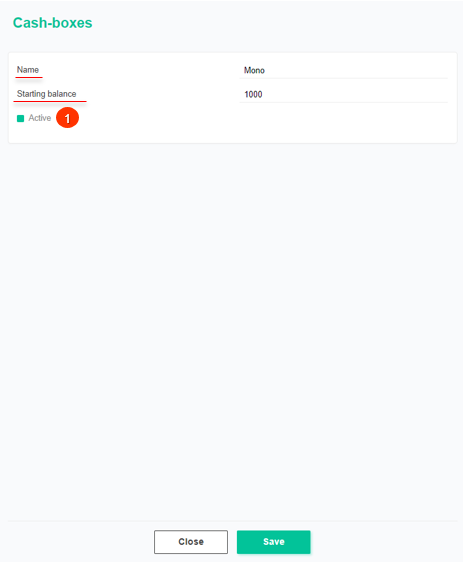
Figure 2 - "Cash boxes" window
In order to edit the cash box data, click on the button ![]() , which is located on the right side of the record in the table area. After that the "Cash boxes" window will open (Figure 2), data changes in which are performed in the same way as when creating (see above).
, which is located on the right side of the record in the table area. After that the "Cash boxes" window will open (Figure 2), data changes in which are performed in the same way as when creating (see above).
In order to delete a cash box, click on the button ![]() located on the right side of the record in the table area. As a result of this action the cash box will be deleted from the table area.
located on the right side of the record in the table area. As a result of this action the cash box will be deleted from the table area.
Note: If financial transactions have been performed on a cash box, it is impossible to delete such a register due to data integrity preservation.
Sections "Categories"
The "Categories" section contains a search line and a table displaying the whole list of categories. This section is intended for creating, editing and deleting categories of financial transactions.
This section is searched by category name (Figure 3, Pointer 2). Enter the name in the search bar and press the button ![]() located in the search bar or press the "Enter" key on the keyboard. As a result, the found records will be displayed in the table on the page.
located in the search bar or press the "Enter" key on the keyboard. As a result, the found records will be displayed in the table on the page.
To clear the search window and reset the filter, click on the button ![]() .
.
To create a category, click on the "Create" button (Figure 3, Pointer 1). As a result, in the "Categories" window that opens (Figure 4), enter a name for the category.
Note: By default, the financial category will be marked as active (Figure 4, Pointer 1). If you uncheck the box, this category will not appear in the list of financial categories when creating a transaction.
To save the data, click on the "Save" button, if canceled, click on the "Close" button.
As a result of the actions performed, a new financial category will be created and displayed in the table (Figure 3, Pointer 3).
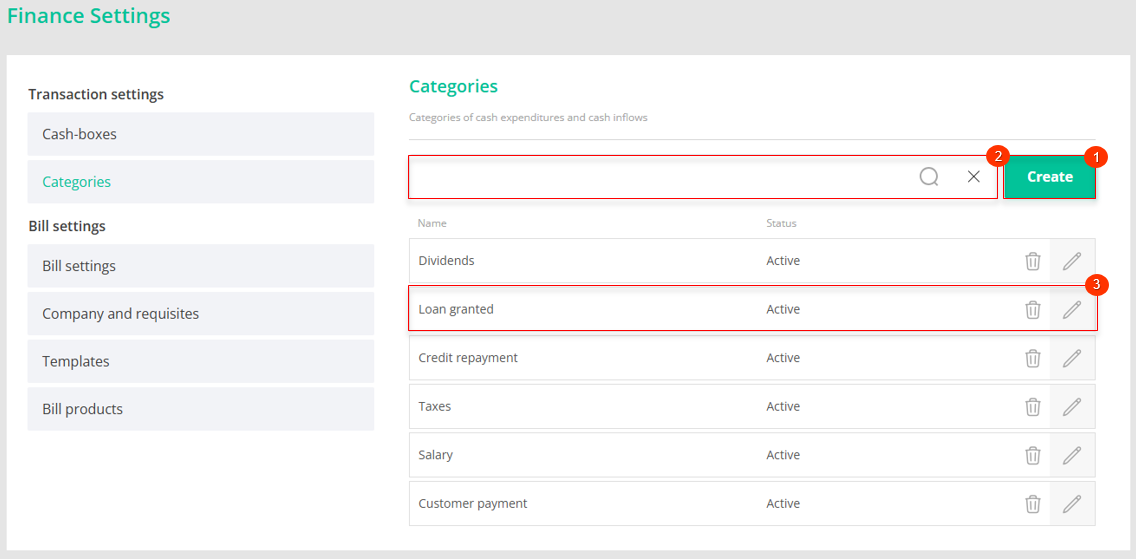
Figure 3 -Categories section
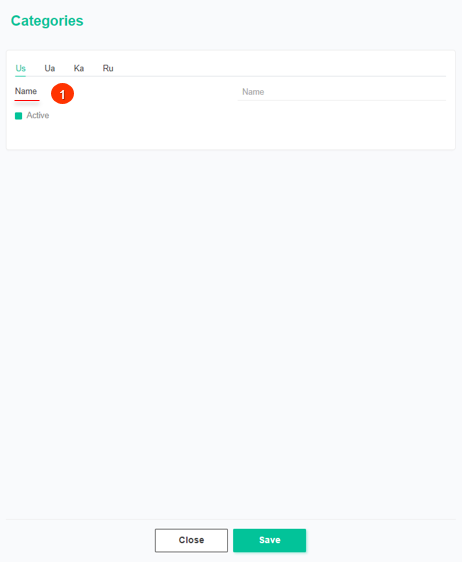
Figure 4 -Categories window
In order to edit a category, click on the button ![]() , which is located on the right side of the record in the table. This will open the "Categories" window (Figure 4), where data changes are performed in the same way as when creating (see above).
, which is located on the right side of the record in the table. This will open the "Categories" window (Figure 4), where data changes are performed in the same way as when creating (see above).
In order to delete a category, click on the button ![]() , which is located on the right side of the record in the table. As a result of this action, the financial category will be deleted from the table.
, which is located on the right side of the record in the table. As a result of this action, the financial category will be deleted from the table.
Sections "Bill settings"
In the "Settings" section there is a functionality that allows you to grant the client payment rights and set the number of days to pay the invoice.
To authorize the payment of an invoice, the "On" checkbox should be selected, in this case the user with the client role will have the opportunity to pay the invoice himself, the "Off" checkbox leaves the right to pay the invoice only to the user with the owner role (Figure 5, Pointer 1)
To set the number of days to pay the invoice, enter the required number of days using the keyboard in the "Amount of days" field.
Note: The invoice issued to the client for payment will be considered overdue after the specified period expires.
This section also provides an option to set up a company. To do this, in the "Default company" field, from the drop-down list that opens when you press the button ![]() , select the company in which the details for payment are set up. Clicking on
, select the company in which the details for payment are set up. Clicking on ![]() (Figure 5, Pointer 2) will open the "Company and requisites" section with a full list of companies where you can make the necessary changes or add a new company.
(Figure 5, Pointer 2) will open the "Company and requisites" section with a full list of companies where you can make the necessary changes or add a new company.
Note: After selecting a company, the "Company requisite" field will be automatically filled in when creating an invoice.
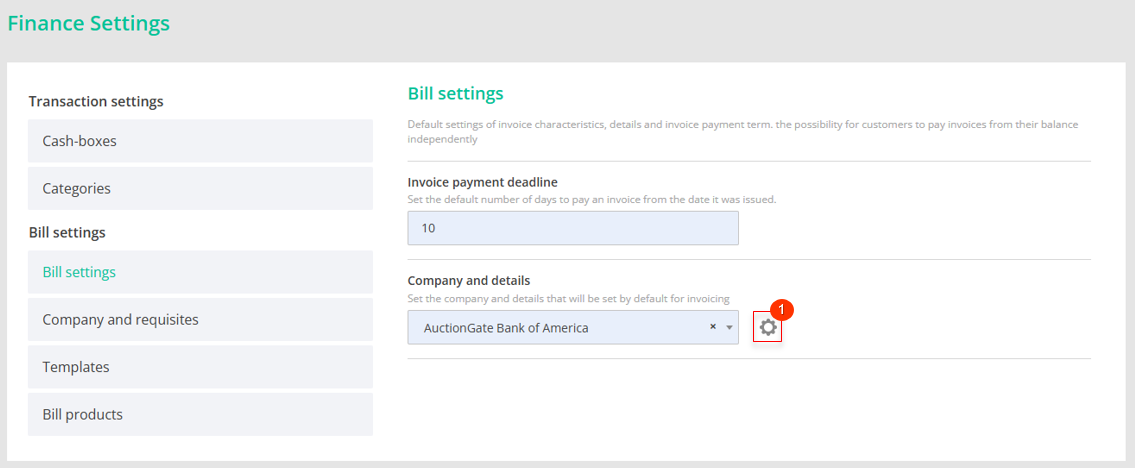 Figure 5 - Settings section
Section "Company and requisites"
The "Company and requisites" section provides an opportunity to manage information about company details. In this section a search bar and a table displaying the list of details are available. This section is intended for creating, editing and deleting details.
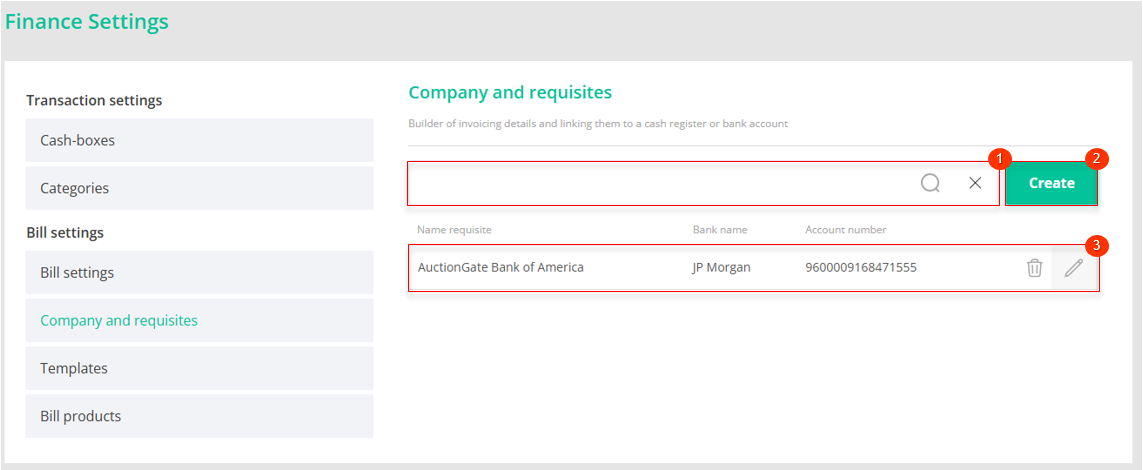
Figure 6 - Section "Company and requisites"
This section is searched by Name requisite, Bank name and Account number (Figure 6, Pointer 2). Enter a value in the search bar and press the ![]() button which is located in the search bar or press the "Enter" key on the keyboard. As a result, the found records will be displayed in the table on the page.
button which is located in the search bar or press the "Enter" key on the keyboard. As a result, the found records will be displayed in the table on the page.
To clear the search box and reset the filter, click on the ![]() button.
button.
In order to create requisites, click on the "Create" button (Figure 6, Pointer 1). This will open the "Requisite" window (Figure 7), which presents 5 blocks of information:
- The "General information" block. This block displays information with general information about the requisite (Figure 7, Pointer 1):
-
“Requisite name” - enter the name of the requisite;
Note: this field is mandatory.
- Block "Company information". This block displays general information about the company necessary for interaction within the services provided. Fill in the following fields:
-
“Name” - enter the name of the company that will provide the service;
-
“Phone” - provide a company phone number;
-
“Email” - provide the company's e-mail address;
-
“Site” - company website;
-
“Address 1” - enter the main address of the company;
-
“Address 2” - provide an additional address (if necessary);
-
“Country” - select a country from the drop-down list that opens when you click on the
button;
Note: To reset the country, press the button.
-
“City” - enter the city where the company is located;
-
“State” - specify the state;
-
"Zip code" - enter the zip code of the company;
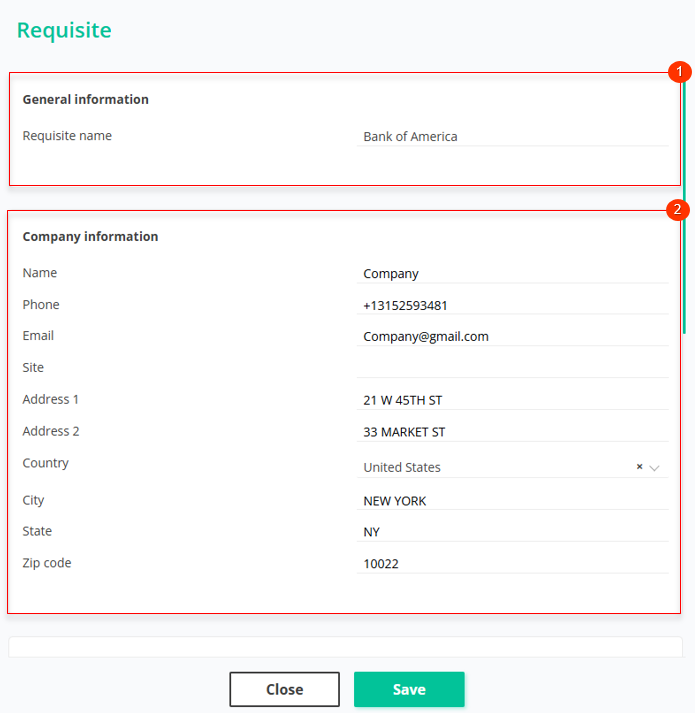
Figure 7 - "Requisite" window
- The "Bank Requisite" block (Figure 8, Pointer 1) contains detailed information about the bank details, including:
-
“Bank name” - enter bank name;
-
“IBAN” - enter the international bank account number;
-
“Account number” - enter the account number;
-
“Routing number” - enter the routing number;
Note: Used in North America. This number identifies the specific bank where a person or company has an account and is part of the bank code of the national payment system.
-
“SWIFT” - add SWIFT code of the bank.
-
“Cash-box” - from the drop-down list that opens when you click on the
button, select a cash register;
Note: To reset the cash register, press .
- Block “Address bank”. This block contains basic information about the bank (Figure 8, Pointer 1). Fill in the following fields:
-
“Address 1” - enter the bank's primary address;
-
“Address 2” - provide an additional address (if necessary);
-
“Country” - specify the country where the bank is located;
-
“City” - enter the city where the bank is located;
-
“State” - specify the state;
-
“Zip code” - enter the bank's zip code;
- Block "Template" is intended for template installation. To select the required template, open the drop-down list that appears after clicking the button and select the appropriate option from the list. (Figure 8, Pointer 3).
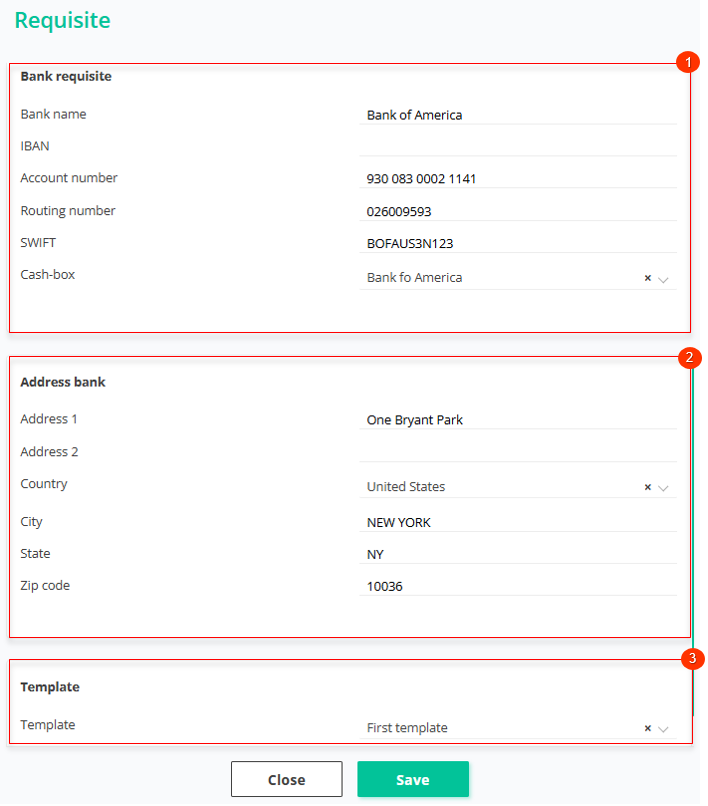
Figure 8 - Continuation of "Requisite" window
To save the data, click on the "Save" button, if canceled, click on the "Cancel" button.
As a result of the actions performed, new details will be created and displayed in the table (Figure 6, Pointer 3).
To edit details, click on the ![]() button located on the right side of the record in the table. This will open the "Details" window (Figure 7), where each block will be available for changes. Clicking the
button located on the right side of the record in the table. This will open the "Details" window (Figure 7), where each block will be available for changes. Clicking the ![]() button in each block unlocks the fields, allowing you to make the necessary changes just as you did when creating (see above).
button in each block unlocks the fields, allowing you to make the necessary changes just as you did when creating (see above).
In order to delete details, click the ![]() button located on the right side of the record in the table. As a result of this action the record will be deleted from the table.
button located on the right side of the record in the table. As a result of this action the record will be deleted from the table.
Section "Templates"
The “Templates” section provides an opportunity to set a template that defines the appearance of the invoice. Here you can customize how the created invoice will look like by selecting the appropriate template from the offered options. A search bar and a table displaying the list of templates are available in this section.
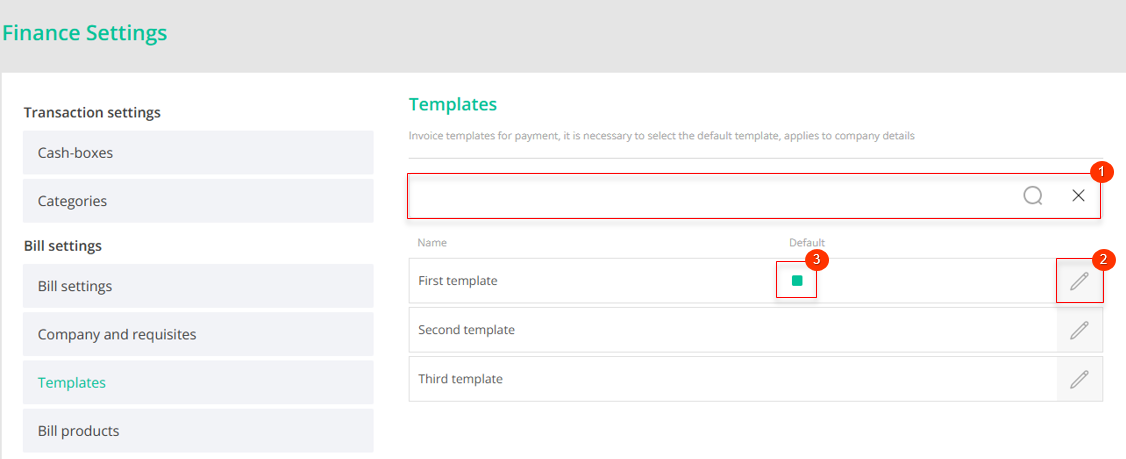
Figure 9 - Section "Templates"
In this section the search is performed by template name (Figure 9, Pointer 2). Enter the value in the search line and press the button located in the search bar or press the "Enter" key on the keyboard. As a result, the found records will be displayed in the table on the page.
To view or edit a template, click on the ![]() button. As a result, the Templates window will open, in which a field for changing the name of the template will become available by clicking the
button. As a result, the Templates window will open, in which a field for changing the name of the template will become available by clicking the ![]() button (Figure 10, Pointer 1).
button (Figure 10, Pointer 1).
Checking Default (Pointer 2) will mean that this template will be automatically applied when creating new details. Thus, this template will be used by default when generating details, unless another template is selected.
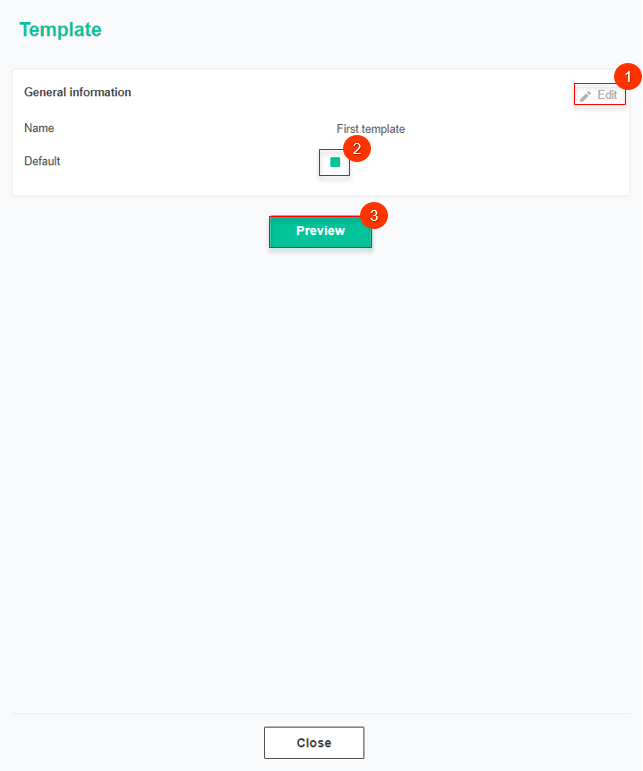
Figure 10 -The "Templates" window
To view the template view, click the ![]() button. This will open the Templates window, where you can familiarize yourself with the design of the selected template and view its appearance (Figure 11).
button. This will open the Templates window, where you can familiarize yourself with the design of the selected template and view its appearance (Figure 11).
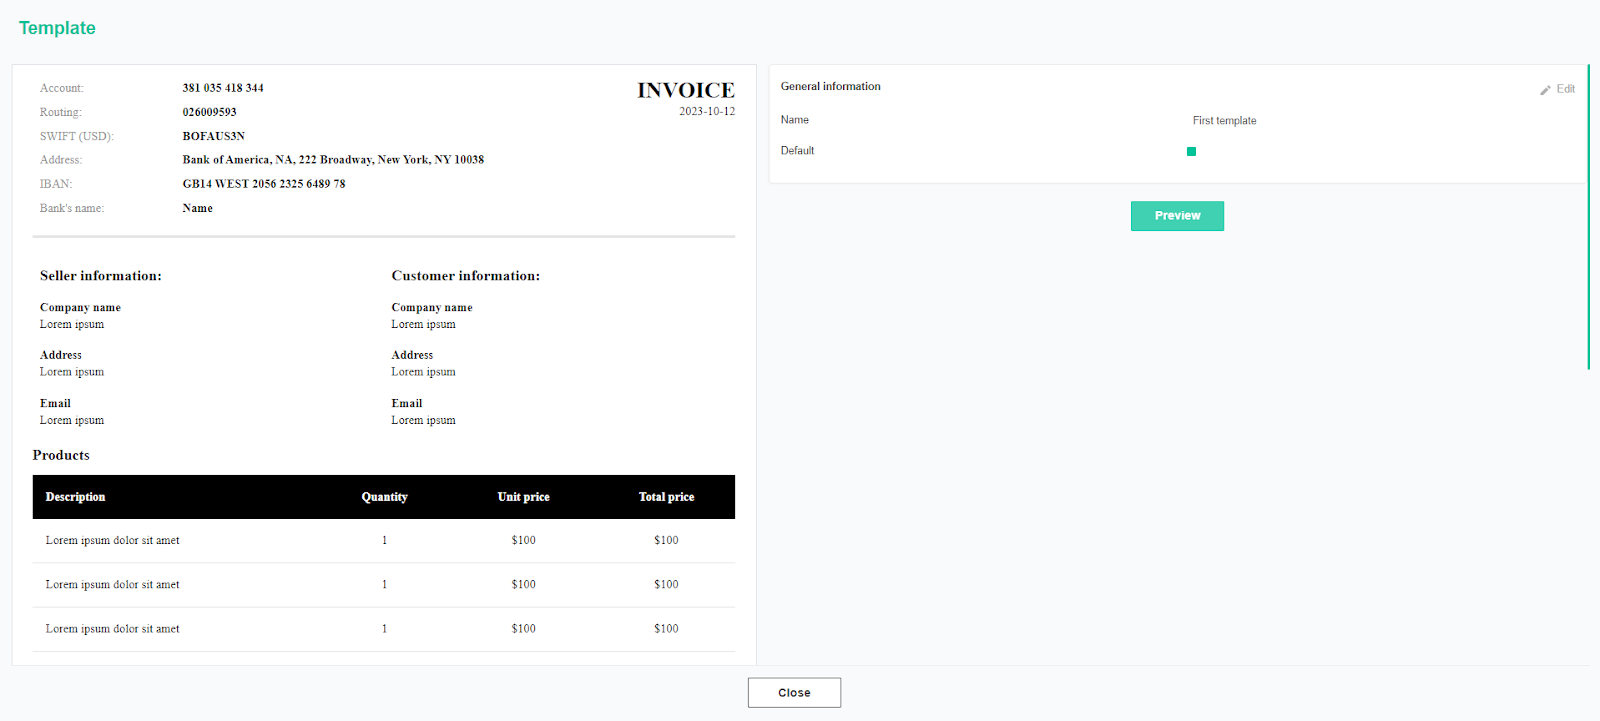
Figure 11 - Invoice template
Section "Bill products"
This section is intended for creating and editing invoice products and their categories. By default, the "Default" category (Figure 12, Pointer 1) is already created, where products that were also created by default (Pointer 2) are displayed.
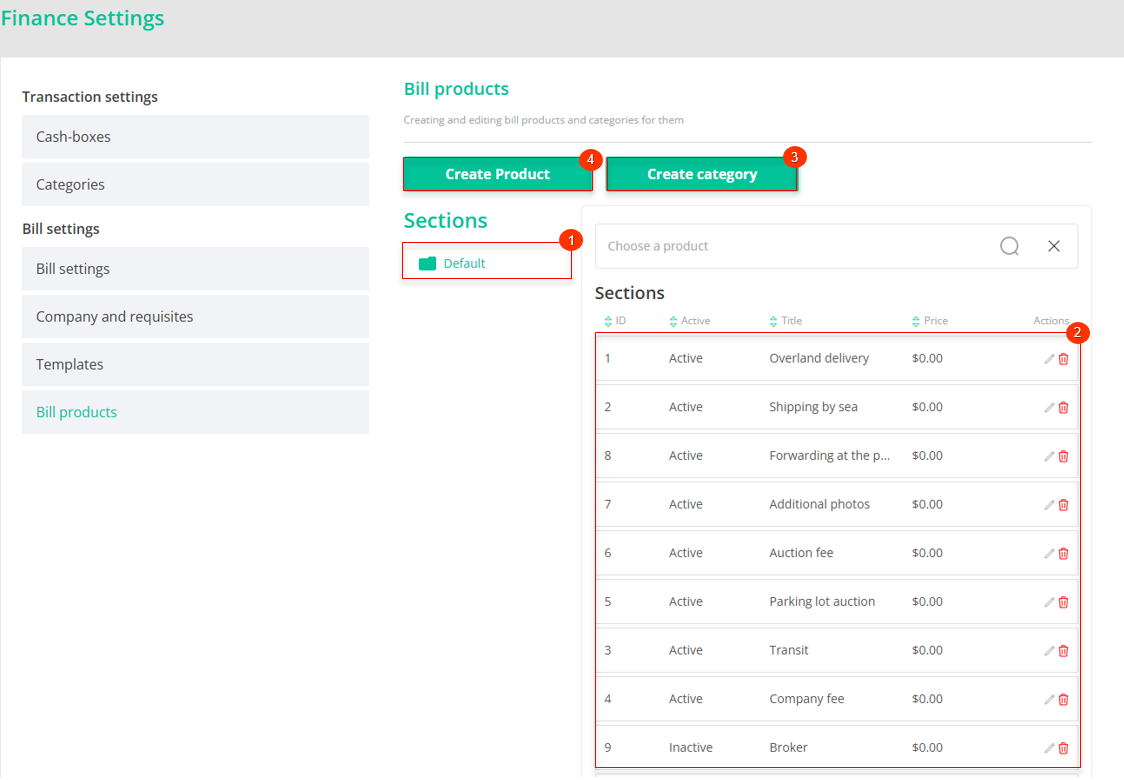
Figure 12 - "Invoice Products" Page
To create an additional category for placing a product, click the "Create category" button (Pointer 3), which will open the "Create category" window. Enter the name and check the "Active" box (Figure 13, Pointer 1).
Note: If the box is not checked, the category will not appear in the list of available categories when adding a new product.
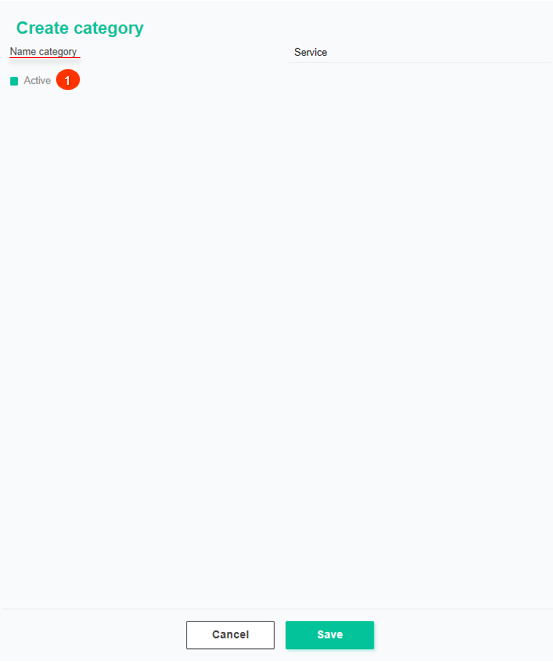
Figure 13 - "Create Category" Window
To save the data, click the "Save" button. To cancel, click the "Cancel" button. As a result of these actions, the category will be created.
To edit a category, click ![]() the button, which will open the "Create category" window. Data changes in this window are made in the same way as when creating a category (see above).
the button, which will open the "Create category" window. Data changes in this window are made in the same way as when creating a category (see above).
To delete a category, click ![]() the button. As a result, the category will be removed from the list.
the button. As a result, the category will be removed from the list.
Note: The "Default" category cannot be edited or deleted.
To create a product, click the "Create Product" button (Figure 12, Pointer 4), which will open the "Create Product" window. Fill in the fields as follows:
-
Name product – enter the product name.
-
Select category – choose a category from the dropdown list that appears when you click the button
;
-
Price – enter the price using the keyboard or by clicking the buttons
;
Check the box ![]() next to the "Active" field (Figure 14, Pointer 1).
next to the "Active" field (Figure 14, Pointer 1).
Note: If the "Active" box is not checked, the product will not be available for adding to the invoice.
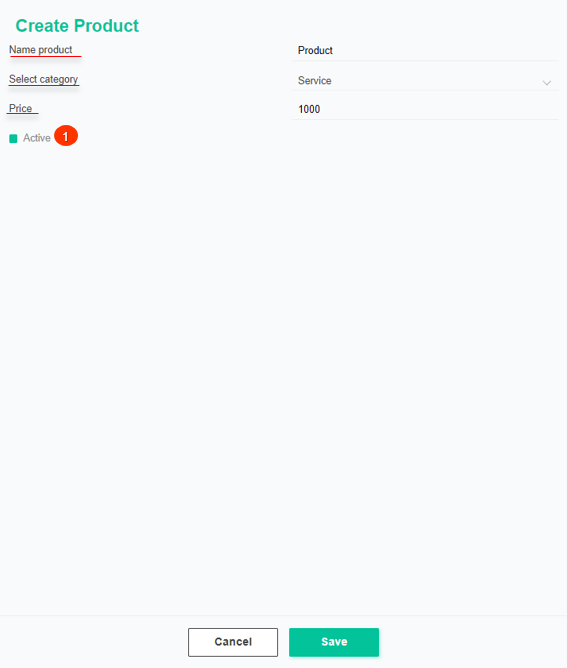
Figure 14 - "Create Product" Window
To save the data, click the "Save" button to cancel, click the "Cancel" button. As a result of these actions, the product will be created and displayed in the table (Figure 12, Pointer 2).
To edit a product, click the button on the right side of the entry in the table. The "Create Product" window will open, where the data can be edited in the same way as when creating a category (see above).
Note: The "Default" product cannot be edited, except for the amount.
To delete a product, click the button on the right side of the entry in the table. The product will be removed from the table.
The search bar allows you to search for products by name. To do this, enter the name and click the button ![]() or press the "Enter" key. The results matching the query will be displayed in the table. To clear the search window, click the button
or press the "Enter" key. The results matching the query will be displayed in the table. To clear the search window, click the button ![]() .
.


