AuctionGate | Logistic CRM system - Site page "My Transactions"
The My Transactions page of the website is designed to record and manage your financial transactions. This page allows you to enter information about your financial transactions, such as income, expenses and transfers between accounts.
The functionality that is available on the page (Figure 1):
-
Search by specified filters;
-
Transaction Creation;
-
Edit Transaction;
-
Creating Exports;
-
Box Office Management.

Figure 1 - My Transactions page
Search by specified filters
Clicking on the "Filter" button (Figure 1, Pointer 1) will open the filter window, which is used to set the search parameters (Figure 2):
-
"Counterparties" - select a client or counterparty from the drop-down list that opens by clicking the
 button ;
 -
"Categories" - from the drop-down list that opens when you click on the
 button , select a financial category;
 -
"Cash-boxes" - select a cash desk from the drop-down list that opens by pressing the
 button;
 -
"Type operation" - select the type of operation from the drop-down list that opens when you click on the button ;
-
"Date" - when you click on an empty field, select a specific date or time period to search for.
Note: It is possible to set one or more parameters to perform a search.
After entering the parameters, click on the "Search" button to generate the list of clients, in case of canceling - click on the "Reset" button.
As a result, the search window will display all the queries entered in the filter, and the search result in the table.
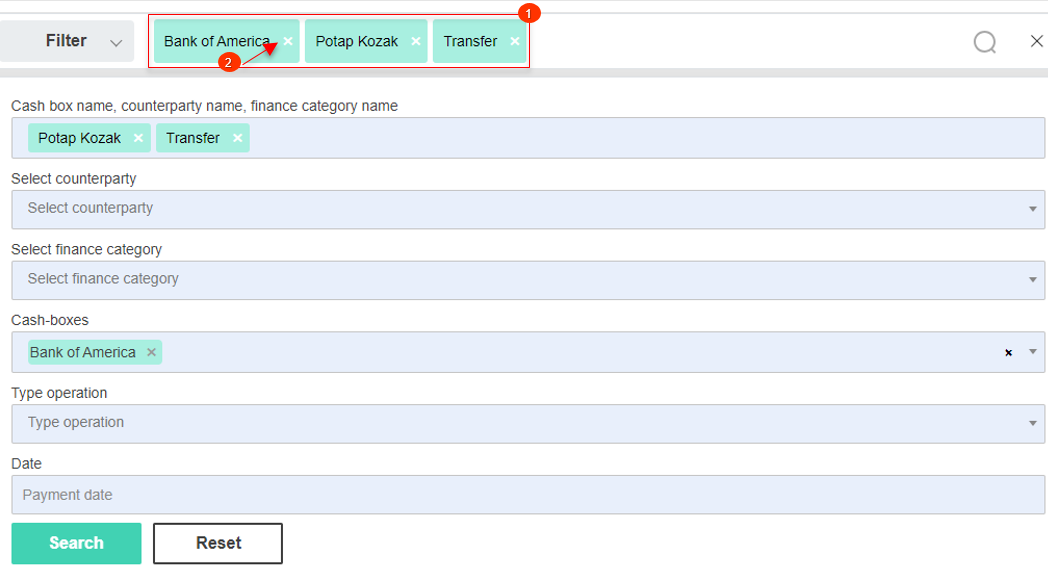
Figure 2 - "Filter" window
The search bar allows you to search by any parameter (Figure 2, Pointer 1). To do this, enter any query and click on the ![]() button located in the search bar or on the "Enter" button located on the keyboard. As a result, the found records corresponding to the entered parameters will be displayed in the table.
button located in the search bar or on the "Enter" button located on the keyboard. As a result, the found records corresponding to the entered parameters will be displayed in the table.
To clear the entire search window and reset the filter, click on the ![]() button. If you want to remove one of the parameters, click on the cross that is located in the query window itself (Figure 2, Pointer 2).
button. If you want to remove one of the parameters, click on the cross that is located in the query window itself (Figure 2, Pointer 2).
To filter by transaction, select the required record in the table and check the box ![]() next to it (Figure 3, Pointer 1). After doing this, a window will appear at the top of the table with the total value by transaction type (Figure 3, Pointer 2). To reset the filter, click the check mark
next to it (Figure 3, Pointer 1). After doing this, a window will appear at the top of the table with the total value by transaction type (Figure 3, Pointer 2). To reset the filter, click the check mark ![]() (Figure 3, Pointer 3).
(Figure 3, Pointer 3).

Figure 3 - Filter by transaction
Transaction Creation
To create a revenue transaction, click on the "Coming" button (Figure 1, Pointer 2). This will open the "New Coming" window (Figure 4), in which fill in the fields:
-
"Cash-boxes" - select a cash desk from the drop-down list that opens by pressing the
 button ;
Note: If it is necessary to add a cash register, click on ![]() , which will open the "Cash registers" window, where in the corresponding fields fill in the name of the register and the initial balance. By default, the cash register will be marked as active (Figure 5, Pointer 1). If you uncheck it, this cash desk will not be displayed in the list of cash desks.
, which will open the "Cash registers" window, where in the corresponding fields fill in the name of the register and the initial balance. By default, the cash register will be marked as active (Figure 5, Pointer 1). If you uncheck it, this cash desk will not be displayed in the list of cash desks.
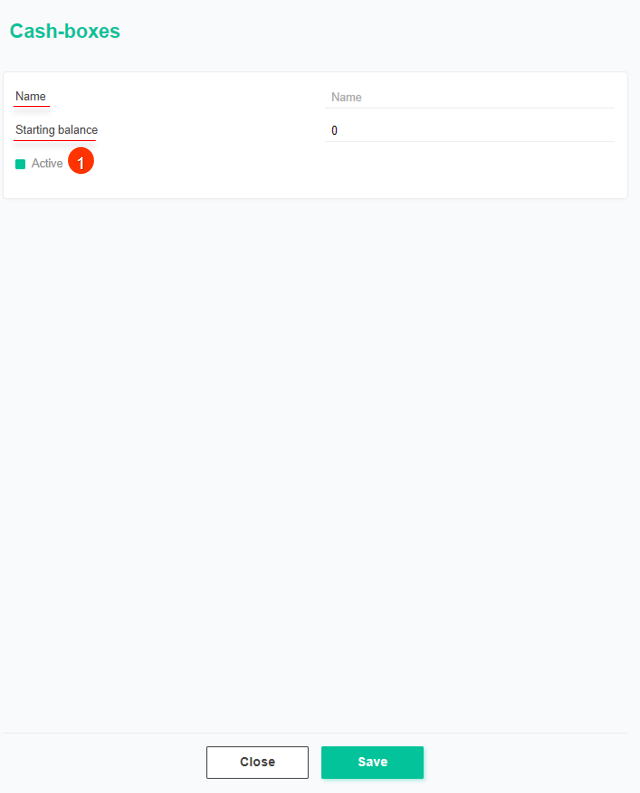
Figure 5 - "Cashier"window
-
"Amount" - use the keypad input to enter the amount;
-
"Categories" - from the drop-down list that opens when you click on the
 button , select a financial income category;
Note: If you want to add a financial category, click on ![]() , which will open the Categories window, where you fill in the category name. By default, the category will be marked as active (Figure 6). If you uncheck the box, the category will not appear in the list.
, which will open the Categories window, where you fill in the category name. By default, the category will be marked as active (Figure 6). If you uncheck the box, the category will not appear in the list.
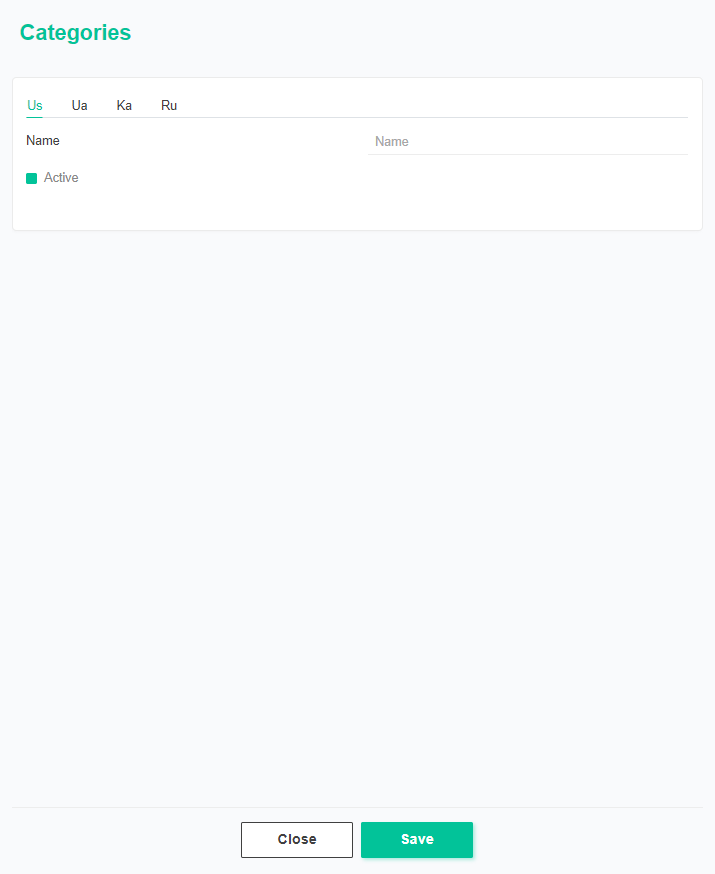
Figure 6 - "Categories" window
-
"Counterparties" - select a counterparty from the drop-down list that opens by pressing the button
;
-
"Date" - set the date and time on which the transaction was made;
Note: By default, the date is set to when the transaction window is opened.
-
"Note" - If necessary, add a comment to the transaction.
To upload documents, click on the button ![]() (Figure 4, Pointer 1), which will open a window where you select the desired files.
(Figure 4, Pointer 1), which will open a window where you select the desired files.
Note:Allowed file formats for download: jpg, png, webp , pdf, heic, heif, bmp.
To save the data click on the button "Save", to cancel the button - "Cancel".
As a result of the actions performed, a new transaction will be created and displayed in the table.
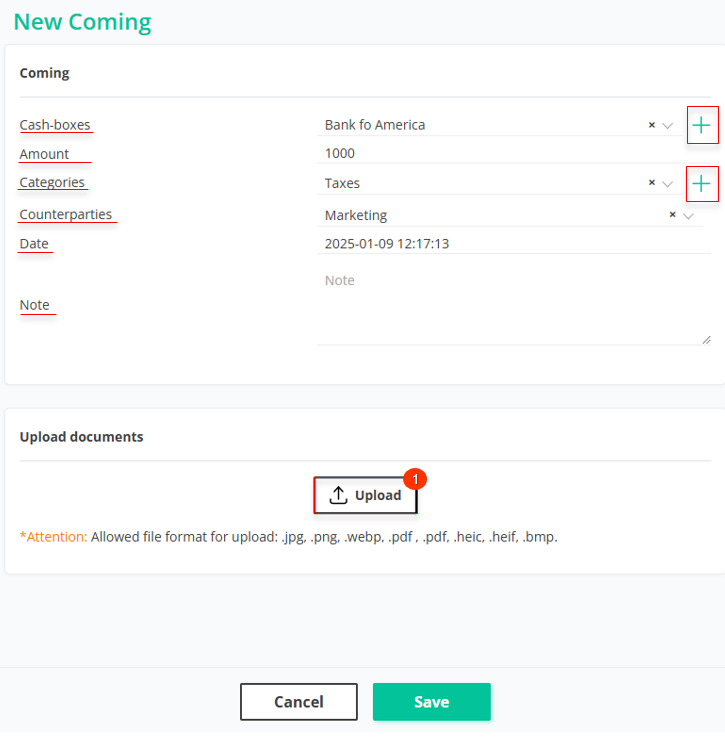
Figure 4 - "New Coming" window
To create an expense transaction, click on the "Consumption" button (Figure 1, Pointer 3). As a result, the "New Consumption" window will open in which fill in the fields similarly to the income transaction (see above).
To create a transfer between cash desks, click on the "Transfer" button (Figure 1, Pointer 4). This will open the "My Transactions" window (Figure 7), in which fill in the fields:
-
"From cash-box" - from the drop-down list that opens when you press the
 button , select the cash desk from which the funds will be transferred;
 -
"To cash-box" - from the drop-down list that opens when you click on the
 button , select the cash desk to which the funds will be transferred;
Note: If you need to add a cash register, click on ![]() , and the "Cash registers" window will open, where in the corresponding fields fill in the name of the register and the initial balance. By default, the cash register will be marked as active (Figure 5, Pointer 1). If you uncheck it, this cash desk will not be displayed in the list of cash desks.
, and the "Cash registers" window will open, where in the corresponding fields fill in the name of the register and the initial balance. By default, the cash register will be marked as active (Figure 5, Pointer 1). If you uncheck it, this cash desk will not be displayed in the list of cash desks.
-
"Amount" - use the keypad input to enter the amount;
-
"Date" - set the date and time on which the transaction was made;
Note: By default, the date is set to when the transaction window is opened.
-
"Note" - If necessary, add a comment to the transaction.
To upload documents, click on the button ![]() (Figure 7, Pointer 1), which will open a window where you select the desired files.
(Figure 7, Pointer 1), which will open a window where you select the desired files.
Note:Allowed file formats for download: jpg, png, webp , pdf, heic, heif, bmp.
To save the data click on the button "Save", to cancel the button - "Cancel".
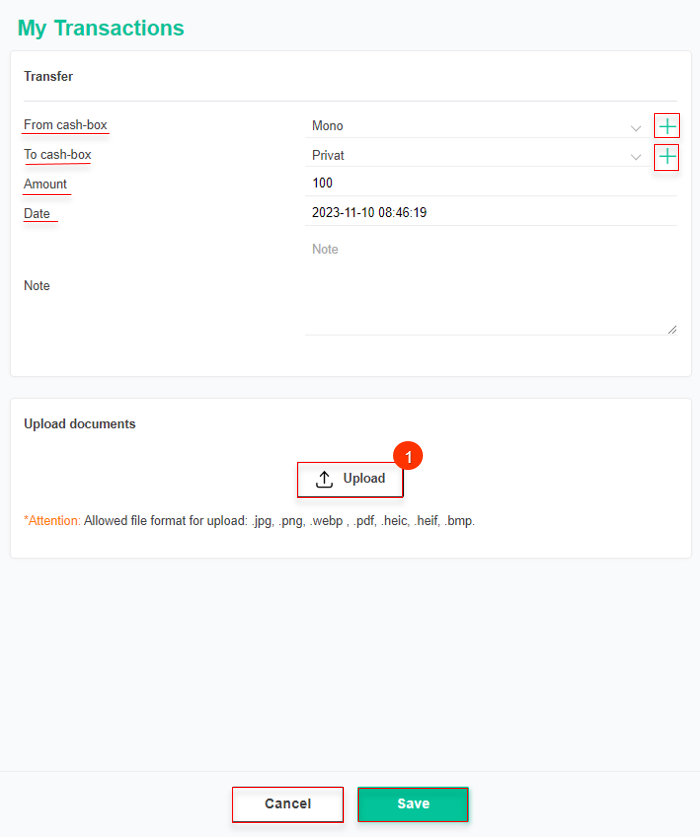
Figure 7 - My Transactions window
As a result of the actions performed, a new transaction will be created and displayed in the table.
Editing a transaction
To make changes to a transaction, select the required record in the table and click the button ![]() (Figure 1, Pointer 5).
(Figure 1, Pointer 5).
This will open the "My Transactions" window To make the fields available for editing, click "Edit" (Figure 8, Pointer 1), where data changes are made in the same way as when creating a transaction (see above).
The History block details all information about past changes and actions related to a given transaction. This includes records of every step and change that may have affected the transaction, as well as additional comments and events to provide complete clarity and transparency in tracking the entire process.
To create a duplicate of this transaction, click on the "Duplicate" button. As a result of this action the "New Coming" or "My Transactions" window will open, depending on the duplicate transaction, where all data from the original transaction will be saved, except for the amount. If it is necessary to delete the transaction, click on the button - "Delete", to close the window - "Close".
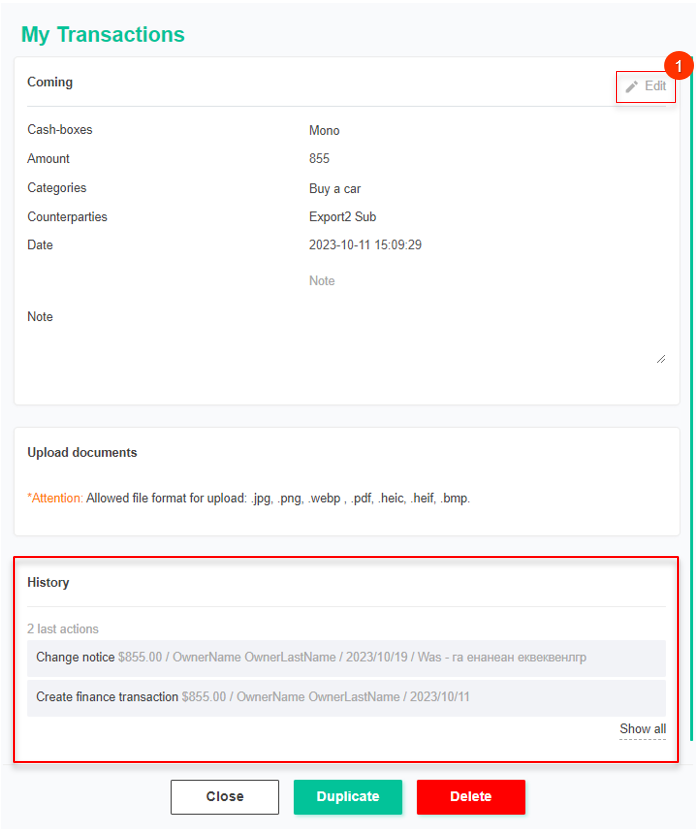
Figure 8 - Edit window "My Transactions"
Creating exports
One of the key features of the "My Transactions" page is the function to export financial transaction data to various formats such as Excel spreadsheets or CSV files, which makes it possible to save and analyze the data off-site.
To export transactions, click the ![]() button (Figure 1, Pointer 6), selecting it will open the "Export" window, which consists of two tabular blocks "Current export" and "Completed export". To export a file, select the desired file format and click the "Start" button (Figure 9, Pointer 1/Pointer 2). When the export is complete, the file will become available in the "Export Completed" section. Then, click on the "Download" button (Figure 9, Pointer 3), select a location to save the file and click "Save".
button (Figure 1, Pointer 6), selecting it will open the "Export" window, which consists of two tabular blocks "Current export" and "Completed export". To export a file, select the desired file format and click the "Start" button (Figure 9, Pointer 1/Pointer 2). When the export is complete, the file will become available in the "Export Completed" section. Then, click on the "Download" button (Figure 9, Pointer 3), select a location to save the file and click "Save".
In case of canceling the transaction export, click the "Cancel" button (Figure 10, Pointer 4). As a result of this action, the file will be removed from the "Current Export" table. To close the window, click the "Close" button. If necessary, for the exported file, you can apply a filter using the filter function (Figure 2) or by checking the boxes in the transaction table (Figure 3).
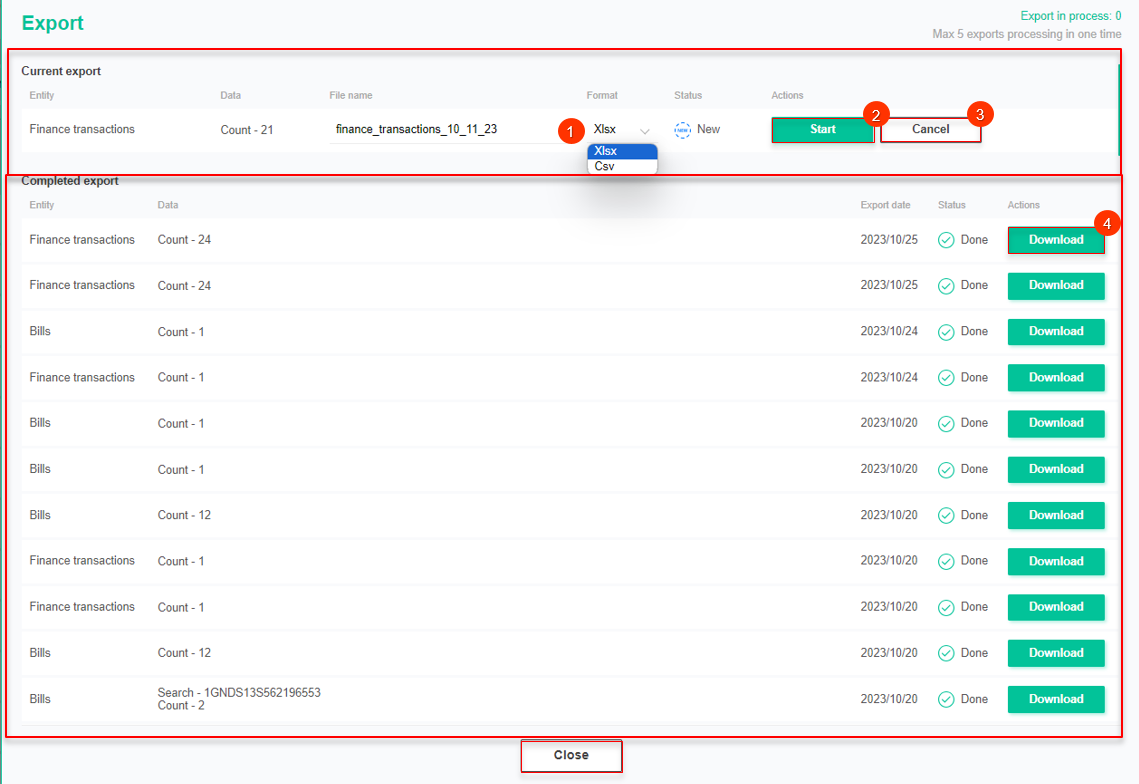
Figure 9- Export window
To view the export history, click the ![]() button (Figure 1, Pointer 6), where selecting Show export will open the Export window, which is identical to the window used to perform company exports.
button (Figure 1, Pointer 6), where selecting Show export will open the Export window, which is identical to the window used to perform company exports.
Cash register management
The "Cash register management" block displays the available cash registers with the current balance. This block also provides information about the total balance, which is the sum of all balances for each cash desk. When you select a particular cash register, transactions are filtered, which allows you to see only the transactions related to that register.
If you want to create a cash register, click on ![]() (Figure 1, Pointer 7), which will open the Cash Register window (Figure 5) where you fill in the fields:
(Figure 1, Pointer 7), which will open the Cash Register window (Figure 5) where you fill in the fields:
-
"Name" - enter the name of the cash register;
-
"Starting balance" - enter the amount of the initial balance on the account.
Note: By default, the cash register will be marked as active (Figure 5, Pointer 1). If you uncheck the box, this cash register will not be displayed in the list of cash registers.
To edit a cash register, click on ![]() (Figure 1, Pointer 8), as a result of this action, the Finance Settings page will open (Figure 10) with the full list of cash registers, where you can make the necessary changes (see the description of the Finance Settings page).
(Figure 1, Pointer 8), as a result of this action, the Finance Settings page will open (Figure 10) with the full list of cash registers, where you can make the necessary changes (see the description of the Finance Settings page).
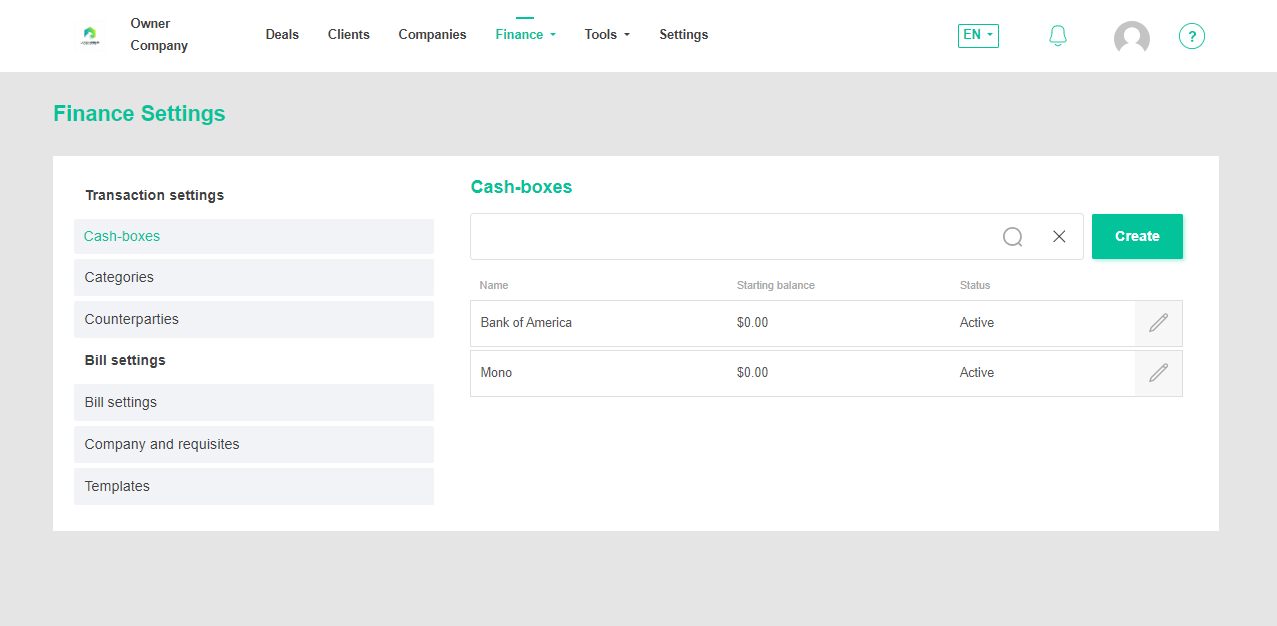
Figure 10 - Finance Infusions website page


